It's looking lovely brother.
great stuff!
Restoring a Lake Placid Blue '63 Bass VI
-
terminalvertigo

- PAT. # 2.972.923

- Posts: 3785
- Joined: Thu Dec 11, 2008 7:08 pm
- Location: Ottawa, Canada
Re: Restoring a Lake Placid Blue '63 Bass VI
GoodDeals:Jaguar018-Skip-Scotty66-Noirengineer-Panoramic-Soundhack-Tribi9-Stereordinary-Dug-Ginnungagap-Loomer-Eupat-FenderBob-Franco-AWSchmit-PeterHerman-TweedleDee-Diceman-Prospect-Danocaster-Glimmertwin-Jetset-Staytuned-ukfuzz-Aen-Atomicmassunit-MT,etc
-
Highnumbers
- PAT. # 2.972.923
- Posts: 633
- Joined: Sat Apr 25, 2009 1:21 am
- Location: Orange County, CA
Re: Restoring a Lake Placid Blue '63 Bass VI
Project update time! Things are getting close.
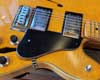
So the next step was surprisingly nerve-wracking and time-consuming --- cutting the forearm contour and shaping the repair slab to the existing belly contour.
Thanks to several members here (and folks on IG) who provided measurements of their original Bass VI models. While dimensions like the guitar's width and length are pretty easy and precise, measuring for the contours is another story. These contours are all gentle curves, which makes it very difficult to get consistent measuring results from people, plus the factory cut each of these contours slightly different since they were shaped by eye/hand with a huge spindle sander.
The belly contour wasn't nearly as difficult because I still had most of the original contour to use as a guide (for the angle etc.). I started by marking the pencil marks for length and then cutting the excess off with a Japanese flush-cut hand saw and coping saw, making sure to save some material for final shaping. Then I used a flat plane rasp, followed by 100-grit sandpaper on the back of a rounded sanding block to get in the curves. I simply followed the original contour and it shaped quite easily.


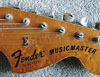
The belly contours on several Fender models were quite extreme during this era, the main comparison for this step is my early '65 LPB Jazzmaster, a '64 Jaguar and '64 Jazzmaster. While the neck date on this Bass VI is May 1963, Fender made a large batch of necks at that point and used them up over the next couple years as orders came in. That means you will often (or typically) find a '64 or even '65 serial number, pot codes and other features coupled with a '63 neck from the factory, only on Bass VI models. This particular example has pot codes dating to the middle of 1964, so it's actually a mid-late '64 production era.
The next step of the forearm contour was surprisingly difficult to get right. I couldn't tell from the provided measurements exactly where the angle should be for this. How parallel or perpendicular is this cutaway to the body? How steep is the "angle? The forearm contour is not a straight angle, it's a continuous curve, so it requires some very loose measuring and a bit of hand-artistry.

I gauged the "angle" of the contour by measuring a few of my guitars with a digital angle gauge (a very handy tool you can get for cheap at Harbor Freight or Amazon). The average angle was about 15-degrees from flat, on the half-dozen guitars I measured from the '62-65 period.


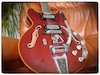
In the end, I used a combination of measurements and also this great reference photo of a '63 CAR Bass VI sold from Guitar Traders Tokyo, which showed by reflection the transition point of the forearm contour. In other words, it shows where the flat plane of the body starts tapering off.

I'm sure this is going too far for most people, but I marked what I thought was the right angle for the forearm contour by measurement and then used a rudimentary photo app to overlay my photo on top of the CAR Bass VI photo and compare the angle line between the two.
My first attempt at this showed that the angle was slightly off, just a hair:

So I corrected the angle, marking it with tape for visibility (for both the photo and as a guide for cutting).

Bingo! Nailed it.

Figured another GIF video would be useful, just for fun:

The actual shaping was pretty straightforward. Rather than use any power tools, I simply used a flat hand rasp followed by several files and various sandpaper grits. It's incredibly easy to cut too much and go too far. Plus I had to keep shaping the curve in the contour, since it's not a straight angle. So I'd do a few passes, then check everything and keep going.

Eventually got down to 180-grit paper and the right shape/dimensions. All fine-sanding from this point forward.

So the next step was surprisingly nerve-wracking and time-consuming --- cutting the forearm contour and shaping the repair slab to the existing belly contour.
Thanks to several members here (and folks on IG) who provided measurements of their original Bass VI models. While dimensions like the guitar's width and length are pretty easy and precise, measuring for the contours is another story. These contours are all gentle curves, which makes it very difficult to get consistent measuring results from people, plus the factory cut each of these contours slightly different since they were shaped by eye/hand with a huge spindle sander.
The belly contour wasn't nearly as difficult because I still had most of the original contour to use as a guide (for the angle etc.). I started by marking the pencil marks for length and then cutting the excess off with a Japanese flush-cut hand saw and coping saw, making sure to save some material for final shaping. Then I used a flat plane rasp, followed by 100-grit sandpaper on the back of a rounded sanding block to get in the curves. I simply followed the original contour and it shaped quite easily.
The belly contours on several Fender models were quite extreme during this era, the main comparison for this step is my early '65 LPB Jazzmaster, a '64 Jaguar and '64 Jazzmaster. While the neck date on this Bass VI is May 1963, Fender made a large batch of necks at that point and used them up over the next couple years as orders came in. That means you will often (or typically) find a '64 or even '65 serial number, pot codes and other features coupled with a '63 neck from the factory, only on Bass VI models. This particular example has pot codes dating to the middle of 1964, so it's actually a mid-late '64 production era.
The next step of the forearm contour was surprisingly difficult to get right. I couldn't tell from the provided measurements exactly where the angle should be for this. How parallel or perpendicular is this cutaway to the body? How steep is the "angle? The forearm contour is not a straight angle, it's a continuous curve, so it requires some very loose measuring and a bit of hand-artistry.
I gauged the "angle" of the contour by measuring a few of my guitars with a digital angle gauge (a very handy tool you can get for cheap at Harbor Freight or Amazon). The average angle was about 15-degrees from flat, on the half-dozen guitars I measured from the '62-65 period.
In the end, I used a combination of measurements and also this great reference photo of a '63 CAR Bass VI sold from Guitar Traders Tokyo, which showed by reflection the transition point of the forearm contour. In other words, it shows where the flat plane of the body starts tapering off.
I'm sure this is going too far for most people, but I marked what I thought was the right angle for the forearm contour by measurement and then used a rudimentary photo app to overlay my photo on top of the CAR Bass VI photo and compare the angle line between the two.
My first attempt at this showed that the angle was slightly off, just a hair:
So I corrected the angle, marking it with tape for visibility (for both the photo and as a guide for cutting).
Bingo! Nailed it.
Figured another GIF video would be useful, just for fun:
The actual shaping was pretty straightforward. Rather than use any power tools, I simply used a flat hand rasp followed by several files and various sandpaper grits. It's incredibly easy to cut too much and go too far. Plus I had to keep shaping the curve in the contour, since it's not a straight angle. So I'd do a few passes, then check everything and keep going.
Eventually got down to 180-grit paper and the right shape/dimensions. All fine-sanding from this point forward.
Last edited by Highnumbers on Sun Oct 22, 2023 10:38 am, edited 3 times in total.
-
Stereordinary

- Expat

- Posts: 10660
- Joined: Fri Sep 15, 2006 11:55 am
- Location: Vancouver, WA USA
- Contact:
Re: Restoring a Lake Placid Blue '63 Bass VI
Awesome work, and great documentation. Looking forward to more!
Rhoney Guitars, 2010-2017, 2024
-
Highnumbers
- PAT. # 2.972.923
- Posts: 633
- Joined: Sat Apr 25, 2009 1:21 am
- Location: Orange County, CA
Re: Restoring a Lake Placid Blue '63 Bass VI
From this point, all I really had to do is fine-sanding and fixing a lot of minor things. I didn't document all of the small fixes, most are just things like smoothing rough router marks and addressing several imperfections.
Basically just hand-sanding the sides to get the right profile, then flat sanding the top and contours with 180-200-320 grit sandpapers until it's nice and smooth.
Basically ready for sanding sealer coats next (which I'm doing to confirm that none of the seam lines will show through), and then shipping it off for paint! I'm quite pleased with how the body has turned out.


Its a dumb little thing, but I like how the two-piece body of the repair slab lines up with the original two-piece body seam. This stuff will be hidden forever, but I like it anyway.

I'll give one more update after I get some sealer coats on, then this thread will go dormant for a while as I'm waiting for paint.
Basically just hand-sanding the sides to get the right profile, then flat sanding the top and contours with 180-200-320 grit sandpapers until it's nice and smooth.
Basically ready for sanding sealer coats next (which I'm doing to confirm that none of the seam lines will show through), and then shipping it off for paint! I'm quite pleased with how the body has turned out.
Its a dumb little thing, but I like how the two-piece body of the repair slab lines up with the original two-piece body seam. This stuff will be hidden forever, but I like it anyway.
I'll give one more update after I get some sealer coats on, then this thread will go dormant for a while as I'm waiting for paint.
-
BTL

- PAT. # 2.972.923
- Posts: 1469
- Joined: Tue Jul 12, 2011 1:24 pm
- Contact:
Re: Restoring a Lake Placid Blue '63 Bass VI
This is amazing, thanks for sharing!

Owner, Lowe Custom Guitars
-
eggwheat
- PAT. # 2.972.923
- Posts: 5153
- Joined: Sat Mar 03, 2007 8:30 am
Re: Restoring a Lake Placid Blue '63 Bass VI
Incredible skills. I have an original '63 VI in LPB if you need anything.
-
cestlamort

- PAT. # 2.972.923
- Posts: 5210
- Joined: Wed Jan 09, 2008 12:01 am
- Location: Seattle
- Contact:
Re: Restoring a Lake Placid Blue '63 Bass VI
Such amazing work. I'd watch your This Old Guitar show on PBS any day of the week.
-
Highnumbers
- PAT. # 2.972.923
- Posts: 633
- Joined: Sat Apr 25, 2009 1:21 am
- Location: Orange County, CA
Re: Restoring a Lake Placid Blue '63 Bass VI
Ha! Now that would be a life goal accomplished right there.cestlamort wrote: ↑Sun Oct 22, 2023 12:12 pmSuch amazing work. I'd watch your This Old Guitar show on PBS any day of the week.
Thanks everyone, glad you’ve enjoyed the process so far.
-
Skeet-1969

- PAT PEND

- Posts: 28
- Joined: Sat May 13, 2023 5:29 am
Re: Restoring a Lake Placid Blue '63 Bass VI
This is so awesome that I wish there were a way to have the beautiful repair visible, kind of like a guitar version of Kintsugi.
You did an incredible job.
https://en.wikipedia.org/wiki/Kintsugi
So cool. Bravo, sir!!
Mike B
"We never play anything the same way once!" - Shelly Manne
-
MayTheFuzzBeWithYou

- PAT. # 2.972.923
- Posts: 2448
- Joined: Mon Jul 03, 2017 12:28 am
- Location: Linz, Austria
Re: Restoring a Lake Placid Blue '63 Bass VI
Wow. Hats off! This is an amazing restoration!
-
Highnumbers
- PAT. # 2.972.923
- Posts: 633
- Joined: Sat Apr 25, 2009 1:21 am
- Location: Orange County, CA
Re: Restoring a Lake Placid Blue '63 Bass VI
Skeet-1969 wrote: ↑Sun Oct 22, 2023 1:46 pm
This is so awesome that I wish there were a way to have the beautiful repair visible, kind of like a guitar version of Kintsugi.
You did an incredible job.
https://en.wikipedia.org/wiki/Kintsugi
So cool. Bravo, sir!!
Mike B
Cheers! While I appreciate the principles of Kintsugi, that philosophy is based around embracing repairs after the natural wear and tear of an item. I don’t think what happened to this Bass VI can be classified as “natural wear and tear” though. I actually can’t wait to cover up the repair work this week!
That’s sort of the catch with repairs, the best quality work aims to be invisible, like nothing ever happened. (Though I should note that there will always be clues this guitar had work done to it, should it ever be inspected in the future.).
-
HNB
- PAT. # 2.972.923
- Posts: 13561
- Joined: Tue May 10, 2011 7:55 am
- Location: Puyallup, Washington
- Contact:
Re: Restoring a Lake Placid Blue '63 Bass VI
Awesome work! Reminds me of the chopped down Jazzy I got here that was remade. 
Christopher
Lilith Guitars
Lilith Guitars
-
GilmourD

- PAT. # 2.972.923
- Posts: 1841
- Joined: Fri Apr 24, 2020 8:11 pm
- Location: Rutherford, NJ
Re: Restoring a Lake Placid Blue '63 Bass VI
I'd pay for a book of photographs of all the rescues you've performed!
-
MattK
- PAT. # 2.972.923
- Posts: 3657
- Joined: Sun Aug 10, 2008 9:51 pm
- Location: Hobart, Australia
Re: Restoring a Lake Placid Blue '63 Bass VI
Glorious work, and I'm learning so much from your approaches too.
-
PorkyPrimeCut
- PAT. # 2.972.923
- Posts: 24476
- Joined: Tue Nov 28, 2006 7:46 am
- Location: Leipzig
- Contact:
Re: Restoring a Lake Placid Blue '63 Bass VI
Quite? That's a commendable & very modest attitude. You should be extremely happy.Highnumbers wrote: ↑Sun Oct 22, 2023 10:49 am...I'm quite pleased with how the body has turned out...
This restoration has been nothing short of brilliant!
You think you can't, you wish you could, I know you can, I wish you would. Slip inside this house as you pass by.