Always on the lookout for a bargain on ebay, but never finding one, I routinely look at Ebay during the day. In mid May 2007 I happened across an action for a natural refin’d 1966 Jaguar with only an hour or two to go, sitting at about US$1400. I had commented on this Jaguar in the preceding week in the Ebay section of this forum, where Jon had said that the refin made it look like a “cane toad”.
Not really expecting to win, thinking that at the last moment the auction would be sniped and the end sale price be shot up to in excess of US$2100 which other similar refins had gone for, I threw in a maximum bid of US$1603 which put me as the top bidder at US$1601. I then waited, …… waited and waited. The auction ended and my bid of US$1601 won the day.
[Mind you a week or so later Scott (scottme) picked up a similar vintage Jaguar on ebay for around US$1100. Bargains are there to be found]
The transaction was made. The guitar was sent to Doug in Florida, as the seller would not ship outside of the USA and in turn Doug forwarded the Jaguar to me. (Thanks again Doug for your help with this.)

I asked the seller if he knew anything about the Jaguar, it’s history and when the refin was done. I mentioned that the decal was obviously a reproduction and given that fact the gold refin of the head stock would also have to be a refin. His reply was:
I Know that it was originally a gold guitar. I Got it gold and there was no changing of the decals.. I am wondering who gave you bad info.. I was the second owner and .... remember I was 17 when I bought it from another young kid probably 19 at the time... It was an ugly color he sold it because he couldn't stand the color either. I had it recolored by a local music shop. Most recently I had it checked over by guitar center ( a big Guitar retailer in the US) He said gold was a rare color and said it was all original. I am telling you as I was told and as I remember. . I hope that this info is helpful to you and that you enjoy the Guitar. any other questions please ask...

As we will see later, the gold is in fact a refin so “guitar center ( a big Guitar retailer in the US)” doesn’t get the points on that question, that’s for sure.
While the Jaguar was winging its way across the Pacific Ocean I made some enquiries about paint stripper, read a few chapters in wood working books and generally go my head around the best methods of removing a clear coat that more than likely would be a poly based finish.
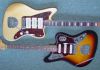
When the Jaguar eventually arrived (on time, safe and sound….. USPS / Aussie Post did a great job as usual) I was pleasantly surprise at the great condition (other than the finish) of the guitar. The case was a bit rough, but serviceable (Fender logo was ¾ missing), it was missing the whammy bar and chrome bridge cover and had an after market (non fender black/white) guard fitted. A brass nut had been fitted.

What did surprise me was the natural refin. It was extensively cracked, but not in the usual “soft checking ” which one would see in vintage nitrocellulose paints, but rather in deep strong stress cracks that emanated from any point of discontinuity in the finish (corner, screw hole, neck edge etc)


The head stock face had long cracks on it that were like nothing I had seen before.

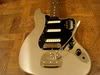
The first thing I did, for satisfy my own curiosity was check out the headstock and decal. As you can see in the above photo the smaller of the two decals to the right has the word “PATENDED” under the “Contour Body”. For a 1965/1966 neck which this is (Dots and Binding only were produced in mid 1965 to early 1966) this decal would have not had any mention of “PATENDED”. The later 2nd generation decal, with the black FENDER with gold outline, had the words “PATENDED”. It can also be seen that the decals are under the clear coat which is totally incorrect for any 1960s Fender guitar. [the damaged high E tuner can also be seen here]


The patent numbers under the FENDER are also incorrect.
This is what the number should be for a late 65/early66 Jaguar

The gold colour upon visual inspection is also obviously not a genuine Fender colour, more like “out of a household spray can” colour.
Apart from the damaged tuner, the rest of the hardware was in great condition:


One of the previous owners has painted some sort of scale using white oil based paint on the rhythm circuit roller knobs (This was a particular pain in the arse to remove)
The foam on the Mute is hard but still looks ok, so I won’t bother replacing it. Also the foam pieces under the PUPs are in very good condition so again the chances are I won’t need to replace these either.
I then removed all the electronics and no surprises were found, pots dated to the 12th week of 1966.
I attempted to repair, bend back, the damaged tine in the High E tuner, but in my haste/stupidity pushed too hard and snapped it off. Only then did it dawn on me that it was a cast piece. (A Homer Simpson moment) But as I had a couple of spare tuner parts in my box of goodies, the swearing only lasted about 10 minutes. But a word of warning, if you do intend to bend the tines of a tuner, do it very slowly using a vice to secure the part. Don’t just grab a screw driver and hold the tuner in the other hand and push as hard as you can, as you are walking from one household room to another.
The bridge thimbles were removed using a tool my father had. It is used to remove screws (of various diameters) that are rusted or have a damaged head. It is a left hand threaded/tapered tool that one screws into a metal hole (that would have been drilled into the damaged screw). When the thread starts to grip is the pulled and turned to the left even more, which pulls the screw (or in this case the thimble) out and locks in further due to its left hand thread.
The neck pocket was particularly messy with what looked like the yellow stain that Fender gave the wood prior to starting the painting (which may have indicated it was originally a sunburst finish) as well as what appeared to be a white paint, which may indicate it was an Olympic White finish.

Also in the neck pocket were quite a bit of writing including what appears to be the word “pictures”.
After removing a lot of the gunk and previous refin “stuff” in the neck pocket, I think it can safely said that this guitar originally had an Olympic White finish. Further the word “Show” can now be seen written into the white painted area. Whether this meant this particular Jaguar was used for a promo show or photo shoot is any bodies guess, but certainly good fodder to speculate about.

At this stage I was still concerned about how I would even start to remove the natural clear coat finish, especially as it was all over the binding and I was concerned that any chemical stripper may damage the binding.
The body and neck was covered in a thick layer of this clearcoat.


Then I had a close look at the checking on the back of the headstock and noticed that the finish appeared to be cracking in a similar manner to how toffee or thin glass does. I applied the nearest technical instrument I had (my index fingernail) and managed to remove a small but significant section of the clear coat refin, revealing almost virgin wood underneath:

I tried it then with a screw driver on a section of the body:


To cut a long story short, the type of clear coat refinish which had been applied to this neck and body of the Jaguar had over the years hardened to such a degree that it had cracked extensively and coupled with the fact that the finish did not appear to “stick” to the wood very well, allowed for the finish to be “scratched off” or “shattered off” easily with almost no damage at all to the underlying wood surface.
I used a small aluminium [yes aluminium, I do spell it correctly] ruler to push horizontally against the surface of the clear coat refin which shattered and removed it with very little effort. Probably in total it took 8 hours on and off to remove the clear coat from the neck and the body. [It was not something you could continually do, breathing in the crap and the concentration required not to damage anything meant that every 20 minutes or so I stopped and watched some TV or had a cuppa] Over a weekend it was completed.


The gold refin plus clear coat on the headstock front face needed to be sanded back, the extra string tree hole was later filled and sanded smooth.
When the trem unit was first removed from the body the letter “S” could be seen written in the cavity.

Once the clear coat and gold refin which remained was removed, revealing remnants of the original Olympic White finish, an additional letter “W” can also be seen. Maybe the “SW” also means “Show”, as per the neck pocket.

The neck had had the neck date sanded off during its previous refin.

However as already stated the only period in which Jaguar necks had Dots and Binding was mid 1965 to early 1966 and given also that the pots date to 12th week of 1966 I am pretty confidant this neck (and body) is what it is. A 1966 Jaguar.
The body and neck are ready for refinishing. I am going to refin it in Foam Green. I won’t restore it back to its original Olympic White as I already have restored a 66 Jaguar to that colour. There are so many variant of Foam Green on the WWW that one can get very confused. I will provide my paint man with some photographs of a 2007 Fender Thin skin AV Jaguar which is in Foam Green plus a sample of the Foam Green Scott (Scottme) used for his Bass VI refin painted onto a piece of wood. (Thanks Scott)
I have an original 1966 white guard already sourced and a good quality reproduction decal (first generation) ready once the painting has been completed. As the painter I intend to use does not do work in the middle of winter I will have to wait until Spring rolls around.
stay tuned for updates ...
======================================
Update October 2007
Today I picked up the refinished body and neck from my luthier. I had chosen Foam Green as the colour, having always loved this custom colour. Scott (scottme) sent me a small piece of plywood painted with some left over Foam Green paint he used on his Bass VI refin. Using this as a guide and some other pictures the painter has achieve a brilliant Foam Green hue, very very close to that of Scott's Bass VI.
As I mentioned in my Long Neck Jaguar thread, both this vintage Jaguar body/neck and the longneck body/neck finsihing/refinishing in nitrocellulose are just magnificant. Deep colour, three dimensional tones and hues, a gloss on the body (and the nack) that one can shave by.
For those in Melbourne (or Australia) I had the body/neck refinished at REAL GUITARS. The cost is somewhat expensive, but after one has seen the quality of the work, it is well worth it. AU$495 for the body and AU$220 for the neck (with matching headstock)
The painter managed to keep the writing in the neckpocket and trem route for me.
Foam Green is hard to photograph, but this is a decent representation ... thanks to Jay's great graphics skills, the colour in theses pics is very close to the actual colour:

more to come....
==================
With the body and neck back from the painter for a few weeks now (while I finished off my Long Neck 3 Pickup Jaguar) it was time to complete this restoration. Plus a week off from work allowed lots of daylight to do it in.
I started just tinkering around with the tuners on Sunday evening and then spent about 7 hours almost completing the refit of the guitar. Why is it that once one starts working on these projects it is so very hard to stop and leave something for the next day(s) ?
I started with the tuners and the reaming out of the tuner holes in the headstock, using rolled up sections of 400 grit sand paper. This removed the excess paint that had crept into the holes during the refinishing.

I did notice that the hole for the ferrel / tuner appears to have been drilled in two sections. On the back side of the headstock the holes are just wide enough to allow the tuner shaft to go through, where as on the front side of the headstock, even allowing for the original fitment of the ferrels, the holes appear to have been drilled with a larger size drill.


When fitting ferrels many use a soldering iron to heat up the ferrel and in turn melting the paint work inside the hole. I prefer to lightly sand/ream out the hole to a point where the ferrel can be partially pushed in by one’s thumb. This for me is a safer, with less chance of damage occurring to the (painted) headstock, albeit a far more time consuming method.
I also needed to sand/ream out the excess paint from the thimble and mute slug holes, prior to fitting.
Next was the fitment of the wiring and electronics back into the body. If the wiring is original and has not been stuffed up or modified with, there is usually enough length to allow ease of fitment and soldering.
The brass plates (with the earth leads attached) were refitted and secured via the glazier points and solder (I managed to locate the last few coils of some 1960s multi flux core solder that my father had in his work shop, so even the solder was vintage !!)
This photo is just to show that even the original Fender soldering was less than pretty, and made my soldering look ok.

The pickup foam, just like the mute foam, had not gone all “gooey” as often is seen, but had gone hard and somewhat brittle. I initially thought about keeping the hardened foam on the mute, but after handling it for a few minutes the foam started to crumble like a hard biscuit would. I decided to replace the foam for the mute, but the pickup foam looked pretty stable and usable.

Strap buttons were no problem and although not a vintage specification, I did add a felt washer to save the paintwork.

Everything was fitting back in just nicely.

After reading Jim Shine’s new WWW page on Jaguars I decided to see if I could read any dates on the pickups and pots. There was no neck date as it had been sanded off when this Jaguar was first refinished some years back. The serial number of 128788 dates the guitar in the September 1965 – April 1966 period. [necks which have dots and binding were phased out in early to mid 1966]
The volume pot had a date of the 12th week of 1966.

Interestingly the pickups appear to have a November / December 1965 date.

All of the electronics were fitted and a test with an amp was required to ensure the re-wiring had been done correctly. The guard was fitted. I had two vintage white guards available to use. One was a 64-ish nitrate celluloid material guard that had shrunk a little and turned minty. The second was a 1966 white vinyl material guard that had not shrunk (all screw holes aligned perfectly) and although quite white, had started to “dirty up” a little, not quite parchment colour but certainly no longer its original snow white hue.
To match the years I chose the 1966 white guard. Interestingly I had to ream out the thimble holes in the guard ever so slightly to allow it to sit flush over the thimbles.

When the body was plugged into an amp it was soon apparent that although the rhythm circuit and neck pickup lead circuit worked perfectly, nothing was coming out of the bridge pickup. After a couple of swear words, the multimeter was brought out and initially I thought it maybe an issue with the switch. However when I tested the ohmage of the bridge pickup it read zero,
Shit !
After unsoldering the bridge pickup it read approximately 6.2kohm. OK so where is the problem?
I resorted to the old “plug in, tap/move/push anything you can see” principle.
Eventually I discovered the problem was with the switch. When I had soldered some of the wires in the pickup selector switch plate, I must have dripped a blob of solder which then shorted out the positive lug with the earth shell of the switch. After cleaning this up, the bridge pickup worked perfectly.

The bridge, although in a reasonable condition when compared to the recent crap that Tune-a-matic was selling on ebay, still needed a little clean up. Detergent, water, kerosene were all used in varying degrees. Basically all that is really needed is some household cleaners and a fair dollop of elbow grease.

Next the neck was ready to be fitted, the original shims were used.


Come Monday lunchtime, the restoration of the Jaguar was essentially complete (except for the decal). I then took the Jaguar to my luthier, who will fit and cut a new nut, refret the neck and set up the guitar.
Stay tuned …
It’s now the end of November and I picked up the Jaguar from my luthier a couple of days back. The refret has been superbly executed, the set up is as smooth as silk. Again if you are in Melbourne then Brendan at REAL GUITARS in High Street Glen Iris (9885 0020) is the only guy you should take your guitars to.
All it needed was to have the bridge cover fitted and the decal place on the head stock. The only repro Jaguar decals I have at the moment are the same type I used for the Long Neck 3 Pickup Jaguar, which have the J A G U A R spaced slightly too far apart, the Pat Nos. slightly smaller font that what was actually used and in any case the Pat Nos are incorrect for a 65/66 Jaguar with dots and binding. There maybe some more correct 1965 / 1966 reproduction decals coming down the line in the not too distant future, but for the moment this decal will do. The decal does look good though ….
A side note on the decal that I used, I did need to cut off the “Pat Pending” small writing under the “Offset Contour Body” decal, as this is not historically correct.
I had to wait for a couple of days for a not too sunny / bright day to take some “finished” photos. Here they are … I do so love the true colour of Foam Green.
One more thing, I’d like to thank Scott for his help with samples of Foam Green, Brendan at Real Guitars, my fellow mods here at OSG.com and not forgetting my nephew Daniel for the use of his digital camera.
[The pastel hues that fender used such as Sonic Blue, Daphne Blue, Surf Green and Foam Green are always difficult to photograph accurately. As shown in the many photographs above, depending upon light source and intensity (not forgetting the effect of the digital camera itself) the colour can vary quite considerably. The following pics are pretty close although not exact to the real (superb) colour.]