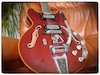
Is that a finished Jag on page 9?
-
Shadoweclipse13

- PAT. # 2.972.923

- Posts: 12446
- Joined: Fri Feb 07, 2014 9:22 pm
- Location: Stuck in the dimension of imagination
Re: Is that a Jag in your spares drawer or a stripy money-pi
Thanks Ben!
Pickup Switching Mad Scientist
http://www.offsetguitars.com/forums/viewtopic.php?f=8&t=104282&p=1438384#p1438384
http://www.offsetguitars.com/forums/viewtopic.php?f=8&t=104282&p=1438384#p1438384
-
PorkyPrimeCut
- PAT. # 2.972.923
- Posts: 24472
- Joined: Tue Nov 28, 2006 7:46 am
- Location: Leipzig
- Contact:
Re: Is that a Jag in your spares drawer or a stripy money-pi
Just in case you didn't see it, you can add ~original to the very end of your Photobucket link, in-between .jpg & [/IMG] to make them visible again.theworkoffire wrote:...I'll try to restore the earlier pics tonight.
Probably only a temporary thing as the fuckers are sure to find out but it's a hell of a lot quicker than re-upping everything again.
You think you can't, you wish you could, I know you can, I wish you would. Slip inside this house as you pass by.
-
theworkoffire
- PAT. # 2.972.923
- Posts: 4143
- Joined: Sun Sep 02, 2007 12:59 am
- Location: Punching the future in the face, London
- Contact:
Re: Is that a Jag in your spares drawer or a stripy money-pi
All pics now restoredtheworkoffire wrote:It's all stained maple - the thicker stripes are sheets intended for skateboard ply, the thinner ones are marquetry veneers. I'll try to restore the earlier pics tonight.Shadoweclipse13 wrote: Ben, it's been awhile since you started the thread and I was thinking about the guard again. Are the colored strips some kind of wood, or did you use thick paper of some kind?
Massive faff, but worth it - Mark, I deleted all my albums from photobucket in a huff as I was downloading them.
-
zastruga

- PAT. # 2.972.923
- Posts: 740
- Joined: Tue Feb 22, 2011 2:20 pm
Re: Is that a Jag in your spares drawer or a stripy money-pi
-
Insomnicide

- PAT. # 2.972.923
- Posts: 59
- Joined: Fri May 19, 2017 5:20 pm
Re: Is that a Jag in your spares drawer or are you just pl..
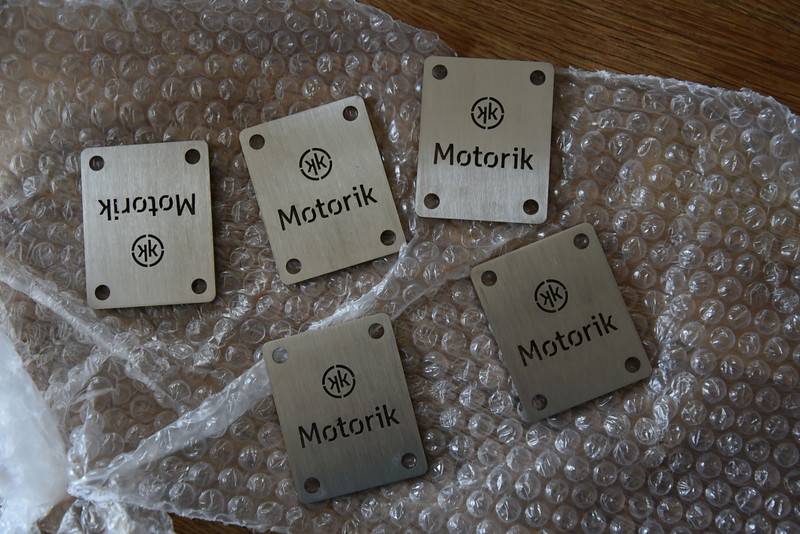
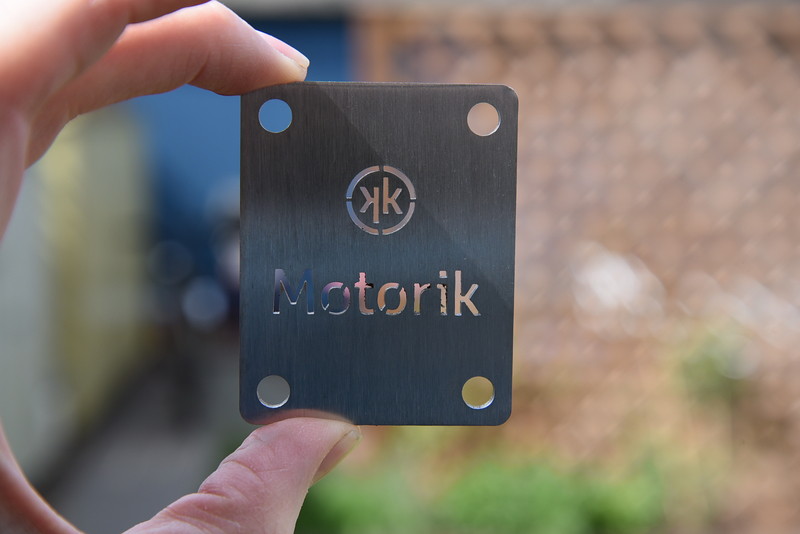
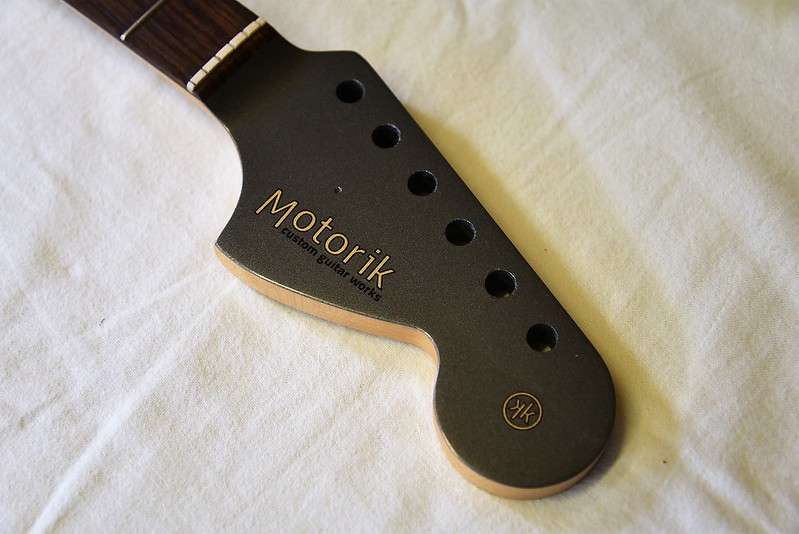
The Green JM belongs to a mate of mine. He's putting it to good use. Plays in Horror My Friend and West Thebarton.theworkoffire wrote:It seems wildly optimistic having five of these cut, since I'm averaging about one guitar every three years at the moment, but anyway, I splashed out and got some neck-plates cut from 2.5mm stainless steel. They look nice brushed, but I'm going to polish them up properly.
Whoever now has the green/cfm JM I built (I think it's still in Australia?) - I promised one of these for it to match the headstock, so get in touch and I'll send one your way.

Let me know if you need help contacting him.
-
PorkyPrimeCut
- PAT. # 2.972.923
- Posts: 24472
- Joined: Tue Nov 28, 2006 7:46 am
- Location: Leipzig
- Contact:
Re: Is that a Jag in your spares drawer or a stripy money-pi
^ ^ Post of the day, right there ^ ^

You think you can't, you wish you could, I know you can, I wish you would. Slip inside this house as you pass by.
-
theworkoffire
- PAT. # 2.972.923
- Posts: 4143
- Joined: Sun Sep 02, 2007 12:59 am
- Location: Punching the future in the face, London
- Contact:
Re: Is that a Jag in your spares drawer or a stripy money-pi
^^Brilliant! Thanks for the pic and info. Just tell him when you see him that he's welcome to a plate, or DM me his address and I'll pop it in the post for him. Great to see that guitar getting good use!
-
theworkoffire
- PAT. # 2.972.923
- Posts: 4143
- Joined: Sun Sep 02, 2007 12:59 am
- Location: Punching the future in the face, London
- Contact:
Re: Is that a Jag in your spares drawer or a stripy money-pit?.
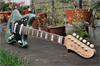
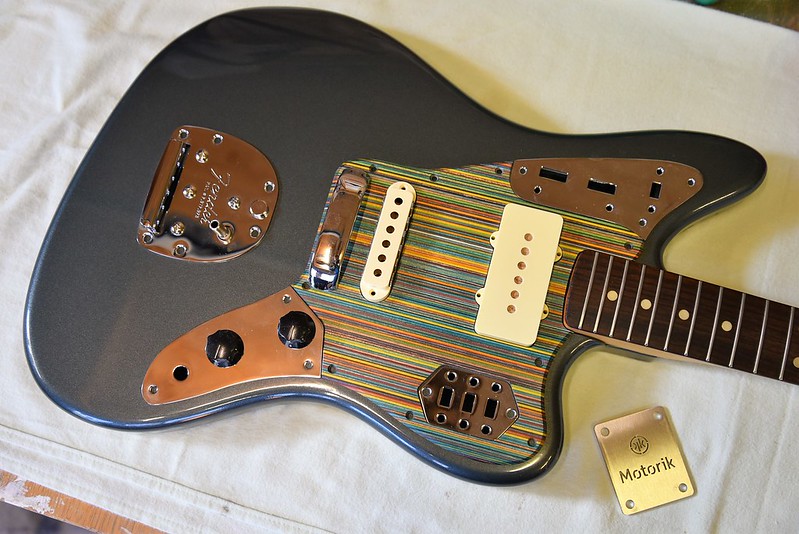
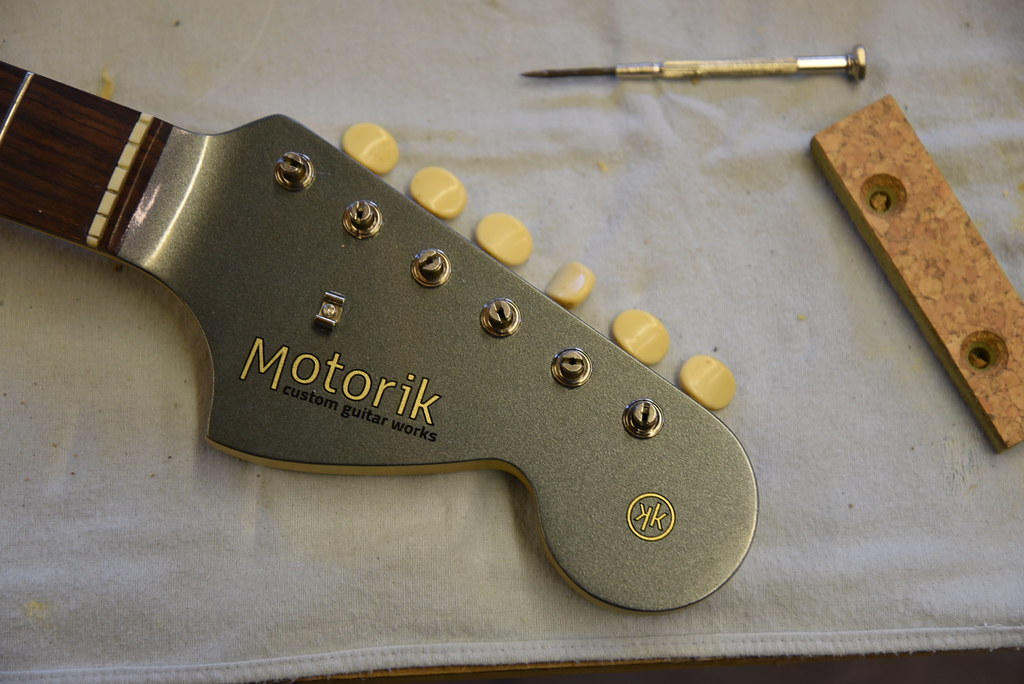
The body and neck for this are now all polished up and ready to go - couldn't resist a quick proof-of-concept 

-
Amon 7.L

- PAT. # 2.972.923
- Posts: 743
- Joined: Sun Aug 28, 2011 5:45 am
Re: Is that a Jag in your spares drawer or a stripy money-pit?.
Whoa!! 
Superb work, Ben!! You can't stop raising the bar of awesomeness!!
The pickguard looks great against the CFM and the icying on the cake would be a "Motorik" labelled trem plate, just because we all know YOU CAN!
Superb work, Ben!! You can't stop raising the bar of awesomeness!!
The pickguard looks great against the CFM and the icying on the cake would be a "Motorik" labelled trem plate, just because we all know YOU CAN!
-
theworkoffire
- PAT. # 2.972.923
- Posts: 4143
- Joined: Sun Sep 02, 2007 12:59 am
- Location: Punching the future in the face, London
- Contact:
Re: Is that a Jag in your spares drawer or a stripy money-pit?.
^^ Cheers! I hadn't even thought about making a trem plate for this  Can't afford it at the moment but you've got me thinking now...
-
antisymmetric
- PAT. # 2.972.923
- Posts: 3605
- Joined: Mon Apr 26, 2010 11:32 pm
- Location: New Zealand
Re: Is that a Jag in your spares drawer or a stripy money-pit?.
Watching the corners turn corners
-
Amon 7.L
- PAT. # 2.972.923
- Posts: 743
- Joined: Sun Aug 28, 2011 5:45 am
Re: Is that a Jag in your spares drawer or a stripy money-pit?.
It's just what I wanted to hear..theworkoffire wrote: ↑Sat Oct 21, 2017 10:33 am^^ Cheers! I hadn't even thought about making a trem plate for this
-
dylanafghjkl

- PAT. # 2.972.923
- Posts: 421
- Joined: Fri Jun 13, 2014 8:59 am
- Location: Melbourne
Re: Is that a Jag in your spares drawer or a stripy money-pit?.
wow that looks amazing, the pickguard looks even better than i thought it would
-
PorkyPrimeCut
- PAT. # 2.972.923
- Posts: 24472
- Joined: Tue Nov 28, 2006 7:46 am
- Location: Leipzig
- Contact:
Re: Is that a Jag in your spares drawer or a stripy money-pit?.
Ha!! Yeah, a trem plate is a cool idea.
The pickguard looks great. I wasn't a fan of the concept but against that CFM it looks pretty classy.
The pickguard looks great. I wasn't a fan of the concept but against that CFM it looks pretty classy.
You think you can't, you wish you could, I know you can, I wish you would. Slip inside this house as you pass by.
-
theworkoffire
- PAT. # 2.972.923
- Posts: 4143
- Joined: Sun Sep 02, 2007 12:59 am
- Location: Punching the future in the face, London
- Contact:
Re: Is that a Jag in your spares drawer or a stripy moneypit?
Thanks all
Thought I might get lucky and have this up and strumming by this evening but it wasn't to be. It's been five years since I last built a full guitar and I can barely remember how it felt to be confident it would turn out well
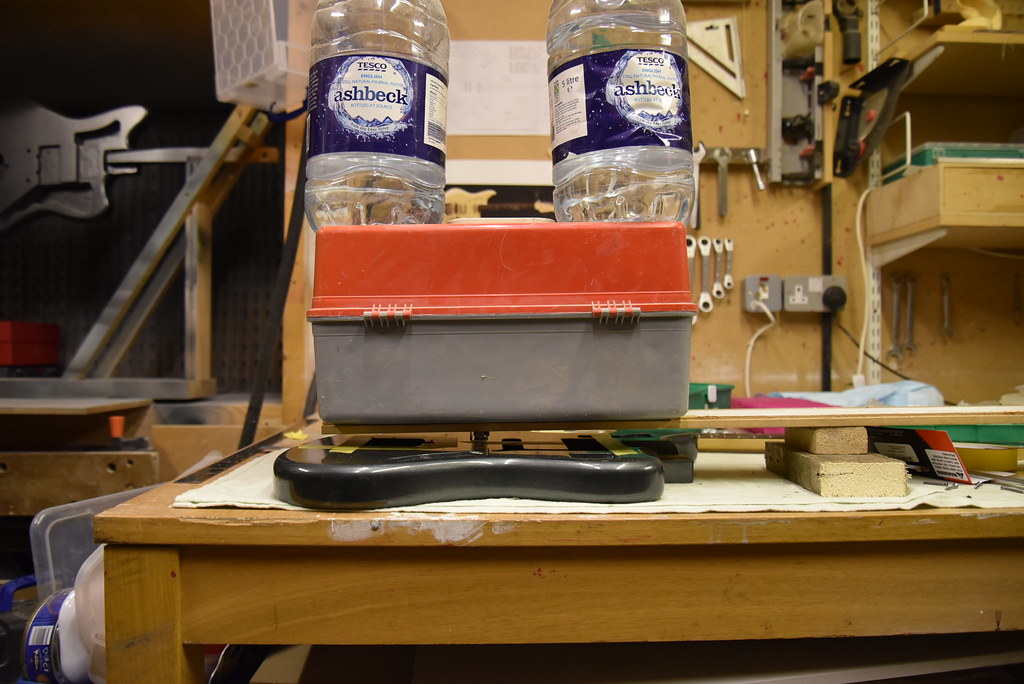
Weirdly (or have I missed something?) the two Staytrem thimbles I have were different lengths - one ~18mm, one 20. Of course I didn't find out until I'd drilled two 18mm deep holes, lined them with thick superglue, and was happily sliding the second one in... Luckily I managed to get it back out before the glue set, but it left all kinds of horror on my drill bit after I'd re-drilled it. Not sure if that was just two thimbles from different batches or what - too late to worry now.
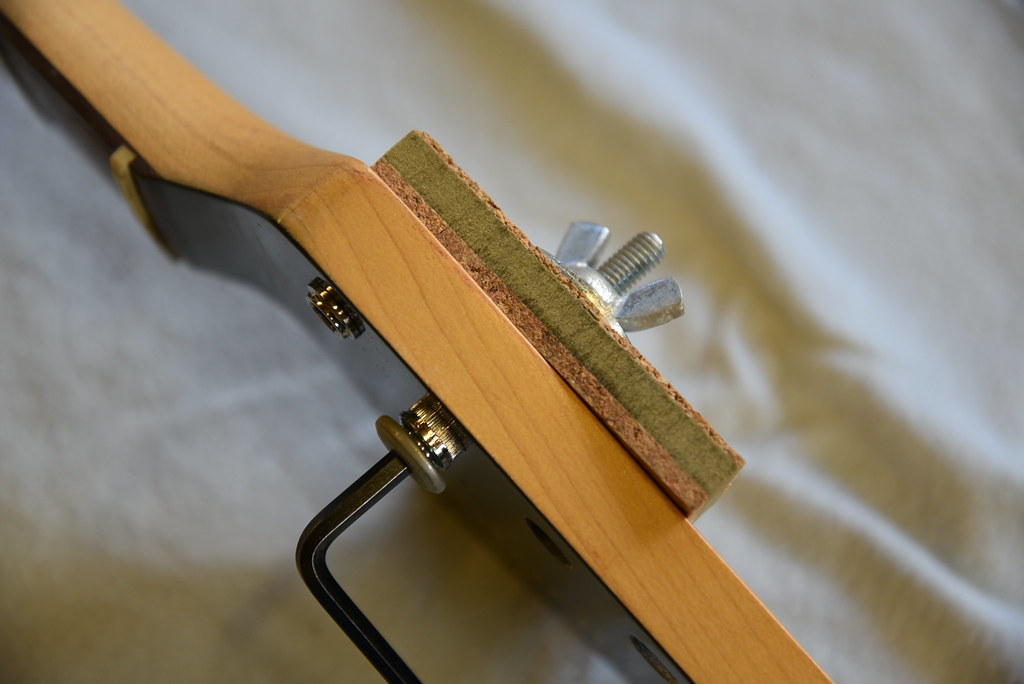
This is me leaving some pressure on them while the glue sets:
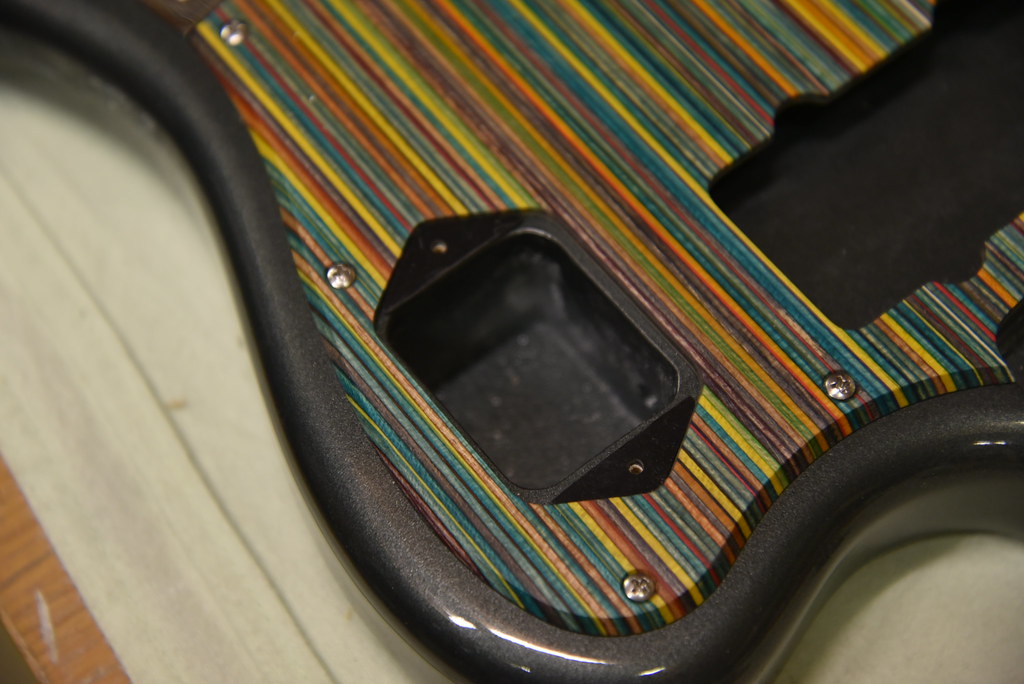
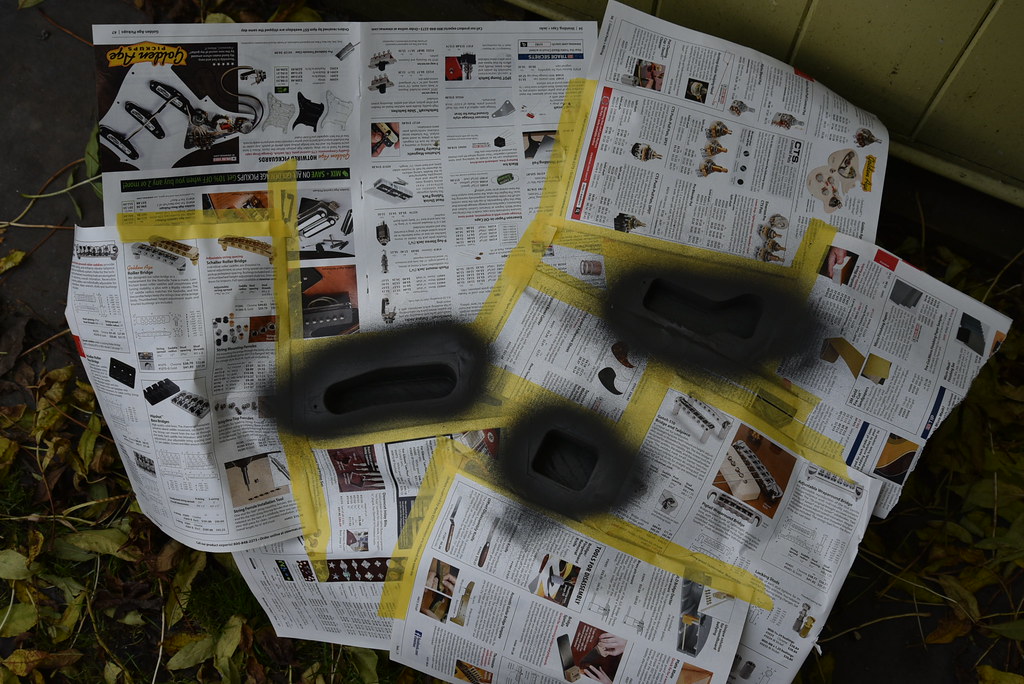
The 3mm guard leaves the switch plate looking a little low for my liking, so I made a couple of spacers for it. One day I might 3D print a proper thingy to go all the way round:
Drilling pilot points for the pickup screws...
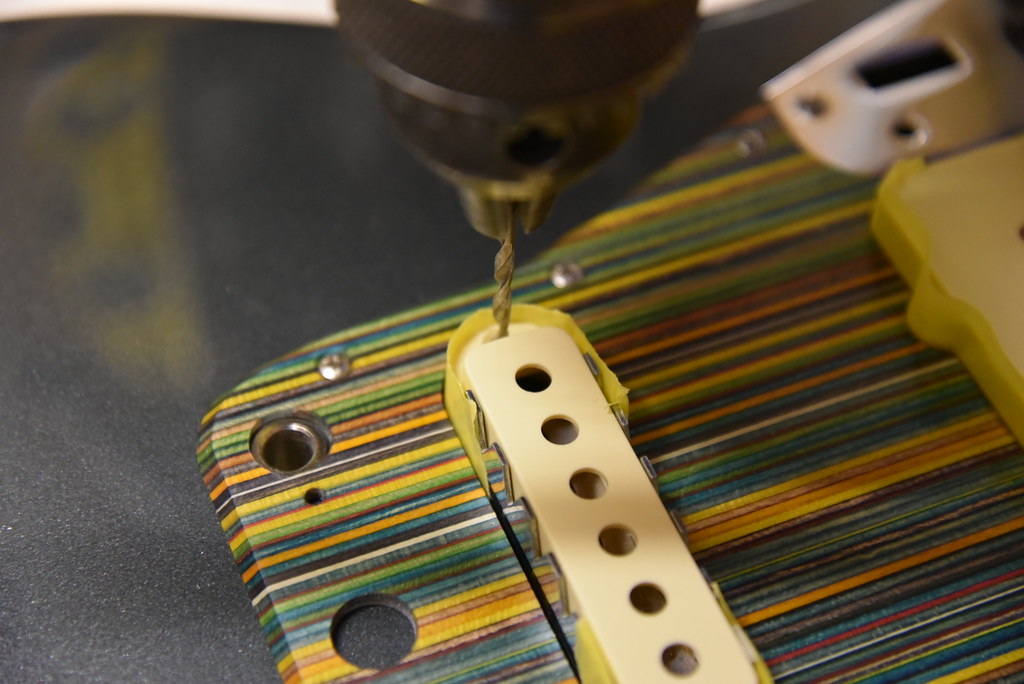
...and the full 2mm pilot holes:
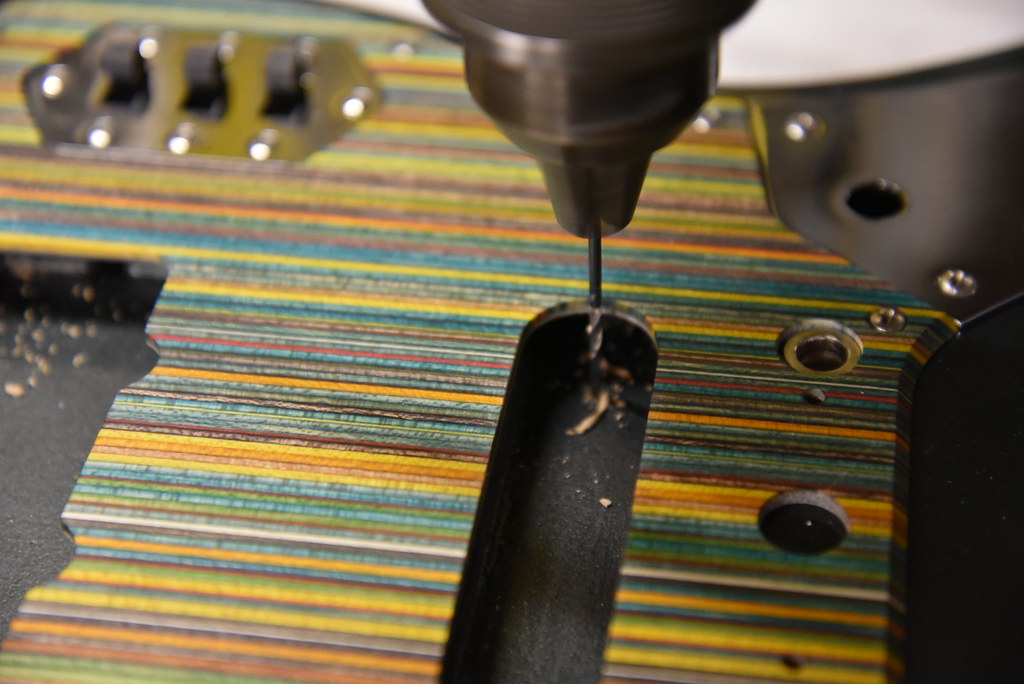
Then amateur-hour started in earnest. I realised I hadn't checked the alignment of loaded control plates when I drilled for the guard screws - I'd just centred everything between the neck and the trem cavity. All of the cavities were twisted about 2mm out of alignment, so none of the electronics properly fitted. I've never really trusted the template I have - it was taken directly from a very late CBS Jag, and I've only ever used it once or twice before, and that was with custom plates and modified routing - I'm now suspecting the trem cavity is slightly off-centre.
Anyway - a little dental work to destroy all the stealth shielding I'd painted under the primer:
Then out for a top-up on aerosol nickel, which reacted aggressively with the still-slightly-soft nitro under and around it (even through any bits of single-layer masking tape). It softened the cavities up so badly that I ended up having to scrape the bases of them back down to wood and re-spray. None of the exposed paintwork is affected, but where there was just a single layer of tape under the plate areas the surface has roughened up a bit - I'll leave it a couple of days and see if I can polish it back out. Lesson learned after the fact, again. Maybe I've only really used this spray on very old poly bodies before...
Pulling bushings in using an M6 bolt and a piece of spare cork flooring. Very satisfying, but I'd left the holes a bit tight and a few little stress-cracks in the nitro appeared between them. This is the second finish on the neck - I ruined the first earlier in the summer not drilling the holes wide enough and chipping the edges - you'd think I'd know better:
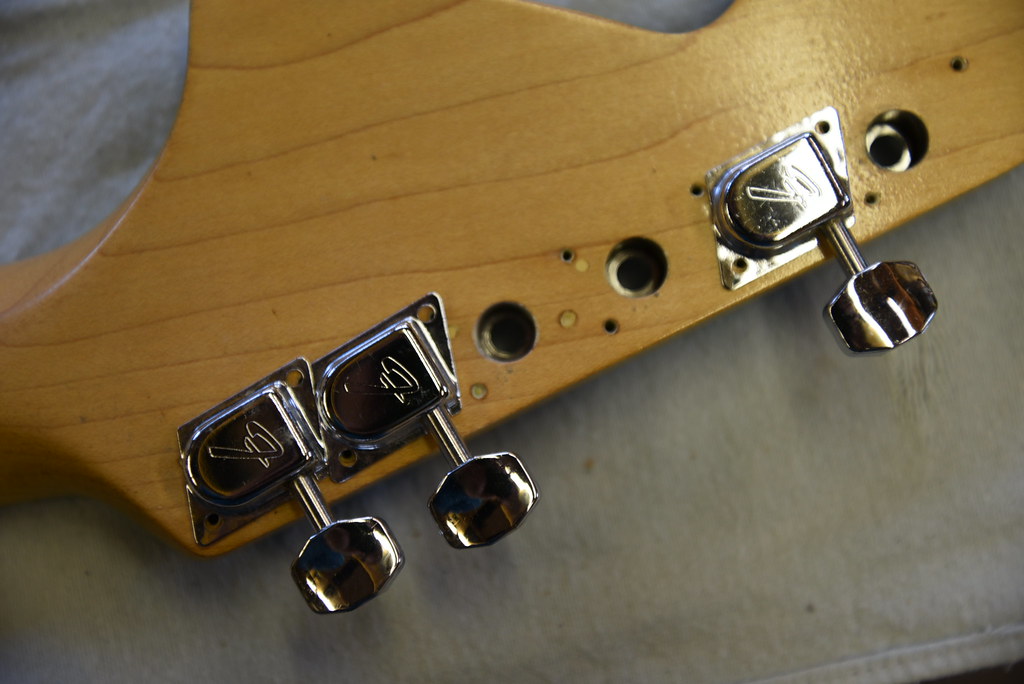
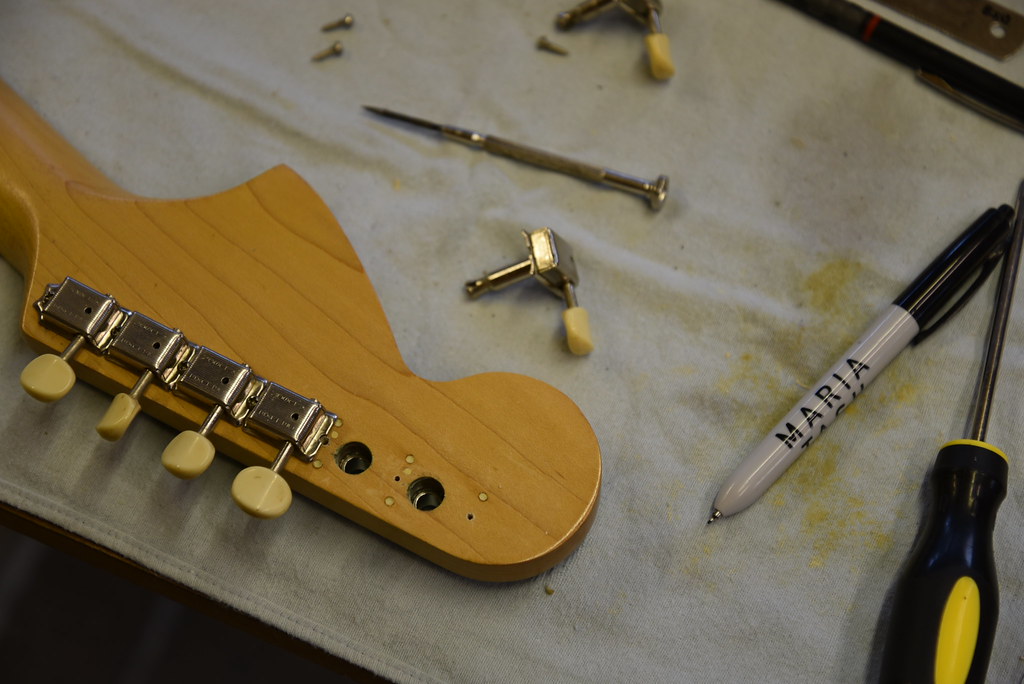
Then I realised/half-remembered the re-issue F-tuners are slightly bigger than the originals for god-only-knows what reason.
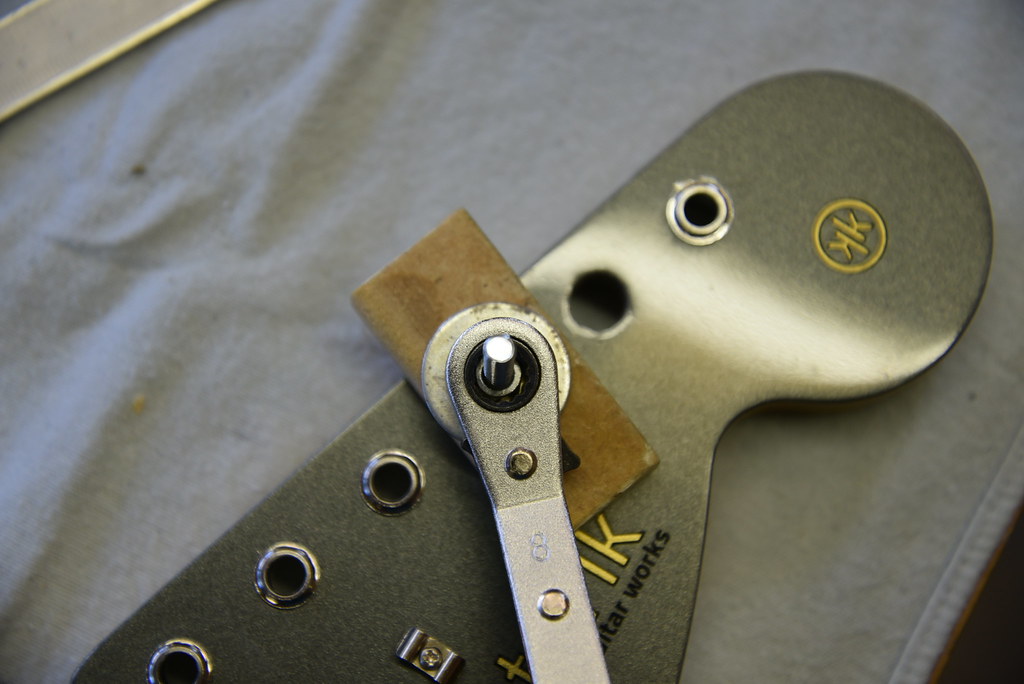
So...carefully out with the bushings again. This time I used an M5 screw and a block of MDF with an 11mm hole in it, just wide enough for the bushing to slide out into it whilst keeping the painted edges pressed down:

I really dislike the hex buttons on those F-tuners anyway, so I wasn't too bothered. Plus, I have a nice set of '65 white-button Klusons that have been sitting in a drawer for the best part of a decade. I gave them a bit of a de-m@j@ with Brasso and they came up a treat:
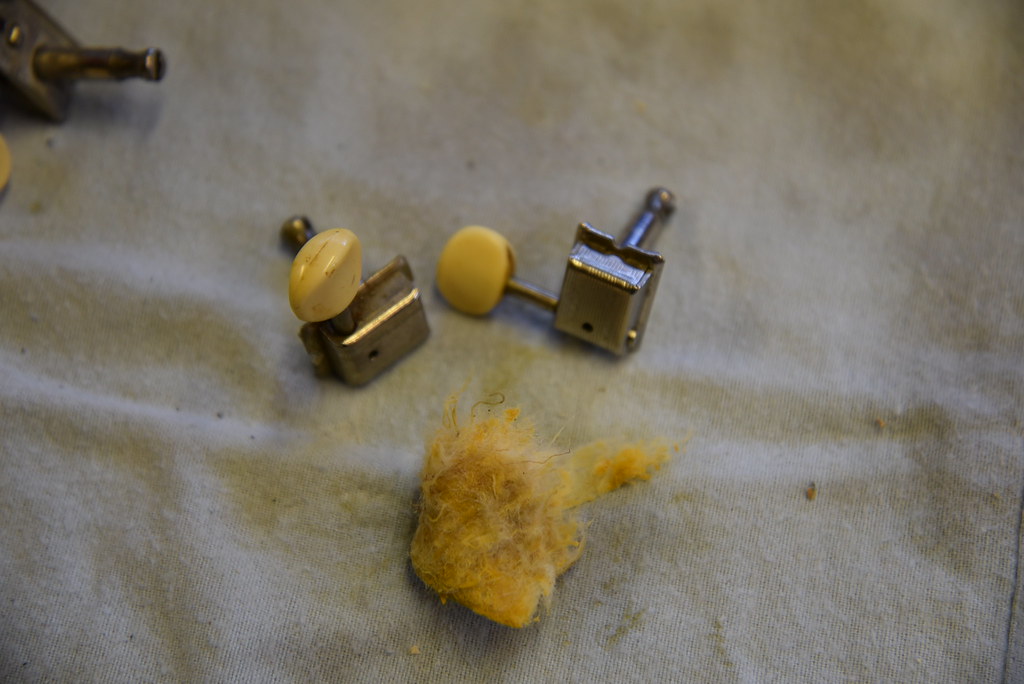
Then the rude bit - I figured the neck had already been re-drilled twice, so once more wouldn't be too sacreligious, plus there was zero chance of me a: buying a set of vintage F-tuners, or b: letting go of this neck and refinishing one drilled for Klusons. I looked at these but I didn't want to spend any silly money making sure I won them, and I'd already turned against hex buttons. So I filled and drilled:
Out of sight, out of mind! And anyone who complains that Fender's aged white pickup covers are a random shade of sickly cream for no reason, you're looking in the wrong place - they're an exact match to the old buttons. Nothing like old pickup covers, mind.
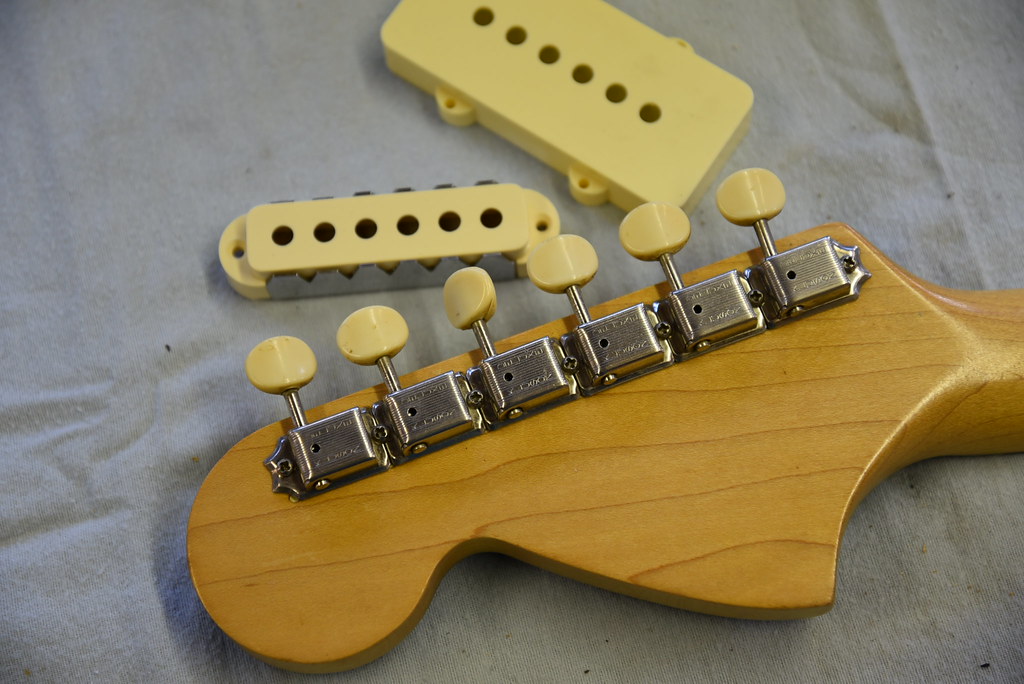
Luckily I had a set of 1/4" x 10mm conversion bushings lying around - shame I couldn't use the vintage ones, but it's a barely noticeable difference. Much nicer than the chrome hex, I think:
Thought I might get lucky and have this up and strumming by this evening but it wasn't to be. It's been five years since I last built a full guitar and I can barely remember how it felt to be confident it would turn out well
Weirdly (or have I missed something?) the two Staytrem thimbles I have were different lengths - one ~18mm, one 20. Of course I didn't find out until I'd drilled two 18mm deep holes, lined them with thick superglue, and was happily sliding the second one in... Luckily I managed to get it back out before the glue set, but it left all kinds of horror on my drill bit after I'd re-drilled it. Not sure if that was just two thimbles from different batches or what - too late to worry now.
This is me leaving some pressure on them while the glue sets:
The 3mm guard leaves the switch plate looking a little low for my liking, so I made a couple of spacers for it. One day I might 3D print a proper thingy to go all the way round:
Drilling pilot points for the pickup screws...
...and the full 2mm pilot holes:
Then amateur-hour started in earnest. I realised I hadn't checked the alignment of loaded control plates when I drilled for the guard screws - I'd just centred everything between the neck and the trem cavity. All of the cavities were twisted about 2mm out of alignment, so none of the electronics properly fitted. I've never really trusted the template I have - it was taken directly from a very late CBS Jag, and I've only ever used it once or twice before, and that was with custom plates and modified routing - I'm now suspecting the trem cavity is slightly off-centre.
Anyway - a little dental work to destroy all the stealth shielding I'd painted under the primer:
Then out for a top-up on aerosol nickel, which reacted aggressively with the still-slightly-soft nitro under and around it (even through any bits of single-layer masking tape). It softened the cavities up so badly that I ended up having to scrape the bases of them back down to wood and re-spray. None of the exposed paintwork is affected, but where there was just a single layer of tape under the plate areas the surface has roughened up a bit - I'll leave it a couple of days and see if I can polish it back out. Lesson learned after the fact, again. Maybe I've only really used this spray on very old poly bodies before...
Pulling bushings in using an M6 bolt and a piece of spare cork flooring. Very satisfying, but I'd left the holes a bit tight and a few little stress-cracks in the nitro appeared between them. This is the second finish on the neck - I ruined the first earlier in the summer not drilling the holes wide enough and chipping the edges - you'd think I'd know better:
Then I realised/half-remembered the re-issue F-tuners are slightly bigger than the originals for god-only-knows what reason.
So...carefully out with the bushings again. This time I used an M5 screw and a block of MDF with an 11mm hole in it, just wide enough for the bushing to slide out into it whilst keeping the painted edges pressed down:
I really dislike the hex buttons on those F-tuners anyway, so I wasn't too bothered. Plus, I have a nice set of '65 white-button Klusons that have been sitting in a drawer for the best part of a decade. I gave them a bit of a de-m@j@ with Brasso and they came up a treat:
Then the rude bit - I figured the neck had already been re-drilled twice, so once more wouldn't be too sacreligious, plus there was zero chance of me a: buying a set of vintage F-tuners, or b: letting go of this neck and refinishing one drilled for Klusons. I looked at these but I didn't want to spend any silly money making sure I won them, and I'd already turned against hex buttons. So I filled and drilled:
Out of sight, out of mind! And anyone who complains that Fender's aged white pickup covers are a random shade of sickly cream for no reason, you're looking in the wrong place - they're an exact match to the old buttons. Nothing like old pickup covers, mind.
Luckily I had a set of 1/4" x 10mm conversion bushings lying around - shame I couldn't use the vintage ones, but it's a barely noticeable difference. Much nicer than the chrome hex, I think: