Blacktop Jazzmaster Jr. Project

Talk about modding or building your own guitar from scratch.
User avatar
gcorona
PAT PEND
PAT PEND
Posts: 16
Joined: Fri Sep 11, 2015 10:08 am
Location: Downey, CA

Blacktop Jazzmaster Jr. Project

Post by gcorona » Mon Jan 18, 2016 4:05 pm

Hello everyone,
I finally got started on my BT partsmaster project. The plan is to build a simple Jazzmaster for my kids and I to learn to play. As we get better we can upgrade and modify. So I decided to start with a single pickup.

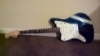
Here is the concept:
Image

I'm not going to stain the body. I like the way the natural color matches the neck.

My brother gave me a Blacktop Jazzmaster body. At the time I had no idea what it was, so I had to start researching. After a few months I picked up enough information to start gathering parts.

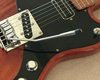
Here is a picture of the body, halfway sanded with 220 grit. I bought a neck for it in Dec. Not a Jazzmaster neck, but I like the headstock design and it fits perfectly.
Image

Next step is to finish sanding down the body with 220 grit, and continue looking for parts. I'm doing all this passively, so this project may take a while.
I'll provide more details and better pictures as I progress.
Last edited by gcorona on Thu Apr 13, 2017 2:00 pm, edited 2 times in total.

User avatar
gcorona
PAT PEND
PAT PEND
Posts: 16
Joined: Fri Sep 11, 2015 10:08 am
Location: Downey, CA

Re: Blacktop Jazzmaster Jr. Project

Post by gcorona » Tue Jan 19, 2016 12:59 pm

I scored a pair of fender style humbuckers and they are on the way.
Things are starting to come together. Slowly. I'm also working on the pickguard. I wanted to play around with pickguard designs and make something unique, so I grabbed a stack of old LP's and a Jazzmaster PG template.
I checked around the forum and found the template for the general outline, but I couldn't find any specific Blacktop Jazzmaster template. I'm going to cut a plywood template and just go from there.
Image
Thank you to everyone who provide templates or directions to where to find them.

~Genaro
Last edited by gcorona on Thu Apr 13, 2017 2:00 pm, edited 1 time in total.

User avatar
mikeyjames56
PAT. # 2.972.923
PAT. # 2.972.923
Posts: 325
Joined: Thu Apr 12, 2012 2:25 pm
Location: Austin

Re: Blacktop Jazzmaster Jr. Project

Post by mikeyjames56 » Tue Jan 19, 2016 1:50 pm

I dig Jr. versions of anything, looking forward to seeing this one!

User avatar
daCod
PAT. # 2.972.923
PAT. # 2.972.923
Posts: 1143
Joined: Mon Sep 01, 2014 8:14 pm
Location: OMA-NE

Re: Blacktop Jazzmaster Jr. Project

Post by daCod » Tue Jan 19, 2016 2:09 pm

mikeyjames56 wrote:I dig Jr. versions of anything, looking forward to seeing this one!
^ i second that. reminds me of the jaguar i did awhile back. now belongs to Jim Roth from Built To Spill...

Image
your paranoia must be weapons-grade.
“I have terrible hearing trouble. I have unwittingly helped to invent and refine a type of music that makes its principal proponents deaf.” ~ PT

User avatar
felixvaughn
PAT. # 2.972.923
PAT. # 2.972.923
Posts: 155
Joined: Mon May 20, 2013 8:58 am
Location: Area 51

Re: Blacktop Jazzmaster Jr. Project

Post by felixvaughn » Tue Jan 19, 2016 6:13 pm

daCod wrote:
mikeyjames56 wrote:I dig Jr. versions of anything, looking forward to seeing this one!
^ i second that. reminds me of the jaguar i did awhile back. now belongs to Jim Roth from Built To Spill...

Image

very cool! what do the switches do?

User avatar
gcorona
PAT PEND
PAT PEND
Posts: 16
Joined: Fri Sep 11, 2015 10:08 am
Location: Downey, CA

Re: Blacktop Jazzmaster Jr. Project

Post by gcorona » Fri Jan 22, 2016 9:49 pm

I found some wood stains in my garage. I know I said I wouldn't stain it, but some of the guitars I've seen on this site look really elegant in a dark shade. It's too tempting. I have dark walnut and English chestnut.
I haven't decided which to use , but I'm leaning towards English Chestnut because of the red tone. I used the dressing room and photoshop to come up with this idea.
Image

If I plan to install a hardtail plate, will it matter what bridge I use?

User avatar
gcorona
PAT PEND
PAT PEND
Posts: 16
Joined: Fri Sep 11, 2015 10:08 am
Location: Downey, CA

Re: Blacktop Jazzmaster Jr. Project

Post by gcorona » Wed Jul 20, 2016 10:43 am

This project was on the back burner for a while. I finally got around to continue.
I sanded down the body as best I could and tried to stain it.
I used a minwax oil based stain called provincial. I practiced on a piece of pine and I liked the results.
Here is the alder body before staining.

Image

After staining

Image

I tried to do a tobacco burst but it needs more work.

Image

I'm not thrilled with the result. I was expecting it to be lighter. I'm going to try lightening the stain by sanding.

More pics to come.
Last edited by gcorona on Thu Apr 13, 2017 2:01 pm, edited 1 time in total.

User avatar
gcorona
PAT PEND
PAT PEND
Posts: 16
Joined: Fri Sep 11, 2015 10:08 am
Location: Downey, CA

Re: Blacktop Jazzmaster Jr. Project

Post by gcorona » Wed Jul 20, 2016 11:01 am

Question:

I was dry fitting the neck and I noticed how high the fretboard is sitting from the body. Is this normal, or do I need to sand down the neck?

Image
Last edited by gcorona on Thu Apr 13, 2017 2:01 pm, edited 1 time in total.

User avatar
PixMix
PAT. # 2.972.923
PAT. # 2.972.923
Posts: 1687
Joined: Fri Aug 21, 2015 6:04 pm

Re: Blacktop Jazzmaster Jr. Project

Post by PixMix » Fri Jul 22, 2016 10:48 am

The neck is probably fine. You are looking at it against a bare body, i.e. no pickguard. However, you will know for sure after you install a bridge and string it, or check with a long ruler.

User avatar
gcorona
PAT PEND
PAT PEND
Posts: 16
Joined: Fri Sep 11, 2015 10:08 am
Location: Downey, CA

Re: Blacktop Jazzmaster Jr. Project

Post by gcorona » Mon Jul 25, 2016 5:53 pm

The staining did not turn out the way I wanted so I sanded back to almost bare wood again.
I found another stain (gunstock 231), in the garage and tried it out. I was pleasantly surprised with it.
Staining and sanding back may have brought out the grain on the alder. I'm happy with the result.
Now it's time for a few coats of polly.

"There are no mistakes. Just happy little accidents" --Bob Ross
Image
Last edited by gcorona on Thu Apr 13, 2017 2:02 pm, edited 2 times in total.

User avatar
gcorona
PAT PEND
PAT PEND
Posts: 16
Joined: Fri Sep 11, 2015 10:08 am
Location: Downey, CA

Re: Blacktop Jazzmaster Jr. Project

Post by gcorona » Mon Jul 25, 2016 6:01 pm

Here we are after two coats of gloss polly. I waited 2 hours between each coat. First coat was light, then I sanded with 1200 sand paper. The second coat went on a bit heavier. I'll sand and add another coat tomorrow.

Image

User avatar
gcorona
PAT PEND
PAT PEND
Posts: 16
Joined: Fri Sep 11, 2015 10:08 am
Location: Downey, CA

Re: Blacktop Jazzmaster Jr. Project

Post by gcorona » Thu Apr 13, 2017 2:29 pm

Just adding a quick update:
I made a pickguard!
Still have to smooth out the edges and drill out the holes.
It was easy to cut. Soldering iron cuts through vinyl like butter.

Image

User avatar
Rgand
PAT. # 2.972.923
PAT. # 2.972.923
Posts: 1171
Joined: Sun Mar 05, 2017 3:55 pm

Re: Blacktop Jazzmaster Jr. Project

Post by Rgand » Fri Apr 14, 2017 7:15 am

I like the pickguard. It's good to know an easy way to cut one from an LP.

User avatar
kosta
PAT. # 2.972.923
PAT. # 2.972.923
Posts: 206
Joined: Mon Oct 26, 2015 5:36 pm
Location: New York

Re: Blacktop Jazzmaster Jr. Project

Post by kosta » Fri Apr 14, 2017 7:42 am

daCod wrote:
mikeyjames56 wrote:I dig Jr. versions of anything, looking forward to seeing this one!
^ i second that. reminds me of the jaguar i did awhile back. now belongs to Jim Roth from Built To Spill...

Image
Awesome build Cody!

And I'm digging the way that yours is coming along gcorona. Big fan of natural finishes!

User avatar
vale
PAT. # 2.972.923
PAT. # 2.972.923
Posts: 339
Joined: Tue Jan 31, 2017 5:18 pm

Re: Blacktop Jazzmaster Jr. Project

Post by vale » Fri Apr 14, 2017 6:59 pm

gcorona wrote:Just adding a quick update:
I made a pickguard!
Still have to smooth out the edges and drill out the holes.
It was easy to cut. Soldering iron cuts through vinyl like butter.

Image
oooh that label being off-centre would trouble me.

extending the theme tho, you could use the pickup arm of a record player as your tremolo arm.
& then you could wire it up & use it for some scratching. hiphopblacktop!
i am an animal.

Post Reply