Starting new build: Starmaster

Talk about modding or building your own guitar from scratch.
Post Reply
User avatar
601210
PAT. # 2.972.923
PAT. # 2.972.923
Posts: 1021
Joined: Mon Sep 08, 2008 3:55 am

Starting new build: Starmaster

Post by 601210 » Thu Aug 09, 2018 6:59 am

So the Starcaster with Jazzmaster routes that I order from Rosser Guitars came in today. Michael was totally easy to deal with and even put the option for JM routes in on request -- also threw in a few scraps for finish testing, too!

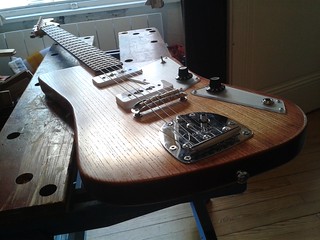
Here's how it looks, in white ash:

Image

Overall I'm quite happy with it, but there are a few issues.

First of all, the radius on the corner of the pickup routes are off by a hair -- the pickup covers won't fit. I traced an outline of the pickup cover (a bit poorly) on some tracing paper and held it up to show the disparity. It's not much at all, but it's on every corner and it looks like the only thing stopping it from going in. I didn't line it up that well in this image, but it should still be visible that the radius is off.

Image

Second, I intended to use the Jazzmaster-shaped P90s from my J Mascis Jazzmaster which are considerably fatter than regular Jazzmaster pickups -- in particular, the polepiece screws stick out by a fair amount. It looks fine for the bridge, but I don't think I'll be able to adjust the neck pickup as low as I usually like them.

For the first issue, I'm thinking a dremel and a steady hand will be more than enough (famous last words). Heck, I could probably do it with a round file and elbow grease. Shouldn't be a problem at all.

For depth issue, I guess I have a couple of options. I could just buy a pair of modestly-priced Jazzmaster pickups that should fit the height fine, I could just live with the pickups being high, jack up the bridge, and set a steeper neck angle (don't really wanna do this), or I could rout out the cavities (probably dangerous without the proper tools, especially when it won't be hidden by a pickguard).

Right now I'm leaning towards just cutting a channel for the polepiece screws, I think that'll give me enough clearance, and it seems a fine compromise that I won't have to worry about using a dremel for. I know it sounds like an "if all you have is a hammer everything looks like a nail" problem, but I don't own a router, my town isn't exactly a hotbed of decent luthiers, and I really don't think it's wise to buy a router just for a one-off project.

What do you guys think?

While I'm at it, I might as well talk about the rest of the plans. So far I'm trawling Reverb for a Squier 50s CV Strat neck because it has exactly the specs I want (9.5", medium jumbo, c profile, maple fretboard, vintage tuners). If I get impatient I'll probably just pick up one of the MIM replacement necks that Fender sells, although that comes out to twice the price. There's also a black-block maple neck on the Warmoth store and I've always wanted a black-block neck, but the price comes out to about the same as the Fender, but it's unfinished.

For the finish I'm planning on doing a rub on satin poly. Tru-oil (or tung oil) isn't available here, and my spraying skills are pretty garbage. Most advice I've seen is to use mineral spirits to thin it down, but every store I've asked it for thought it was some kind of brand of paint thinner so I guess it's not that common either. Perhaps paint thinner will do, since it's supposed to be the same thing but less refined?

I'll also try a walnut stain on a scrap piece to see if I can pull it off well, but I'm kind of inclined to going natural. I'm guessing a grain fill is in order since it's ash, but I'm still torn between trying the sand-on poly method or doing it "properly" with wood filler.

User avatar
Fiddy
PAT. # 2.972.923
PAT. # 2.972.923
Posts: 12395
Joined: Thu Nov 29, 2007 11:38 am
Location: Canada Dry

Re: Starting new build: Starmaster

Post by Fiddy » Thu Aug 09, 2018 9:31 am

Dremel and steady hand can't be used on the same sentence.

Nice body, should turn out great.

User avatar
601210
PAT. # 2.972.923
PAT. # 2.972.923
Posts: 1021
Joined: Mon Sep 08, 2008 3:55 am

Re: Starting new build: Starmaster

Post by 601210 » Thu Aug 09, 2018 9:40 am

True. I'm thinking of going with one of those plunge bases to hopefully make it a little less awful.

Would you say freehanding it with a round file would be a safer way to go?

User avatar
solfege
PAT. # 2.972.923
PAT. # 2.972.923
Posts: 544
Joined: Sat Feb 10, 2018 5:05 pm
Location: Philly

Re: Starting new build: Starmaster

Post by solfege » Thu Aug 09, 2018 12:21 pm

Nice body. I have a Jag body coming soon, I think, and I should ask him to toss a couple of scraps in for the same purpose. I'd definitely mention to him that his routes are off, too. From what I can tell on Instagram, he's getting a new CNC set up, so maybe he needs that little bit of feedback to avoid other problems in the future.

User avatar
paulnb57
PAT. # 2.972.923
PAT. # 2.972.923
Posts: 92
Joined: Thu Jul 17, 2014 2:23 am
Location: Isle of Wight UK

Re: Starting new build: Starmaster

Post by paulnb57 » Thu Aug 09, 2018 12:32 pm

If its only the ends of the polepiece screws that prevent the pickup from being lowered enough it would not be necessary to rout a slot, you could make a simple template to mark the screw positions in the route then drill a clearance hole for the end of each screw to drop into, just dont drill right through!
Not sure about the corners have you spoken to the builder, it may be possible for him to rectify the issue?

User avatar
601210
PAT. # 2.972.923
PAT. # 2.972.923
Posts: 1021
Joined: Mon Sep 08, 2008 3:55 am

Re: Starting new build: Starmaster

Post by 601210 » Thu Aug 09, 2018 4:01 pm

paulnb57 wrote:
Thu Aug 09, 2018 12:32 pm
If its only the ends of the polepiece screws that prevent the pickup from being lowered enough it would not be necessary to rout a slot, you could make a simple template to mark the screw positions in the route then drill a clearance hole for the end of each screw to drop into, just dont drill right through!
Not sure about the corners have you spoken to the builder, it may be possible for him to rectify the issue?
Great suggestion, and probably much easier to do cleanly than what I was thinking. There's quite a lot of material under the routes so if I go slow and mark the bit properly it shouldn't be too hard.

I let him know about the corners. Unfortunately the body has taken quite a trip at this point so getting it sent back isn't really an option, but I knew that was a risk.

User avatar
Fiddy
PAT. # 2.972.923
PAT. # 2.972.923
Posts: 12395
Joined: Thu Nov 29, 2007 11:38 am
Location: Canada Dry

Re: Starting new build: Starmaster

Post by Fiddy » Thu Aug 09, 2018 4:27 pm

Buy a Jazzmaster pickup route template, take it to a local woodshop or buy the dremel router/plunger thingy...

link

User avatar
epizootics
PAT. # 2.972.923
PAT. # 2.972.923
Posts: 719
Joined: Wed Jun 28, 2017 10:29 pm
Location: Lyon, France

Re: Starting new build: Starmaster

Post by epizootics » Thu Aug 09, 2018 10:00 pm

601210 wrote:
Thu Aug 09, 2018 6:59 am
For the finish I'm planning on doing a rub on satin poly. Tru-oil (or tung oil) isn't available here, and my spraying skills are pretty garbage. Most advice I've seen is to use mineral spirits to thin it down, but every store I've asked it for thought it was some kind of brand of paint thinner so I guess it's not that common either. Perhaps paint thinner will do, since it's supposed to be the same thing but less refined?

I'll also try a walnut stain on a scrap piece to see if I can pull it off well, but I'm kind of inclined to going natural. I'm guessing a grain fill is in order since it's ash, but I'm still torn between trying the sand-on poly method or doing it "properly" with wood filler.
Is it fair to assume that you live in California and that you're a victim of the 'NOT FOR SALE IN THE STATE OF CALIFORNIA' label on the Tru-oil bottle?

Paint thinner will do the trick. Every place on the planet seems to have a different name for mineral oils, but 'paint thinner' is one of them, along with 'white spirit' (that's what we call it in France and in the UK), 'naphtha' and 'turpentine' (even though it isn't actual turpentine). Do yourself a favor and try to find the low-odor stuff, though. It'll make the whole process a lot nicer on your nose.

As for the grain filling, it depends on what you're aiming for. I personally like to keep the grain showing on ash, and it makes the whole process a lot easier, but that's just personal taste. This is where I like it to be:

Image

You do want something to highlight the grain though, and that's something either the grain filler or a walnut stain can do. Stains are easy to apply, just use a wide brush to apply it on evenly, then quickly rub off the excess with a rag. In the picture above, I used mahogany stain to create the faux-burst effect, but it also served the purpose of making the grain pop out where I sanded most of it off. The rest of the finish is shellac (which brings out the golden tones of ash in a nice way) with a few coats of tru-oil on top to protect the shellac from booze. I didn't use any grain filler.

It's going to turn out beautiful regardless of the technique you use, don't sweat too much over it! If you don't like what you're getting, you can always sand it back and start over.

User avatar
oid
PAT. # 2.972.923
PAT. # 2.972.923
Posts: 834
Joined: Sat Feb 10, 2018 8:19 pm

Re: Starting new build: Starmaster

Post by oid » Thu Aug 09, 2018 11:58 pm

I would not seal the grain by sanding on poly, that just sounds like one of the least fun bits of finish work ever, do people actually do that with poly? My favorite will always be sanding on boiled linseed, some pumice can be added in to speed things up on deep pored wood like ash. Oil ages the best, it never stops drying, and as it dries it shrinks which is the look of those old prewar acoustics, gives a nice depth to the finish decades down the line.
epizootics wrote:
Thu Aug 09, 2018 10:00 pm
Is it fair to assume that you live in California and that you're a victim of the 'NOT FOR SALE IN THE STATE OF CALIFORNIA' label on the Tru-oil bottle?
That is surprising, there is nothing in Tru-Oil that is not available in California already, there must be some red tape they have not bothered to go through or something, or maybe it would require them disclosing the mysterious 'proprietary oil' that makes up like 1% of the bottle.
Logic gates based on billiard-ball computer designs have also been made to operate using live soldier crabs of the species Mictyris guinotae in place of the billiard balls.

User avatar
601210
PAT. # 2.972.923
PAT. # 2.972.923
Posts: 1021
Joined: Mon Sep 08, 2008 3:55 am

Re: Starting new build: Starmaster

Post by 601210 » Fri Aug 10, 2018 3:11 am

I wish I was in California, it isn't available at all in the Philippines :whistle:. I don't think you can import it yourself either since there's a non-zero chance of it spontaneously combusting or something like.

I have 4 scraps with me, so I guess that's 4 different finishing methods I can try. Still kind of 50-50 on not pore filling at all to be honest. So maybe I'll do one without filler, one stained, one with wood filler, and then one more that I haven't thought of yet. Should be able to pick up supplies over the weekend.

User avatar
601210
PAT. # 2.972.923
PAT. # 2.972.923
Posts: 1021
Joined: Mon Sep 08, 2008 3:55 am

Re: Starting new build: Starmaster

Post by 601210 » Fri Aug 31, 2018 2:23 am

Update!

(I swear, pics will come when I have the whole thing together).

So my poly is curing and all the parts have arrived.

I managed to enlarge the pickup routes with a dremel, a sanding bit, and the plunge router attachment. Holy shit, that plunge router attachment, do not buy that thing. It uses springs on either side on two supports with pretty loose tolerance, and it only locks on one side, so the result is that it's practically impossible to get perpendicular with the surface. Lesson learned. I also went with the trick of drilling out the holes for the extended polepieces on a JMJM pickup so everything looks okay from there, or at least reasonable. I didn't use a template because I'm an impatient idiot, so the upper and lower lines of the pickup cavities have a little dent in them, but it's nothing I'd notice from 2 feet away.

For the body I went with a natural-colored (lightish) grain fill because I didn't like the look for the dark. I actually prefer a more subtle grain, like on a butterscotch blonde (but minus the butterscotch blonde), so it worked pretty well.

I'm glad I did a grain fill but holy hell was it unpleasant to do. One very piece of advice I read online was "If you want a 'natural' grainy feel on an ash body, grain fill it as best as you can and be pleasantly surprised when the finish sinks into the grain anyways." There are some sections that didn't take as well as others, and I could have maybe done a second pass if I was going to be a real perfectionist about it, but it feels fine to me now and the main problem parts (the roundovers and ends of the guitar -- the endgrain, basically -- were rough as hell) are way better now.

For finish I went with a regular interior satin polyurethane thinned down about 50% with paint thinner, sanding at 1000 and wiping on every 3 hours for 5 coats. I had to improvise a sketchy stand with a bench vise and a flattened PVC pipe but everything held well together and now I'm giving it another 24 hours to cure before I hack away at it once more.

A couple of questions, btw:

There are a few swab marks, mostly around the butt of the guitar so it's not a big deal. I'm 50-50 on rubbing it out with paste wax or just letting it be.

What I'm thinking is to hit the whole thing with 1000 grit on a sanding block to get it decently flat, then paste finishing wax with 0000 steel wool. However, the only steel wool I can get is pretty awful -- tiny shavings everywhere -- and I'm worried about it getting stuck into some of the less-filled grain with the wax. I do have a powerful magnet on hand, but I can imagine them getting pretty stuck in there anyways. Anyone ever do anything like this? I'm also wondering if I can avoid that by just rubbing out with the 1000 grit sandpaper or a rag, but I'm worried the former would be too aggressive and the latter not aggressive enough. Anyone ever do something like this on poly?

Also, the body came drilled for the important things like the pots, neck, and bridge, but not the strap pins or trem plate screws. Kind of a boneheaded moment forgetting to drill those out before finishing, but I'm banking on the fact that the finish I have now is way thinner than the Fender factory polys anyways so hopefully I don't chip. Of course I'll be doing all the precautions anyways.

I'm also thinking of having a friend laser cut a pickguard out of some acrylic since I realized I don't particularly like the look of pickguardless guitars. It's going to be a custom job anyways since the dimensions of the JM pickups are way different from on the real thing, but if anyone out there had a scale tracing of a Starcaster pickguard that would be super helpful.

Post Reply