
Starcaster build! (Again) (finished p.6)
-
gishuk

- PAT. # 2.972.923

- Posts: 1677
- Joined: Fri Mar 19, 2010 10:57 am
- Location: Devon, UK
-
aliendawg

- PAT. # 2.972.923
- Posts: 746
- Joined: Tue May 13, 2014 1:11 pm
- Location: brazil
Re: Starcaster build! (Again)
Binding looks amazing!
"With the resurgence of offsets it seems like we're also seeing a resurgence of people who don't know what to do with them" - 601210
-
rexter

- PAT. # 2.972.923
- Posts: 1689
- Joined: Tue Sep 22, 2009 3:44 am
- Location: Norwich, East of England
Re: Starcaster build! (Again)
Nice one! Is your binding abs plastic? I hear conflicting things on whether or not acetone will melt it and I’m wondering whether to use
Superglue instead??
Superglue instead??
-
gishuk
- PAT. # 2.972.923
- Posts: 1677
- Joined: Fri Mar 19, 2010 10:57 am
- Location: Devon, UK
Re: Starcaster build! (Again)
Thanks man, Im happy with how it turned out so far.
Im using this binding, http://www.stewmac.com/Materials_and_Su ... nding.html , although Ive had this sat around for a few years I dont imagine they've changed the formula.
I had read stuff about acetone not working too but watched a youtube video of a guy just brushing it onto the wood and going for it, so I tried that and it worked. It evaporates really fast so you have to use quite a bit of the stuff, but I just brushed it onto the wood with the binding right next to it and pressed it in with fingers and then the stewmac brown tape. Some areas needed a bit more acetone flooding down into the gap behind the binding after a first attempt to stick it, and then pressing the stuff into the wood, but it was pretty easy.
I was using some 100% acetone I got from either amazon or a chemical supply place, you could hear it fizz when it touches the plastic so it clearly worked fast. Maybe people have been trying with diluted stuff and having issues?
Edit - https://www.amazon.co.uk/dp/B01MXE1LJC/ ... TE_3p_dp_1 this is what I used if thats any help to you.
-
gishuk
- PAT. # 2.972.923
- Posts: 1677
- Joined: Fri Mar 19, 2010 10:57 am
- Location: Devon, UK
Re: Starcaster build! (Again)
Scraped it back. Few little spots that need a touch more work when I do the final sanding but thats all. This is only my second binding job and its come out much cleaner than the last one. I think the acetone method really is a winner compared to using the stewmac binding glue. Much cleaner.

-
rexter
- PAT. # 2.972.923
- Posts: 1689
- Joined: Tue Sep 22, 2009 3:44 am
- Location: Norwich, East of England
Re: Starcaster build! (Again)
Amazingly neat - looks lovely!
-
gishuk
- PAT. # 2.972.923
- Posts: 1677
- Joined: Fri Mar 19, 2010 10:57 am
- Location: Devon, UK
Re: Starcaster build! (Again)
Thanks man, im really happy with how this ones turning out.
Still a few chances to totally cock it up yet though
Still a few chances to totally cock it up yet though
-
gishuk
- PAT. # 2.972.923
- Posts: 1677
- Joined: Fri Mar 19, 2010 10:57 am
- Location: Devon, UK
Re: Starcaster build! (Again)
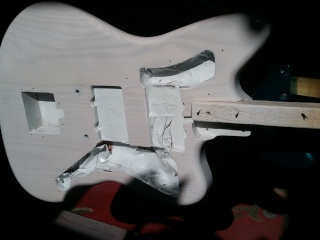
Its been far too hot to want to work on this in any major way, but I have progress nonetheless. Got the bridge thimble holes located and drilled, drilled the neck bolt holes and test fitted the neck (always a good idea to make sure it fits before starting finishing  ) and chose and drilled a location for the controls.
Still have to drill the 'tunnels' from the pickup cavitys to the control cavity, and the ground wire from the bridge. Im also undecided how I want to do the output jack, on the side like a Starcaster or on the top like an Es-335. Any opinions are welcome.
And the area around the neck pocket and the binding inside the horns isnt finished yet, which is why that area looks a little rougher than the rest.
-
alkalineHemlock

- PAT. # 2.972.923
- Posts: 85
- Joined: Sat Jun 13, 2015 6:57 pm
Re: Starcaster build! (Again)
This is a really beautiful build! Loving those f-hole/not-so-f-holes. How did you go about routing out the binding channel, though? Was it a particular router bit?
-
gishuk
- PAT. # 2.972.923
- Posts: 1677
- Joined: Fri Mar 19, 2010 10:57 am
- Location: Devon, UK
Re: Starcaster build! (Again)
Thanks man!
For binding channel I used a template trim router bit with an undersized bearing, where the difference between the size of the bit and the size of the bearing is the size of the binding.
For binding channel I used a template trim router bit with an undersized bearing, where the difference between the size of the bit and the size of the bearing is the size of the binding.
-
gishuk
- PAT. # 2.972.923
- Posts: 1677
- Joined: Fri Mar 19, 2010 10:57 am
- Location: Devon, UK
Re: Starcaster build! (Again)
This is only the very first step in the finish and it won't be this colour in the end, but colour!

-
ludobag1
- PAT. # 2.972.923
- Posts: 2547
- Joined: Sun Nov 23, 2008 4:28 pm
- Location: france
Re: Starcaster build! (Again)
seems purple no?
to make a top like the prs i do this way
first i use the stain water based for easy diluting
then first step i take the stain straight and Apply on the wood to saturate it ,few pass can be needed ,let it dry
sand it to have only stain in figuring
after i use the stain really diluted and with multiple pass i obtain the color i want
careful of mixing different color sometime it don(t work well or you have a hue really not interresting ,like blue and yellow will do green
i know some use black before switching to color but for 3 D effect i prefer to use the same stain
-
gishuk
- PAT. # 2.972.923
- Posts: 1677
- Joined: Fri Mar 19, 2010 10:57 am
- Location: Devon, UK
Re: Starcaster build! (Again)
Im using water based stains, I plan to sand this back and leave the purple in the figuring, then go over it with blue and then probably sand that back and do blue again over that. Should leave a purple tint in some of the figuring, thats the idea anyway
-
ludobag1
- PAT. # 2.972.923
- Posts: 2547
- Joined: Sun Nov 23, 2008 4:28 pm
- Location: france
Re: Starcaster build! (Again)
if you diluted you sand less , is easyer to darken by each pass rather than clearing by sanding
try on scraps before
try on scraps before
-
gishuk
- PAT. # 2.972.923
- Posts: 1677
- Joined: Fri Mar 19, 2010 10:57 am
- Location: Devon, UK
Re: Starcaster build! (Again)
Thats a good tip thank you Ill have a go on some offcuts and see how that works out.
This is my first time doing a stain finish so a lot to learn!
This is my first time doing a stain finish so a lot to learn!