My first Mustang - a new project (advice needed, regular progress pics)

Talk about modding or building your own guitar from scratch.
User avatar
AliGlenUig
PAT PEND
PAT PEND
Posts: 35
Joined: Sat Feb 20, 2016 10:04 am

Re: My first Mustang - a new project

Post by AliGlenUig » Wed Mar 21, 2018 11:49 am

A horrible update: disaster fitting the tuners.

Marked it all up, drilled pilot holes to fit the tuners and drove in the screws, as I've done before with absolutely no issues.

However, on completion, noticed a thin crack had appeared at the end of the last tuner. I hadn't heard anything crack, but had music on in the background.

Took them all back off to check and...

Image

It's split between every. fucking. hole. The splits look like they pass at least half the way through the headstock, not through to the face though, and there seems very little movement in them.

What on earth should I do? I feel like I've just destroyed this fairly expensive neck, I'm not even sure how or why this has happened, I've never seen anything like it. I imagine the proper approach would be to glue it and clamp, but the cracks are far too fine to get anything in to them, and they don't seem to want to open wider, not that I've tried too hard.

The desperate part of me wonders if it'll still be okay, but I'd be worried about putting tension on the headstock in this state, I have no idea what might happen then.

I am beyond gutted.

User avatar
hpr_hpr
PAT. # 2.972.923
PAT. # 2.972.923
Posts: 434
Joined: Fri Apr 03, 2015 9:48 am

Re: My first Mustang - a new project

Post by hpr_hpr » Wed Mar 21, 2018 12:20 pm

Take a deep breath, you're not as badly off as you probably think you are . . .

OK . . . the reason for the crack is that your pilot holes weren't large enough for the screws . . . but you knew that, different turners have different size screws and different woods - and even different pieces of the same wood - behave ... differently ... and the good news is the crack isn't all the way through the thickness or to the edge . . .

I see you seem to have some kind of ferrules in the holes as well . . . did they go in easy or did you have to use some force . . .

SO this can be fixed . . . it's just going to be a little harder . . . well . . . probably . . . it depends . . . . . does a piece of paper slide easily into the crack? If so you can use a glue loaded piece of paper to force glue into the crack, do this REPEATEDLY, clamp it up, loosen it, repeat 2 or three times, then clamp it up and let it dry and if everything goes right it's actually stronger than the wood itself was . . . . that's the fast and low tech way of fixing this . . . .

Now if you have acces to a router (or you can use a back saw, chisels, files, and some low grit sandpaper but that's harder and going to take longer, you can also accomplish this with a circular saw BUT that requires careful measuring) a 'neater' way to do this is to get a piece of 1/2" maple (or walnut, or mahogany, or another wood, if you want to make it look like it was intentional), rout out a 1/2" wide dado over the tuner holes ~3/8" deep (the tuner holes are something like 21 - 26/64 so 1/2 would be as wide or wider) ... ... ...

/ ALTERNATIVE / rout away a ~3/8" deep or so rabbet from beyond the holes to the edge, this would be an easier option for the circular saw as you only need one EXACT cut, then you just make repeated cuts to hog out the rest and smooth things with chisels and sandpaper, just make sure you support the saw with another piece of wood beyond the headstock to the saw can not tip / END /

... ... ... and glue in the piece, plane/sand flat with the rest of the headstock and you're good as new, redrill the tuner holes, then do the screw holes (remember the screws really barley have to grab, they are not holding anything against force in that direction, they are there to hold the tuning machine and prevent it rotating - which force is perpendicular to the screw) . . . . To make it look even more intentional if you use a different wood, rout a 2nd 1/2" wide dado half as deep parallel to the first further out (say half way between the first and the other edge) - or not even parallel - and glue in the same wood . . . .

A note on exotic wood and glue . . . maple and walnut are OK to glue, almost no issues there, but if you go for an exotic (even mahogany) make sure you wipe it down with mineral spirits, acetone, turps (basically any solvent) before gluing until no more 'color' comes off to remove the surface oils, forget to do that and you'll have a marginal bond at best.

Remember, the sign of a master crafts man is not that he manages to do things perfectly every time, it's how he recovers from the inevitable mistakes.
When thinking about any advice given always ask yourself "why would (s)he know more than I do".

User avatar
AliGlenUig
PAT PEND
PAT PEND
Posts: 35
Joined: Sat Feb 20, 2016 10:04 am

Re: My first Mustang - a new project

Post by AliGlenUig » Wed Mar 21, 2018 12:57 pm

hpr_hpr wrote:
Wed Mar 21, 2018 12:20 pm
... and the good news is the crack isn't all the way through the thickness or to the edge . . .
Actually, it is all the way to the edge at the nut end, another photo:

Image

hpr_hpr wrote:
Wed Mar 21, 2018 12:20 pm
I see you seem to have some kind of ferrules in the holes as well . . . did they go in easy or did you have to use some force . .
They went in with a firm push with the tool provided with the tuners, no bashing away at them if that's what you mean, I'm assuming they're going to be an issue and need removed before I attempt to fix this?
hpr_hpr wrote:
Wed Mar 21, 2018 12:20 pm
SO this can be fixed . . . it's just going to be a little harder . . . well . . . probably . . . it depends . . . . . does a piece of paper slide easily into the crack? If so you can use a glue loaded piece of paper to force glue into the crack, do this REPEATEDLY, clamp it up, loosen it, repeat 2 or three times, then clamp it up and let it dry and if everything goes right it's actually stronger than the wood itself was . . . . that's the fast and low tech way of fixing this . . . .
Right, I can definitely get paper in to the crack and I will definitely make a mess of things if I attempt your second suggestion. (Although the idea of skunk stripes on the back of the headstock is visually very cool).

So, glue and clamp looks to be the way forward right enough. Thank you so much for being the calm voice of reason here, I think I'm going to owe you in particular rather a lot by the time this is over...

User avatar
AliGlenUig
PAT PEND
PAT PEND
Posts: 35
Joined: Sat Feb 20, 2016 10:04 am

Re: My first Mustang - a new project

Post by AliGlenUig » Wed Mar 21, 2018 1:54 pm

Right. I've done my best to get glue into it, and I've clamped it. I'll leave it overnight and see if it stays closed when I attempt to refit the tuners tomorrow. It's not a very pretty repair but the tuners will cover almost all of it.

The good news is that I got the neck fitted to the body with no issues before I spotted the issue with the headstock, so, assuming this works, I'm now a lot closer to having it put together.

This has got to be one of the most popcorn-worthy build threads on here in some time...

User avatar
hpr_hpr
PAT. # 2.972.923
PAT. # 2.972.923
Posts: 434
Joined: Fri Apr 03, 2015 9:48 am

Re: My first Mustang - a new project

Post by hpr_hpr » Wed Mar 21, 2018 2:21 pm

AliGlenUig wrote:
Wed Mar 21, 2018 12:57 pm
Right, I can definitely get paper in to the crack and I will definitely make a mess of things if I attempt your second suggestion. (Although the idea of skunk stripes on the back of the headstock is visually very cool).

So, glue and clamp looks to be the way forward right enough. Thank you so much for being the calm voice of reason here, I think I'm going to owe you in particular rather a lot by the time this is over...
Actually trying the glue up does not preclude doing the 2nd at some time in the future :)

As for being the calm voice of reason, just returning the favor (and building karma) . . . .

N.B. just thought of the 'steam punk' solution = pan head #10 woodscrew through the side of the headstock before, between and after the tuners . . . . :w00t: . . . y'll have to be careful to not interfere with the tuner mounting screws though . . .
When thinking about any advice given always ask yourself "why would (s)he know more than I do".

User avatar
AliGlenUig
PAT PEND
PAT PEND
Posts: 35
Joined: Sat Feb 20, 2016 10:04 am

Re: My first Mustang - a new project

Post by AliGlenUig » Thu Mar 22, 2018 2:49 am

Well, looks like the glue I used was too viscous and didn't penetrate properly. The crack opened up again. I've read reports elsewhere of success with really thin viscosity CA glue as it wicks its way deep into thin cracks. Gonna pick some up and give that a shot.

User avatar
AliGlenUig
PAT PEND
PAT PEND
Posts: 35
Joined: Sat Feb 20, 2016 10:04 am

Re: My first Mustang - a new project

Post by AliGlenUig » Mon Apr 30, 2018 12:17 pm

PROGRESS REPORT:

life got in the way for a while but I'm back at this again and continuing to post progress and seek advice on here if you all are still feeling charitable!

So, I got the nasty headstock crack repaired. First attempt failed, tried loading glue in with paper but it didn't hold. I reckon the glue was too viscous. This meant I had to scrape out the bad glue job with a needle to try again, which made a bit of a mess of the edges of the cracks, meaning that the final repair is quite visible because the edges of the crack got dirty.

However, the fix is now as strong as anything going (my local guitar repair guy was kind enough to recommend a good glue and lend me some clamps to get it done). Picked up some Titebond, levered the cracks open a little more, very carefully, and massaged the glue in to them, repeatedly clamping and loosening to draw the glue further in, massaging more in as I went along. (Not sure why I'm explaining this process except I suppose it might be useful to somebody as novice as I am).

It's a bit of an ugly repair due to the messy cracks, but the tuners hide most of it and it's not through to the front of the headstock, so there's not actually much visible:

Image

Anyway the tuners are happily installed now and all good on that front, so it's time to move on... See my next post.

User avatar
AliGlenUig
PAT PEND
PAT PEND
Posts: 35
Joined: Sat Feb 20, 2016 10:04 am

Re: My first Mustang - a new project

Post by AliGlenUig » Mon Apr 30, 2018 12:40 pm

Having dealt with the tuner Odyssey, I've run straight into my next problem. Looking for more advice.

I picked up a really lovely scratch plate from a guy who makes them locally, supposedly to US spec, which is what the body is, and it appeared to be a great fit:

Image

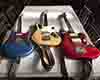
I then picked up some very cheap Squier Mustang pickups from eBay, not planning to use them long term but as an intermediary set and to make sure I can understand and test the wiring setup before I get some high end pups. They appear to sit okay in the body routes, although a bit wonky. 'no problem' I think, as they're mounted to the pickguard anyway so that'll keep them level:

Image

However, loading them to the pickguard and fitting the lot to the body, the fit isn't quite perfect. It can just about be wiggled in to place, but the body routes and the pickguard holes seem to be slightly at odds. The pickguard forces the pickups hard up against the inner side of both routes, so that the pickups won't sit flat, they both tilt towards the middle of the body as they are hard up against the inner edges of the route. This wasn't very easy to photograph but is quite noticeable in person, and not at all desirable. I've also shown the problem here with the pickups uncovered, but I've got white covers that I want to use and the extra mm those add make the problem even more pronounced.

Image

Image


So, the questions are: does anyone have an opinion on the likely cause of the problem, and what should I do about it?

I guess the problem is either:
a) the scratch plate isn't quite cut properly, the pickup holes being a little too close together? This would be a shame as it looks lovely, and I couldn't be sure in buying another one that it would be any different, as that level of specification isn't readily available.
b) the Squier pickups in a US Fender spec body are the problem, perhaps their base plate is slightly wider than the US ones, and they are thus slightly too tight in the body routes?
c) the body routes are slightly too far apart, it's not a Fender body, I'm not entirely sure where it was made, it's a new third party replica that is supposedly cut to exact US spec, but perhaps it's not as exact as the seller claimed?

In line with this, I guess the potential solutions are:
a) buy another pickguard and see if it improves the problem, a real shame as I got two cut to the same spec by this seller and they are high quality great jobs in terms of looks and shape - really nice tight lines at the neck and bridge that fit perfectly.
b) go ahead and get those hand wound boutique pick ups I was eventually going to install anyway, and hope they fit better, a gamble in a way I suppose but I was going to buy them eventually anyway.
c) carefully widen the routes on the body a little to improve the fit. This perhaps seems like the most drastic solution, but is also potentially the cheapest and easiest one, something I could do right away and ought to guarantee an improved fit without changing pickups or the plate. However, I don't want to make that decision lightly.

If I could ask for any opinions or advice, I would be most grateful.

(Also sorry I'm so fucking long winded and verbose, I hope someone can be bothered to read all of this).

User avatar
hpr_hpr
PAT. # 2.972.923
PAT. # 2.972.923
Posts: 434
Joined: Fri Apr 03, 2015 9:48 am

Re: My first Mustang - a new project

Post by hpr_hpr » Mon Apr 30, 2018 2:02 pm

Hmmm, seems the pickups fit VERY tightly in the body from the photograph . . . . SO . . . if the body is just .5mm off in one direction and the pick guard is .5mm off in the other you end up with the problem described . . . or if the bases are just a bit larger than spec . . . as for a 'solution'.

a. might work BUT it's a throw of the dice . . . .
b. unlikely but not impossible if the bases of your current pickups are out of spec
c. some low grit sandpaper and careful sanding will do it . . . be careful to sand the whole side vertically . . . you'll find quickly that it's very easy to sand more off the top than the bottom.

or

d. take some 220 / 320 sandpaper and sand down the edges of the pickup baseplates . . . . especially if they are cheap pickups . . . . . . .
When thinking about any advice given always ask yourself "why would (s)he know more than I do".

User avatar
solfege
PAT. # 2.972.923
PAT. # 2.972.923
Posts: 544
Joined: Sat Feb 10, 2018 5:05 pm
Location: Philly

Re: My first Mustang - a new project

Post by solfege » Mon Apr 30, 2018 2:07 pm

I don't have enough expertise to confidently advise you on how to handle the problem, but I will say the pickguard looks lovely and it'd be a total shame to trash it.

I wonder, though, why not just go with the pickups you intend to use? Surely the worst thing that's likely to happen to them in newbie wiring-land is that you'll mess up the end of the leads a bit, or something. Seems a shame to consider more radical surgery to a pristine body or tossing a nice guard if the problem is simply that the cheapie pickups you got don't fit well inside the body.

User avatar
AliGlenUig
PAT PEND
PAT PEND
Posts: 35
Joined: Sat Feb 20, 2016 10:04 am

Re: My first Mustang - a new project

Post by AliGlenUig » Mon Apr 30, 2018 2:08 pm

hpr_hpr wrote:
Mon Apr 30, 2018 2:02 pm
d. take some 220 / 320 sandpaper and sand down the edges of the pickup baseplates . . . . especially if they are cheap pickups . . . . . . .
I had thought about this, but the wires connect so close to the edge of the base plate that there isn't really much room for this.

I think widening the routes is probably the best option. I'd be more inclined to work with a Dremel or a good chisel than sandpaper though, as I think there's quite a bit of widening required. I'm pretty handy with a chisel and going carefully and slowly should allow me to not make a hash of it. Obviously a router would be the best thing for the job but I don't have access to one...

User avatar
AliGlenUig
PAT PEND
PAT PEND
Posts: 35
Joined: Sat Feb 20, 2016 10:04 am

Re: My first Mustang - a new project

Post by AliGlenUig » Mon Apr 30, 2018 2:11 pm

AliGlenUig wrote:
Mon Apr 30, 2018 2:08 pm
I'm pretty handy with a chisel and going carefully and slowly should allow me to not make a hash of it. Obviously a router would be the best thing for the job but I don't have access to one...
I should maybe clarify that and say that I know using a chisel will probably make for a slightly angular and ugly looking route, although careful finishing should minimise this. But this won't be visible under the plate, and as I'm not interested in selling this at any point I'm not overly concerned about the body looking slightly ugly when stripped down. It's not like the guitar will have much monetary value anyway, and not like I'd be doing it to a real Fender.

User avatar
AliGlenUig
PAT PEND
PAT PEND
Posts: 35
Joined: Sat Feb 20, 2016 10:04 am

Re: My first Mustang - a new project

Post by AliGlenUig » Mon Apr 30, 2018 3:01 pm

... And another stumbling block.

Had a feeling the weird roller bridge wouldn't fit the bill when I received it and realised the saddles were super tall and odd, and not individually height adjustable. Started stringing up just to check that as well as neck alignment. Good news is the neck is good and straight (I did align it carefully before marking and drilling but still good to confirm this).

However this bridge isn't going to work. Although billed as suitable for a Mustang, the saddles are enormously high even with the bridge fully lowered:

Image

I could sort of tell this would be the case as soon as I saw the bridge in person, but thought I'd try it anyway and it's even worse than I had thought.

Here's the clearance at the 12th fret, well in excess of a centimeter:

Image

No amount of truss rod adjustment and neck shimming is going to cope with that! Looks like I'm selling this to someone who has a guitar it'll work on, and buying a standard Mustang bridge for the time being. Finally found some decent looking roller saddles aimed at the Mustang bridge too, so will probably invest in those at some point.

Let this be a record of the fact that these bridges are in NO WAY fit for a Mustang.... Oops.

User avatar
AliGlenUig
PAT PEND
PAT PEND
Posts: 35
Joined: Sat Feb 20, 2016 10:04 am

Re: My first Mustang - a new project

Post by AliGlenUig » Mon Apr 30, 2018 3:15 pm

solfege wrote:
Mon Apr 30, 2018 2:07 pm
I wonder, though, why not just go with the pickups you intend to use? Surely the worst thing that's likely to happen to them in newbie wiring-land is that you'll mess up the end of the leads a bit, or something. Seems a shame to consider more radical surgery to a pristine body or tossing a nice guard if the problem is simply that the cheapie pickups you got don't fit well inside the body.
You could be right, I'm just not sure if there's any likelihood that the boutique pickups would have a narrower base plate. That was one of the things I was looking for opinions on.

User avatar
solfege
PAT. # 2.972.923
PAT. # 2.972.923
Posts: 544
Joined: Sat Feb 10, 2018 5:05 pm
Location: Philly

Re: My first Mustang - a new project

Post by solfege » Mon Apr 30, 2018 5:00 pm

AliGlenUig wrote:
Mon Apr 30, 2018 3:15 pm
I'm just not sure if there's any likelihood that the boutique pickups would have a narrower base plate. That was one of the things I was looking for opinions on.
Pretty sure a boutique maker could send you dimensions to measure very easily.

Post Reply