Surf Green MJT Jazzmaster Finished Pg. 3
-
Embenny

- PAT. # 2.972.923

- Posts: 10363
- Joined: Tue May 24, 2016 5:07 am
Re: Surf Green MJT Jazzmaster Build
That looks really good! Fits the wear of the body well.
The artist formerly known as mbene085.
-
HNB

- PAT. # 2.972.923
- Posts: 13540
- Joined: Tue May 10, 2011 7:55 am
- Location: Puyallup, Washington
- Contact:
Re: Surf Green MJT Jazzmaster Build
Thanks! I printed and inked my decal for the headstock. This is going to have a black Coronado neck clone. 
 2018-01-06_02-10-58 by Christopher Louck, on Flickr
2018-01-06_02-10-58 by Christopher Louck, on FlickrChristopher
Lilith Guitars
Lilith Guitars
-
davidblane

- PAT. # 2.972.923
- Posts: 104
- Joined: Wed Feb 13, 2013 8:56 pm
- Location: St. Louis, MO
- Contact:
Re: Surf Green MJT Jazzmaster Build
Looks great!
I love MJT's stuff. Putting together an MJT Shoreline Gold Jazzmaster at the moment.
Hope your wife is well!
I love MJT's stuff. Putting together an MJT Shoreline Gold Jazzmaster at the moment.
Hope your wife is well!
-
HNB
- PAT. # 2.972.923
- Posts: 13540
- Joined: Tue May 10, 2011 7:55 am
- Location: Puyallup, Washington
- Contact:
-
HNB
- PAT. # 2.972.923
- Posts: 13540
- Joined: Tue May 10, 2011 7:55 am
- Location: Puyallup, Washington
- Contact:
Re: Surf Green MJT Jazzmaster Build
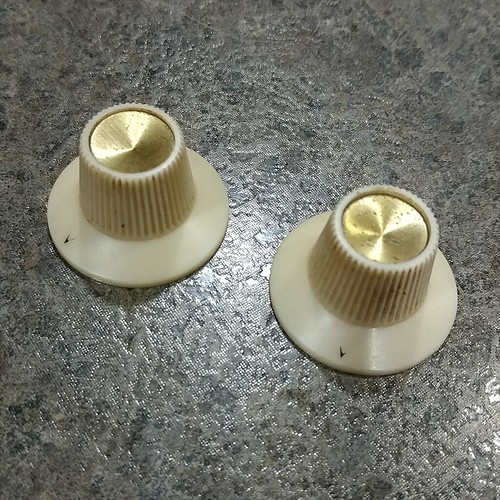
More parts came in. Got it mocked up. Looking great! I love the vintage knobs I found. I think they will work perfect.
 IMG_20180110_180509_977 by Christopher Louck, on Flickr
 IMG_20180110_182638_326 by Christopher Louck, on Flickr
IMG_20180110_180509_977 by Christopher Louck, on FlickrIMG_20180110_182638_326 by Christopher Louck, on FlickrChristopher
Lilith Guitars
Lilith Guitars
-
N0_Camping4U
- PAT. # 2.972.923
- Posts: 1682
- Joined: Thu Oct 03, 2013 1:59 pm
- Location: Houston Texas
Re: Surf Green MJT Jazzmaster Build
Can't wait to see this, dude. Looks like something I would do so I'm stoked to see her completed.
Where did you get those knobs!
Where did you get those knobs!
"I've been waiting for you, Obi-Wan. We meet again, at last. The circle is now complete. When I left you, I was but the learner, now I am the master."
-
HNB
- PAT. # 2.972.923
- Posts: 13540
- Joined: Tue May 10, 2011 7:55 am
- Location: Puyallup, Washington
- Contact:
Re: Surf Green MJT Jazzmaster Build
eBay. Just searched set screw knobs and they came up. Seller had two or three other listings also iirc.
https://www.ebay.com/itm/2-Vintage-Roga ... Swol5Y0eRU
https://www.ebay.com/itm/2-Vintage-Roga ... Swol5Y0eRU
Christopher
Lilith Guitars
Lilith Guitars
-
HNB
- PAT. # 2.972.923
- Posts: 13540
- Joined: Tue May 10, 2011 7:55 am
- Location: Puyallup, Washington
- Contact:
Re: Surf Green MJT Jazzmaster Build
Big update because some big stuff came in.
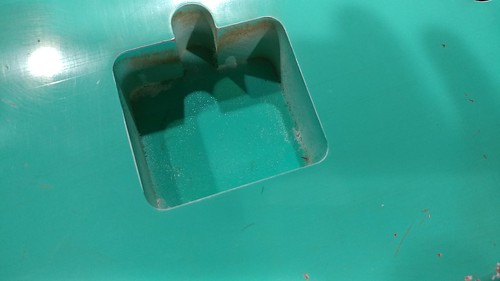
First off I finally got around to squaring the tremolo rout. If you get an aftermarket body and it isn't square in the lower corners, pick up a hand chisel and square it. It helps keep the tremolo back from getting stuck against the wood and it is pretty easy.
 20180113_094610 by Christopher Louck, on Flickr
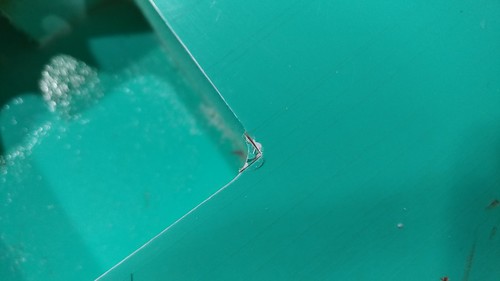
Gently press the blade of the chisel in the corners to mark the cut. Don't press too hard or you might lose a bunch of finish or it can slip and jam into the bottom of the cavity. NO HAMMER, just press.
 20180113_094630 by Christopher Louck, on Flickr
Keep slowly working your way down the corner. Don't push too hard so it won't slip and slam to the bottom.
 20180113_095042 by Christopher Louck, on Flickr
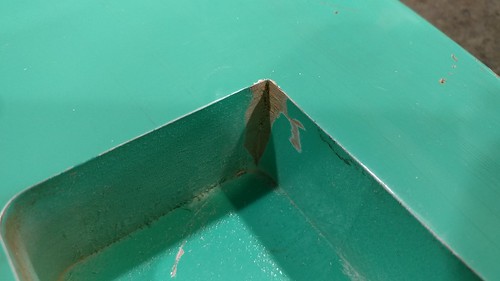
Do the same on the other side.
 20180113_095508 by Christopher Louck, on Flickr
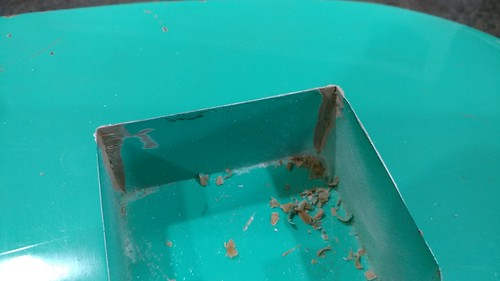
Finished.
 20180113_095517 by Christopher Louck, on Flickr
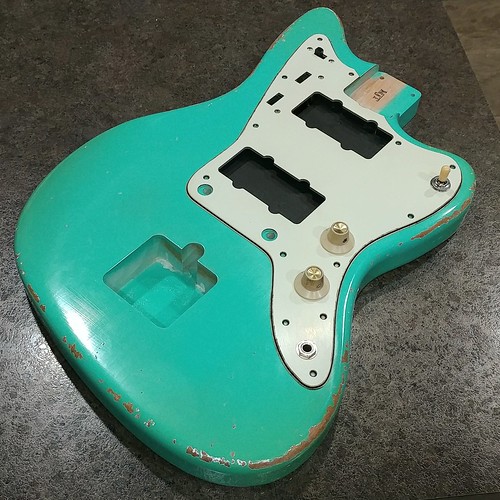
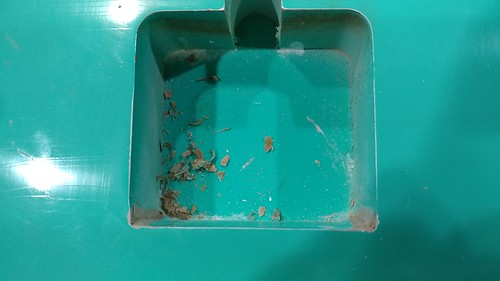
Then I installed my bridge cups. I had to drill the holes bigger. The stock MJT holes were smaller than the actual bridge posts. I used my drill press and a scrap piece of wood to find the right size hole. One was slightly too small and the next size up was slightly too big. I went with slightly too big. I added a bit of wood glue to the thimble to tighten the space. The side with the ground wire didn't need anything because the wire helped it fit in snug. Make sure to tape a mark on the drill bit so you don't drill too deep. Go slow and careful with these finishes. They like to chip and wear.
 20180113_103736 by Christopher Louck, on Flickr
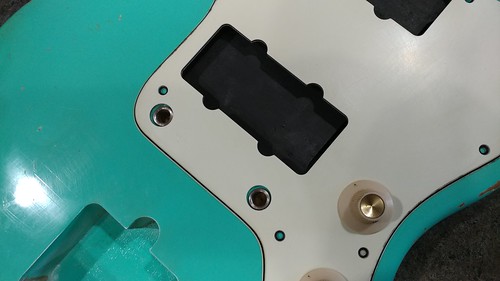
(By the way, another example of a Japanese guard fitting just fine around the bridge posts. This one is from Allparts.)
With the Mastery in.
 20180113_103728 by Christopher Louck, on Flickr
 20180113_103721 by Christopher Louck, on Flickr
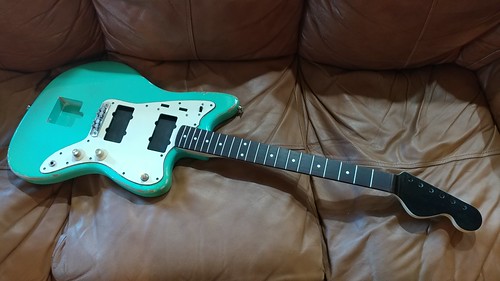
The Coronado clone neck came in. It is pretty fantastic. The fretboard is super dark. Fretwork is nice. No sharp edges. Back shape is nice and smooth. A little bit of paint reaction to the bubble wrap, but I am doing a decal so it doesn't really matter. I needed to sand the finish anyways for decal application. It fit without any pocket modifications. I can't honestly remember the last time I had a neck fit a body with no work needed. CRAZY. I think it will look pretty cool.
 20180113_111504 by Christopher Louck, on Flickr
 20180113_111509 by Christopher Louck, on Flickr
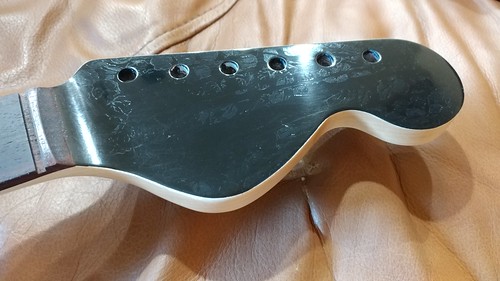 20180113_111524 by Christopher Louck, on Flickr
I sanded it with synthetic steel wool and applied my custom decal I made.
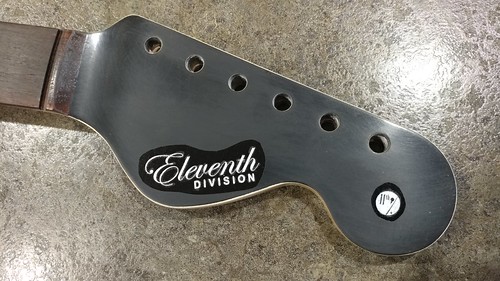 20180113_113659 by Christopher Louck, on Flickr
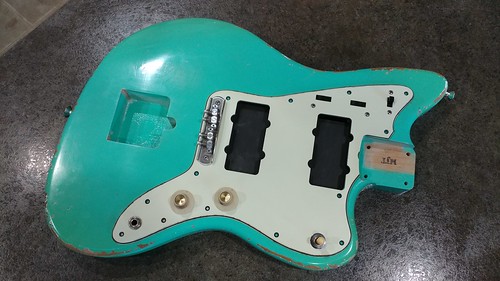
I also got a Rothstein copper shield for it. Needed a little trimming for the Allparts guard, but no biggie. Looks nice!
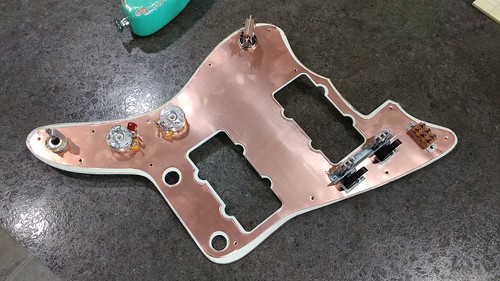 20180113_124427 by Christopher Louck, on Flickr
First off I finally got around to squaring the tremolo rout. If you get an aftermarket body and it isn't square in the lower corners, pick up a hand chisel and square it. It helps keep the tremolo back from getting stuck against the wood and it is pretty easy.
20180113_094610 by Christopher Louck, on FlickrGently press the blade of the chisel in the corners to mark the cut. Don't press too hard or you might lose a bunch of finish or it can slip and jam into the bottom of the cavity. NO HAMMER, just press.
20180113_094630 by Christopher Louck, on FlickrKeep slowly working your way down the corner. Don't push too hard so it won't slip and slam to the bottom.
20180113_095042 by Christopher Louck, on FlickrDo the same on the other side.
20180113_095508 by Christopher Louck, on FlickrFinished.
20180113_095517 by Christopher Louck, on FlickrThen I installed my bridge cups. I had to drill the holes bigger. The stock MJT holes were smaller than the actual bridge posts. I used my drill press and a scrap piece of wood to find the right size hole. One was slightly too small and the next size up was slightly too big. I went with slightly too big. I added a bit of wood glue to the thimble to tighten the space. The side with the ground wire didn't need anything because the wire helped it fit in snug. Make sure to tape a mark on the drill bit so you don't drill too deep. Go slow and careful with these finishes. They like to chip and wear.
20180113_103736 by Christopher Louck, on Flickr(By the way, another example of a Japanese guard fitting just fine around the bridge posts. This one is from Allparts.)
With the Mastery in.
20180113_103728 by Christopher Louck, on Flickr20180113_103721 by Christopher Louck, on FlickrThe Coronado clone neck came in. It is pretty fantastic. The fretboard is super dark. Fretwork is nice. No sharp edges. Back shape is nice and smooth. A little bit of paint reaction to the bubble wrap, but I am doing a decal so it doesn't really matter. I needed to sand the finish anyways for decal application. It fit without any pocket modifications. I can't honestly remember the last time I had a neck fit a body with no work needed. CRAZY. I think it will look pretty cool.
20180113_111504 by Christopher Louck, on Flickr20180113_111509 by Christopher Louck, on Flickr20180113_111524 by Christopher Louck, on FlickrI sanded it with synthetic steel wool and applied my custom decal I made.
20180113_113659 by Christopher Louck, on FlickrI also got a Rothstein copper shield for it. Needed a little trimming for the Allparts guard, but no biggie. Looks nice!
20180113_124427 by Christopher Louck, on FlickrChristopher
Lilith Guitars
Lilith Guitars
-
HNB
- PAT. # 2.972.923
- Posts: 13540
- Joined: Tue May 10, 2011 7:55 am
- Location: Puyallup, Washington
- Contact:
Re: Surf Green MJT Jazzmaster Build

Christopher
Lilith Guitars
Lilith Guitars
-
jason29307

- PAT PEND

- Posts: 3
- Joined: Sun Jan 07, 2018 8:17 pm
Re: Surf Green MJT Jazzmaster Build
Really digging the build. Looks great. Where did you get your neck from?
-
HNB
- PAT. # 2.972.923
- Posts: 13540
- Joined: Tue May 10, 2011 7:55 am
- Location: Puyallup, Washington
- Contact:
Re: Surf Green MJT Jazzmaster Build
2fLAz in France. Builder there made it custom.
Christopher
Lilith Guitars
Lilith Guitars
-
derekstudt
- PAT PEND
- Posts: 28
- Joined: Mon Jan 15, 2018 6:08 am
Re: Surf Green MJT Jazzmaster Build
This is coming along nicely! Definitely following the progress.
-
HNB
- PAT. # 2.972.923
- Posts: 13540
- Joined: Tue May 10, 2011 7:55 am
- Location: Puyallup, Washington
- Contact:
Re: Surf Green MJT Jazzmaster Build
Thanks!
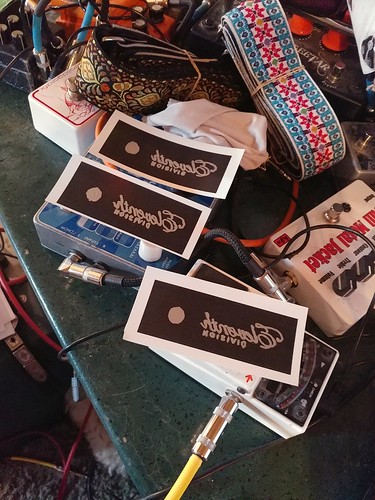
I did some wiring today. I got everything (aside from the pickups 'cause they aren't here yet) done. I have it set up so that the upper rhythm circuit uses both pickups. (So I can get a bassy neck or bridge sound if I like.)
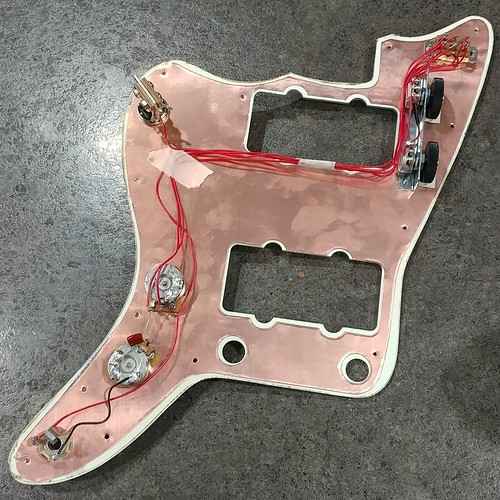 2018-01-20_02-00-40 by Christopher Louck, on Flickr
I did some wiring today. I got everything (aside from the pickups 'cause they aren't here yet) done.
2018-01-20_02-00-40 by Christopher Louck, on FlickrChristopher
Lilith Guitars
Lilith Guitars
-
countertext

- PAT. # 2.972.923
- Posts: 4148
- Joined: Wed Sep 28, 2011 6:25 pm
- Location: Tacoma
Re: Surf Green MJT Jazzmaster Build
Hey, man, tell yr lady I’m sending positive vibes from Tacoma.
-
HNB
- PAT. # 2.972.923
- Posts: 13540
- Joined: Tue May 10, 2011 7:55 am
- Location: Puyallup, Washington
- Contact: