
I had issues with my jazzmaster not quite lining up when I built it, and the bass Vi bridge fits into the normal jazzmaster ferrules and has the same string spacing.
Hopefully it all works fine and you don't need it.


Thanks. I did that and it worked perfectly.


Just realized how silly this comment was, you need a 12 string bridge. Whoops.Insomnicide wrote: ↑Mon Oct 16, 2017 3:59 pmIf you have intonation issues from slight variations in scale length, you might be able to alleviate them with a Staytrem bass VI bridge.
I had issues with my jazzmaster not quite lining up when I built it, and the bass Vi bridge fits into the normal jazzmaster ferrules and has the same string spacing.
Hopefully it all works fine and you don't need it.
Eh, I considered just replacing the saddles if needed. It would work.Insomnicide wrote: ↑Sun Nov 05, 2017 6:21 pmJust realized how silly this comment was, you need a 12 string bridge. Whoops.
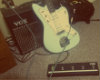
Looking good! Hopefully you can find the rest of the parts soon without issue.
Exactly, I always thought about turning my CP jazzmaster into a 12 string. Its really the only situation with a JM were you want that short break angle.s_mcsleazy wrote: ↑Tue Nov 07, 2017 5:06 amif you are running enough tension on the guitar, that bridge should work.
I considered starting with a CP because it is easy to find 12 string TOM bridges, or just file one down yourself. But I want to make it work with the classic bridge, if possible. If not, I'll try something else.bacca51 wrote: ↑Tue Nov 07, 2017 10:31 amExactly, I always thought about turning my CP jazzmaster into a 12 string. Its really the only situation with a JM were you want that short break angle.s_mcsleazy wrote: ↑Tue Nov 07, 2017 5:06 amif you are running enough tension on the guitar, that bridge should work.
Forsure, the standard jm bridge and tremolo placement will work, you may just need to shim the neck to get enough tension and the high octaves might not intonate perfectly... but thats the fun of the twelve string, modulation!sirspens wrote: ↑Tue Nov 07, 2017 4:58 pmI considered starting with a CP because it is easy to find 12 string TOM bridges, or just file one down yourself. But I want to make it work with the classic bridge, if possible. If not, I'll try something else.bacca51 wrote: ↑Tue Nov 07, 2017 10:31 amExactly, I always thought about turning my CP jazzmaster into a 12 string. Its really the only situation with a JM were you want that short break angle.s_mcsleazy wrote: ↑Tue Nov 07, 2017 5:06 amif you are running enough tension on the guitar, that bridge should work.
Exactly.bacca51 wrote: ↑Tue Nov 07, 2017 6:06 pmForsure, the standard jm bridge and tremolo placement will work, you may just need to shim the neck to get enough tension and the high octaves might not intonate perfectly... but thats the fun of the twelve string, modulation!


