I haven't weighed it yet, but it's much lighter than I was expecting from plywood.
ThePearDream's Talman Projects
-
ThePearDream

- PAT. # 2.972.923

- Posts: 2082
- Joined: Sun Jun 25, 2017 6:18 am
- Location: Detroit
- Contact:
Re: ThePearDream's Talman Projects
Doug
@dpcannafax
@dpcannafax
-
Rgand
- PAT. # 2.972.923
- Posts: 1171
- Joined: Sun Mar 05, 2017 3:55 pm
Re: ThePearDream's Talman Projects
I'd be curious if you do weigh it.ThePearDream wrote: ↑Sun Aug 26, 2018 5:54 pmI haven't weighed it yet, but it's much lighter than I was expecting from plywood.
-
Shadoweclipse13

- PAT. # 2.972.923
- Posts: 12446
- Joined: Fri Feb 07, 2014 9:22 pm
- Location: Stuck in the dimension of imagination
Re: ThePearDream's Talman Projects
LOVE the guard material. Reminds me of the acrylic sheets we use in industrial applications, for conveyor edges. It's a milky white-colored, super dense plastic. GREAT stuff. I knew a guy who took home the garbage scraps of that stuff to use as templates for homemade bows (like for archery).
Pickup Switching Mad Scientist
http://www.offsetguitars.com/forums/viewtopic.php?f=8&t=104282&p=1438384#p1438384
http://www.offsetguitars.com/forums/viewtopic.php?f=8&t=104282&p=1438384#p1438384
-
Rgand
- PAT. # 2.972.923
- Posts: 1171
- Joined: Sun Mar 05, 2017 3:55 pm
Re: ThePearDream's Talman Projects
UHMW. Yes, amazing stuff. I went through a lot of it building custom food processing machinery. Outlasts a lot of other materials, especially in wet conditions. That would make a killer pickguard. I may have to look into that. Thanks for the idea.Shadoweclipse13 wrote: ↑Mon Aug 27, 2018 2:05 amLOVE the guard material. Reminds me of the acrylic sheets we use in industrial applications, for conveyor edges. It's a milky white-colored, super dense plastic. GREAT stuff. I knew a guy who took home the garbage scraps of that stuff to use as templates for homemade bows (like for archery).
-
Shadoweclipse13
- PAT. # 2.972.923
- Posts: 12446
- Joined: Fri Feb 07, 2014 9:22 pm
- Location: Stuck in the dimension of imagination
Re: ThePearDream's Talman Projects
UHMW. I couldn't think of it. Thanks! And yeah, I think the color would be the perfect white for someone who doesn't dig sterile medical white. It's got just a hint of off-white-ness...
Pickup Switching Mad Scientist
http://www.offsetguitars.com/forums/viewtopic.php?f=8&t=104282&p=1438384#p1438384
http://www.offsetguitars.com/forums/viewtopic.php?f=8&t=104282&p=1438384#p1438384
-
DeathJag

- PAT. # 2.972.923
- Posts: 2297
- Joined: Wed Aug 08, 2018 11:44 am
Re: ThePearDream's Talman Projects
It almost looks like delrin.
-
Rgand
- PAT. # 2.972.923
- Posts: 1171
- Joined: Sun Mar 05, 2017 3:55 pm
Re: ThePearDream's Talman Projects
It would be great for times when you want something between white and pearl.Shadoweclipse13 wrote: ↑Mon Aug 27, 2018 9:17 amUHMW. I couldn't think of it. Thanks! And yeah, I think the color would be the perfect white for someone who doesn't dig sterile medical white. It's got just a hint of off-white-ness...
-
milkypostman

- PAT PEND

- Posts: 38
- Joined: Sat Oct 23, 2010 9:05 pm
- Location: Madison, WI
Re: ThePearDream's Talman Projects
so when you replace bridges and such i'm always curious how you place the bridge,
do you print a template on paper?
do you use a straight edge to get it lined up with the neck properly?
do you just measure the distance from the neck pocket to the bridge?
i'd like to customize some guitars but am intimidated by the prospect of "free handing" these things without a lasercut template. although i'd like to gain some knowledge about how forgiving some of these things are. I would guess that a neck has some freedom for alignment and such.
-
ThePearDream
- PAT. # 2.972.923
- Posts: 2082
- Joined: Sun Jun 25, 2017 6:18 am
- Location: Detroit
- Contact:
Re: ThePearDream's Talman Projects
Well, in this most recent project, I drew up the plans myself in AutoCAD and had them lasercut. So I can be reasonably sure that my placement is correct.milkypostman wrote: ↑Wed Aug 29, 2018 11:07 amso when you replace bridges and such i'm always curious how you place the bridge,
do you print a template on paper?
do you use a straight edge to get it lined up with the neck properly?
do you just measure the distance from the neck pocket to the bridge?
i'd like to customize some guitars but am intimidated by the prospect of "free handing" these things without a lasercut template. although i'd like to gain some knowledge about how forgiving some of these things are. I would guess that a neck has some freedom for alignment and such.
Now, in the project a few pages back, where I put a mustang trem on the hardtail Talman, I did the following:
Mask off the top of your body. Place a good straight edge along the side of the neck and mark on the body where the line extending from the neck is. Repeat on the other side of the neck. You now have two non-parallel lines. Take measurements at three points of these lines, marking the center point between the lines. Even if you aren't measuring perfectly square to the center line, the center points will still fall along the center line. Connect your three points and you should have an accurate center line. Measure out you scale length and mark a line perpendicular to the center line. From there, what you do will depend on what type of bridge you are using. Again, this is what I've done in the past, though I'm sure there are other methods.
Doug
@dpcannafax
@dpcannafax
-
blimpage

- PAT. # 2.972.923
- Posts: 312
- Joined: Tue Jul 11, 2017 3:43 am
- Location: Melbourne, Australia
Re: ThePearDream's Talman Projects
Dang, this is looking gooooood.

-
ThePearDream
- PAT. # 2.972.923
- Posts: 2082
- Joined: Sun Jun 25, 2017 6:18 am
- Location: Detroit
- Contact:
Re: ThePearDream's Talman Projects
Thank you blimpage.
The laser cutting service I use (Ponoko) has a ton of plastic options that get the creative juices flowing, including Delrin. They aren't making these materials themselves, they can be sourced from other places and made into pickguards in the more standard method.
Tell me these wouldn't look awesome as pickguards:


The translucent materials could be back painted like glass tiles or left alone and used as cavity covers.
Anyway, I've spent a few minutes during this week applying epoxy. I want the top and side surfaces to be as smooth as possible before I route the binding channel so I don't transfer any dips or voids to the channel. The epoxy will double as a sealer for finishing as well.


Since my pickups had come from a Sigler pre-wired guard, some of the leads were rather short. Instead of just extending the leads, I decided to splice them into a length of shielded four conductor wire. This should make the soldering process less confusing, since I don't have to try and translate single coil wire colors into a humbucker scheme on the fly. I was able to take my time and ensure I had the correct wires selected as coil starts and ends and connect them to the appropriate color (I used Seymour Duncan's scheme). The wiring will be a lot neater as well, since I won't have 8 leads to wrangle.

Lastly, I had been planning to have the jack mounted through the side, but have decided I didn't want to try drilling through the side of plywood. So I will just mount it to the plate. I also decided to scrap the bass tone knob, and just use a mini toggle as a strangle switch. This will free up a position for the jack. I still have some steel sheet, so I may redesign the control layout and make a new plate, or maybe I'll just use the one I've already made.
The laser cutting service I use (Ponoko) has a ton of plastic options that get the creative juices flowing, including Delrin. They aren't making these materials themselves, they can be sourced from other places and made into pickguards in the more standard method.
Tell me these wouldn't look awesome as pickguards:
The translucent materials could be back painted like glass tiles or left alone and used as cavity covers.
Anyway, I've spent a few minutes during this week applying epoxy. I want the top and side surfaces to be as smooth as possible before I route the binding channel so I don't transfer any dips or voids to the channel. The epoxy will double as a sealer for finishing as well.
Since my pickups had come from a Sigler pre-wired guard, some of the leads were rather short. Instead of just extending the leads, I decided to splice them into a length of shielded four conductor wire. This should make the soldering process less confusing, since I don't have to try and translate single coil wire colors into a humbucker scheme on the fly. I was able to take my time and ensure I had the correct wires selected as coil starts and ends and connect them to the appropriate color (I used Seymour Duncan's scheme). The wiring will be a lot neater as well, since I won't have 8 leads to wrangle.
Lastly, I had been planning to have the jack mounted through the side, but have decided I didn't want to try drilling through the side of plywood. So I will just mount it to the plate. I also decided to scrap the bass tone knob, and just use a mini toggle as a strangle switch. This will free up a position for the jack. I still have some steel sheet, so I may redesign the control layout and make a new plate, or maybe I'll just use the one I've already made.
Doug
@dpcannafax
@dpcannafax
-
ThePearDream
- PAT. # 2.972.923
- Posts: 2082
- Joined: Sun Jun 25, 2017 6:18 am
- Location: Detroit
- Contact:
Re: ThePearDream's Talman Projects
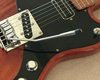
I got the binding on. I was sure that when I pulled the tape off, the binding was going to come flying off, but it held.

Then I scraped the binding down flush and then routed the neck pocket. There are a few very minor goofs to fix up. But, considering that this was my first attempt at binding, I'm pretty happy with the results.


The neck pocket is just a hair too tight, so I have to do a little sanding there. Next is squaring up the trem route, fixing the few minor flubs, final sanding, then finishing, and if I feel like it, cleaning up my workshop. Speaking of the finish, I have some of the Krylon Fierce Fuschia Glitter Blast on it's way, along with the Krylon clear coat. I'll put some wipe on water based poly on the back/sides and do a satin finish there, with the top glossy. I also need to pick a name for this and order a decal.
Then I scraped the binding down flush and then routed the neck pocket. There are a few very minor goofs to fix up. But, considering that this was my first attempt at binding, I'm pretty happy with the results.
The neck pocket is just a hair too tight, so I have to do a little sanding there. Next is squaring up the trem route, fixing the few minor flubs, final sanding, then finishing, and if I feel like it, cleaning up my workshop. Speaking of the finish, I have some of the Krylon Fierce Fuschia Glitter Blast on it's way, along with the Krylon clear coat. I'll put some wipe on water based poly on the back/sides and do a satin finish there, with the top glossy. I also need to pick a name for this and order a decal.
Doug
@dpcannafax
@dpcannafax
-
milkypostman
- PAT PEND
- Posts: 38
- Joined: Sat Oct 23, 2010 9:05 pm
- Location: Madison, WI
Re: ThePearDream's Talman Projects
What do you mean by squaring up the term route?
-
ThePearDream
- PAT. # 2.972.923
- Posts: 2082
- Joined: Sun Jun 25, 2017 6:18 am
- Location: Detroit
- Contact:
Re: ThePearDream's Talman Projects
The rounded corners at the tail end of the trem route need to be made square with a chisel. If I don't do that the trem may bind at those locations.
Doug
@dpcannafax
@dpcannafax
-
ThePearDream
- PAT. # 2.972.923
- Posts: 2082
- Joined: Sun Jun 25, 2017 6:18 am
- Location: Detroit
- Contact:
Re: ThePearDream's Talman Projects
Not a huge update, but the body is ready to be finished. Every spot that needed filling is filled with epoxy, every bit of shaping is done, and everything is sanded to 220.


The finish will be here this week. I will do some testing before I start, to see if this Krylon product is compatible with regular Krylon paint (I want to lay a few coats of black underneath the flake) and/or lacquer (easier to get than the Krylon glitter clear coat). So, depending on test results and the weather, finishing will happen in the next few weeks.
The finish will be here this week. I will do some testing before I start, to see if this Krylon product is compatible with regular Krylon paint (I want to lay a few coats of black underneath the flake) and/or lacquer (easier to get than the Krylon glitter clear coat). So, depending on test results and the weather, finishing will happen in the next few weeks.
Doug
@dpcannafax
@dpcannafax