New Custom Scratch Build - The Narwhal (Lots of Pics!)
-
Deed_Poll

- PAT. # 2.972.923

- Posts: 3209
- Joined: Sun Dec 23, 2012 9:24 am
- Location: Brighton, UK
Re: New Custom Scratch Build - The Narwhal (Lots of Pics!)
The flame on that walnut is gorgeous!
Owner Operator of GuitarForm - Custom Offset Guitar Bodies
www.guitarform.com ◈ @guitar_form
www.guitarform.com ◈ @guitar_form
-
overpwredbyfunk

- PAT PEND

- Posts: 27
- Joined: Sat Oct 26, 2013 4:26 pm
Re: New Custom Scratch Build - The Narwhal (Lots of Pics!)
okay! back for another image and progress dump!
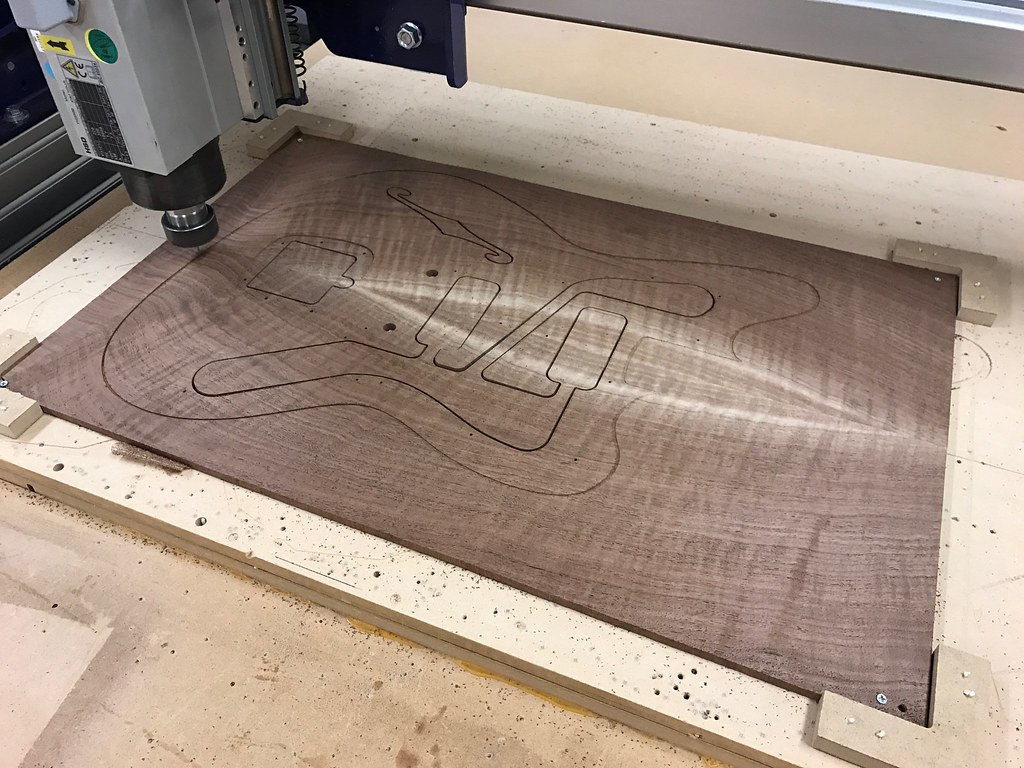
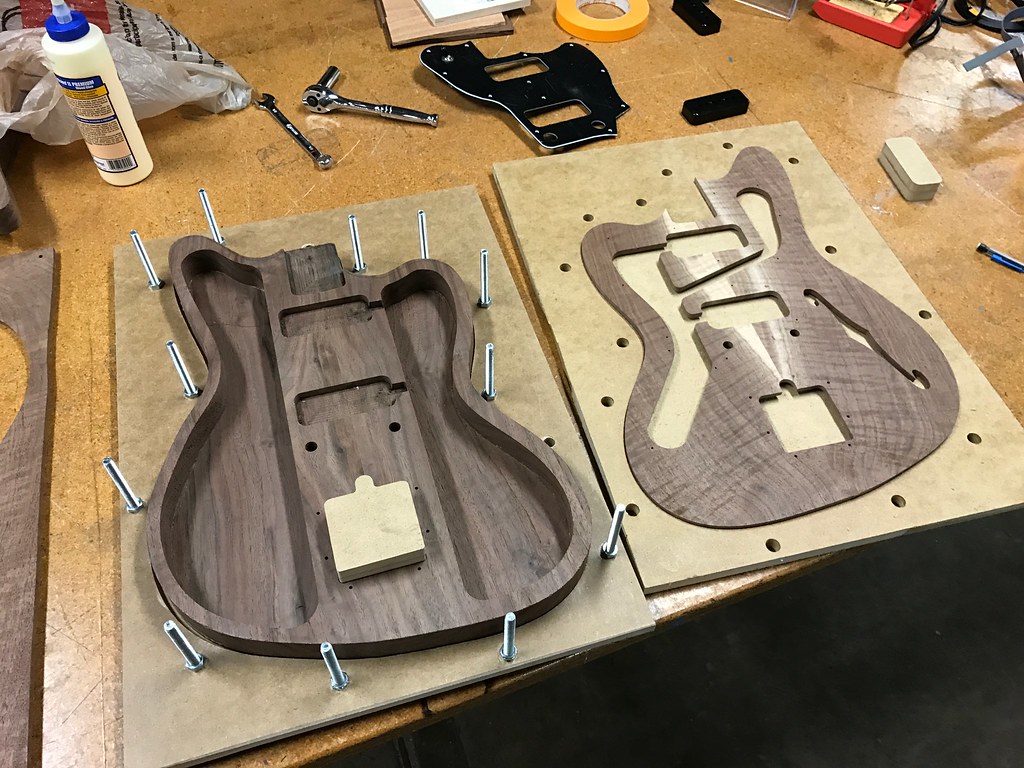
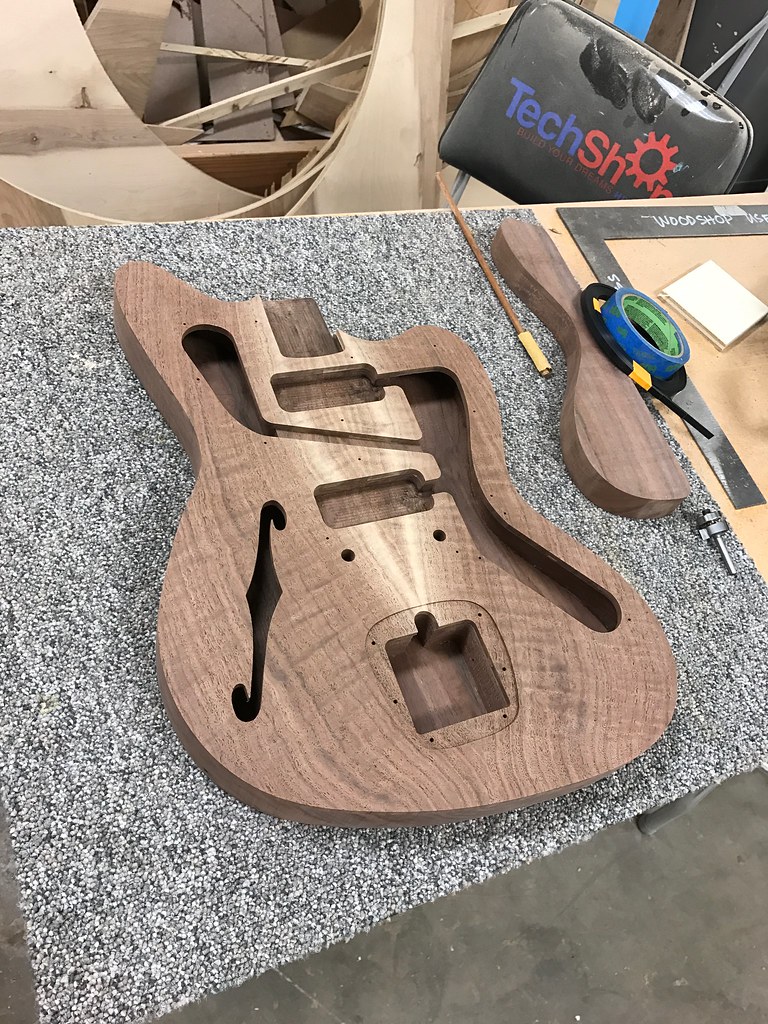
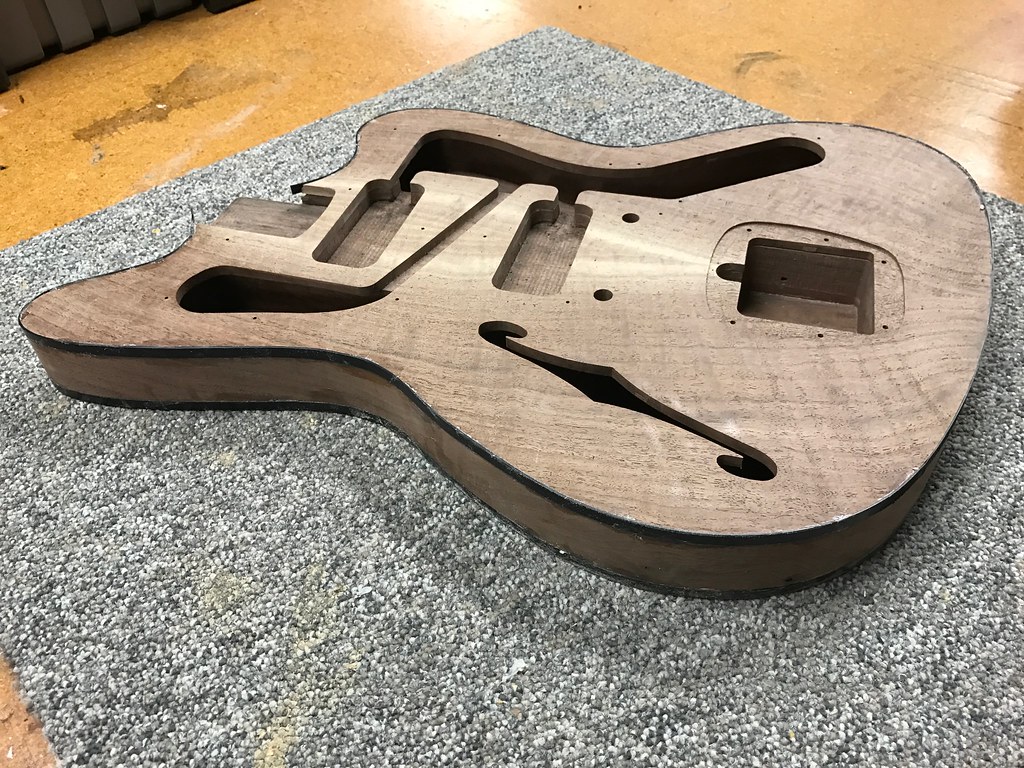
after joining my book matched piece of walnut, it was off to the CNC
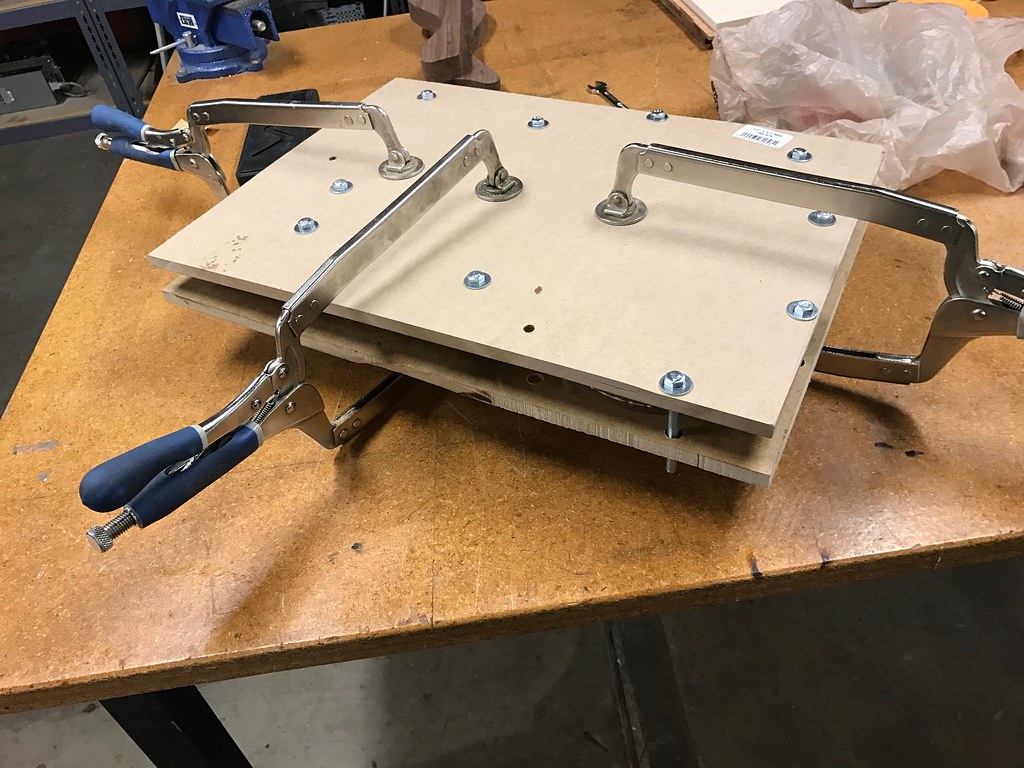
and from there, into the gluing jig
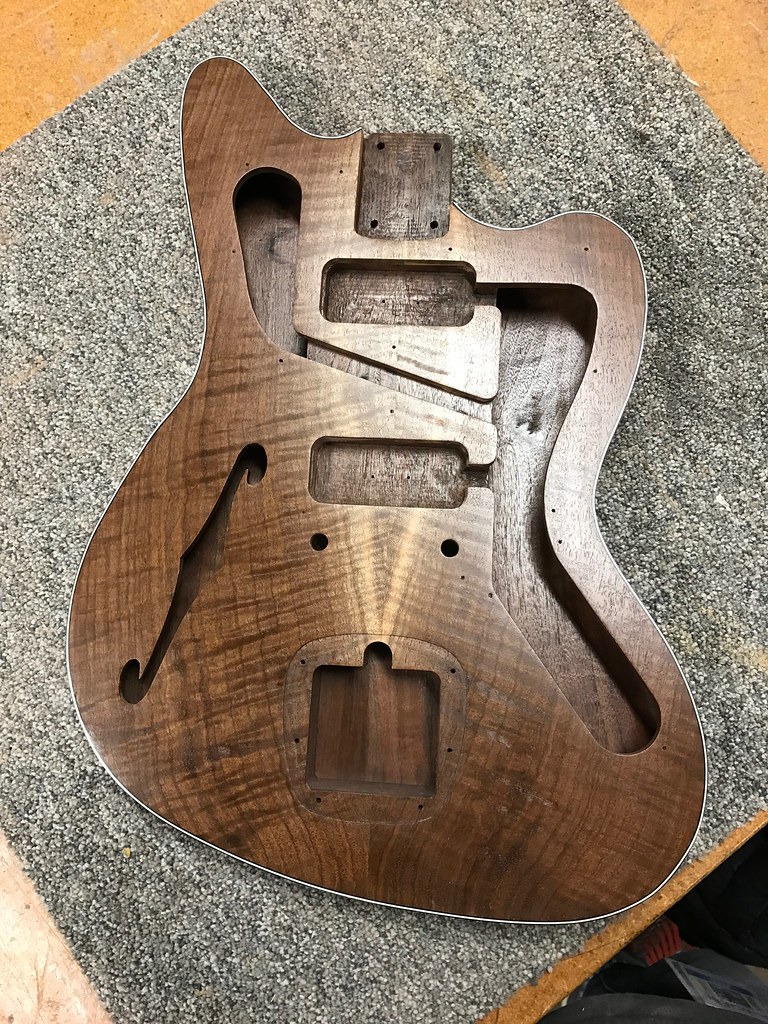
and here it is all dry fit after coming out of the glue jig--looking sweet!
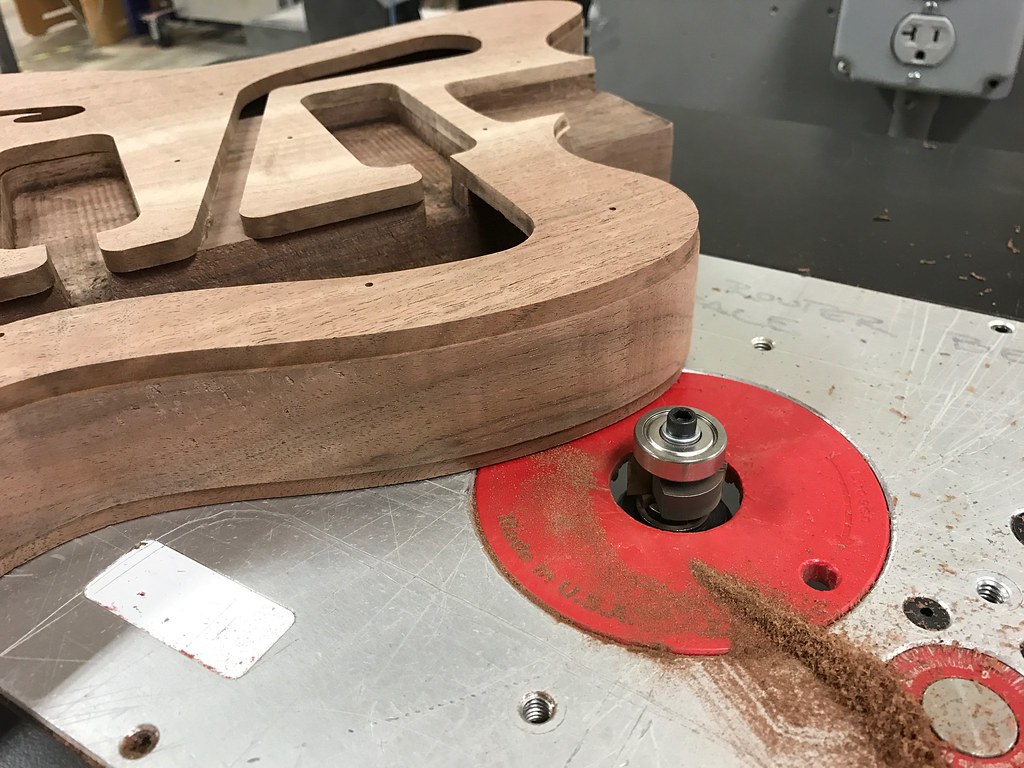
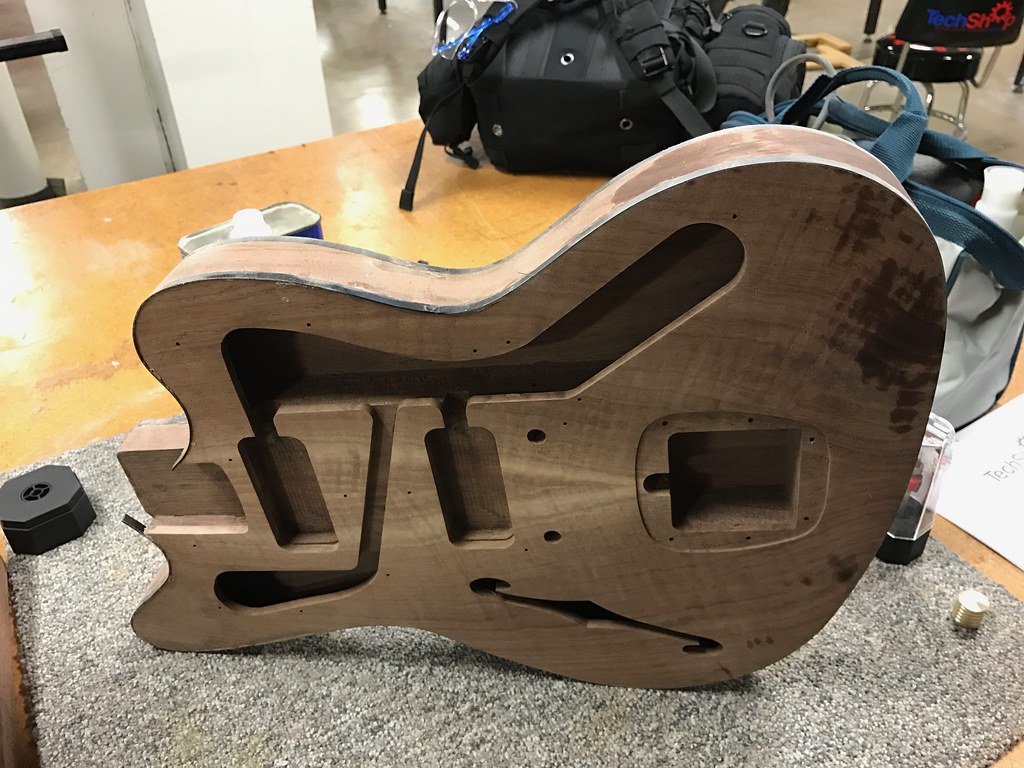
from there it was off to some sanding
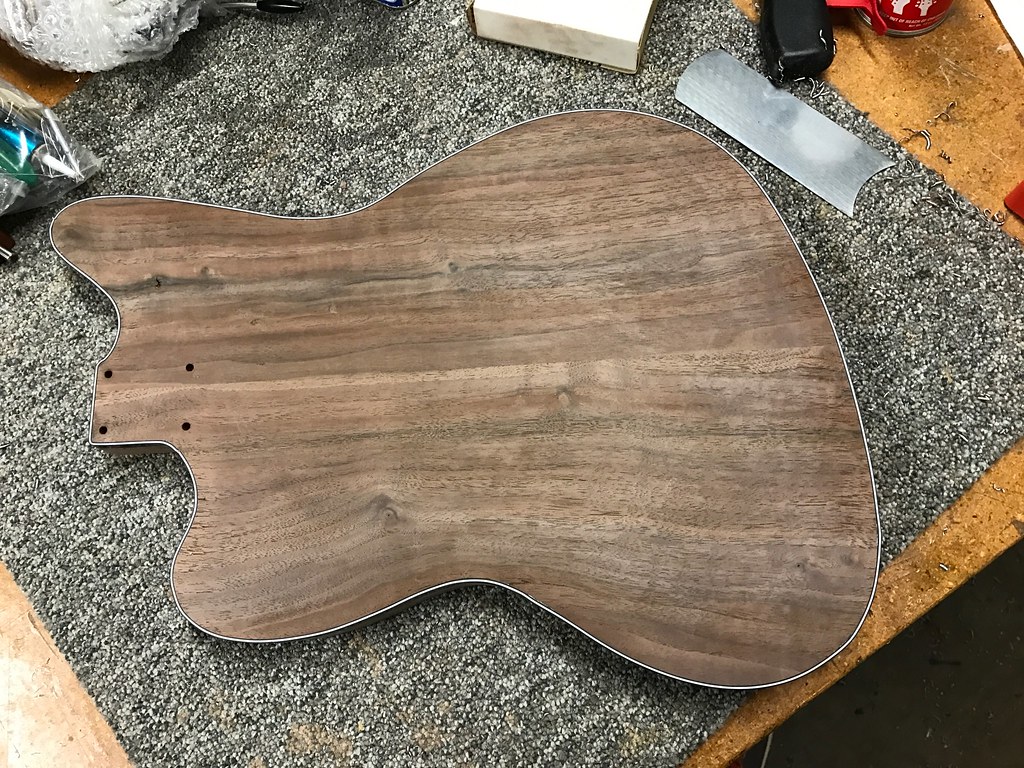
and then on to the table router to cut some binding channels to hide the layering of wood. I thought long and hard about how to do this--either with binding or with a round over but finally settled on the binding because i've never done it and wanted the challenge.
from there, it was time to get binding. lots of binding tape, a heat gun, and stewmac binding glue. just took my time working around the guitar.
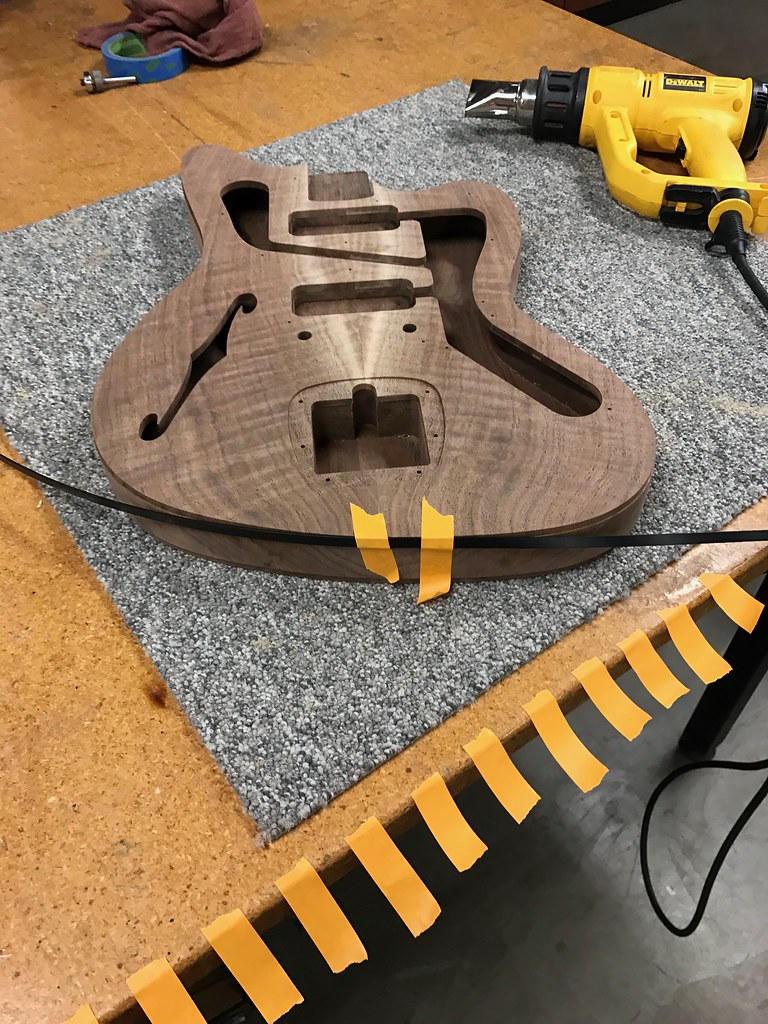
and the top done
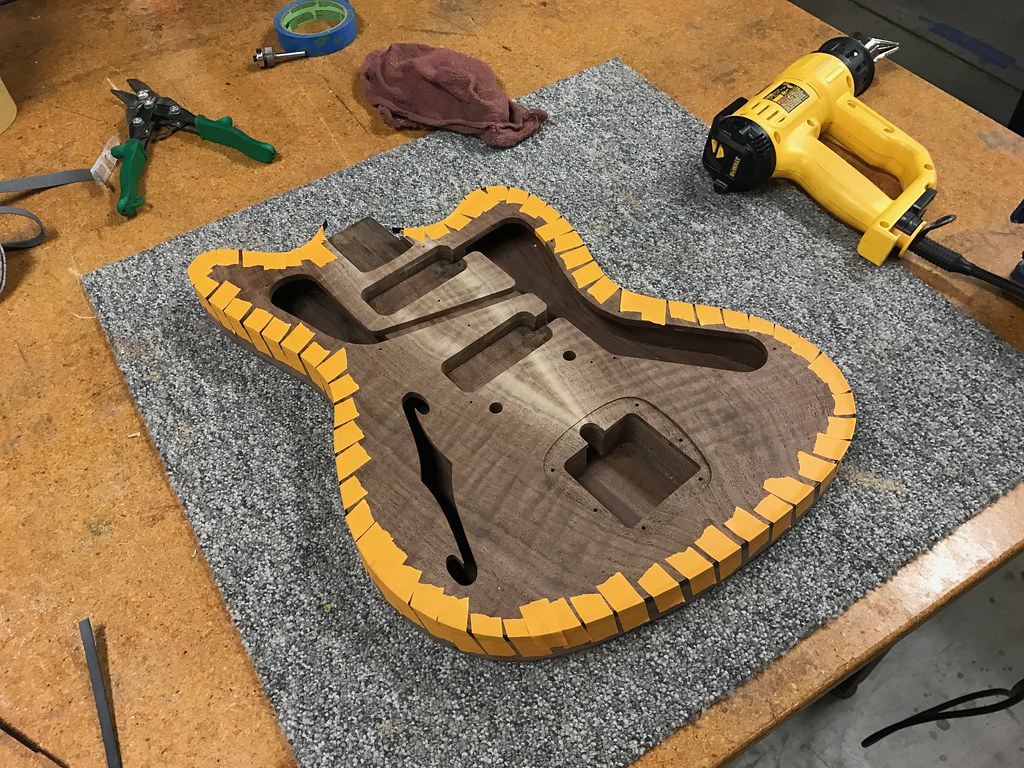
and the bottom done

twelve hours from now we'll see how it looks! i left the binding just a bit proud so i can sand flush. with any luck, tomorrow i'll be able to get to that and add a coat of sanding sealer before grain filling.
have to travel a bit for work tuesday to saturday, so there won't be any progress for a few days
after joining my book matched piece of walnut, it was off to the CNC
and from there, into the gluing jig
and here it is all dry fit after coming out of the glue jig--looking sweet!
from there it was off to some sanding
and then on to the table router to cut some binding channels to hide the layering of wood. I thought long and hard about how to do this--either with binding or with a round over but finally settled on the binding because i've never done it and wanted the challenge.
from there, it was time to get binding. lots of binding tape, a heat gun, and stewmac binding glue. just took my time working around the guitar.
and the top done
and the bottom done
twelve hours from now we'll see how it looks! i left the binding just a bit proud so i can sand flush. with any luck, tomorrow i'll be able to get to that and add a coat of sanding sealer before grain filling.
have to travel a bit for work tuesday to saturday, so there won't be any progress for a few days
-
UC3

- PAT. # 2.972.923
- Posts: 149
- Joined: Sun Jun 21, 2009 7:18 am
- Location: SoCal
Re: New Custom Scratch Build - The Narwhal (Lots of Pics!)
Funk,
Very Awesome! This is fun to watch. Beautiful work, and well thought out.
One of these days...
Meanwhile back at the ranch, I just returned from our local Maker Place after spending an entire day doing it "old-school" with 1/2" MDF and a plunge router.
In the days of the CNC, I was a monkey.
Good luck and keep posting images. It's what I appreciate the most about all those that contribute here at OSG.
-
overpwredbyfunk
- PAT PEND
- Posts: 27
- Joined: Sat Oct 26, 2013 4:26 pm
Re: New Custom Scratch Build - The Narwhal (Lots of Pics!)
unwrapped the binding tape today . . .
to tell you the truth i don't love it. for one, it's so thin on the front and back sides that it's barely noticeable. why go through all the trouble of doing binding if you only notice it from the side?
also, there were some craftsmanship issues. i guess i had some wobbly routes both in depth and height and by the time i sanded it smooth it looked a little poor. the binding with was 0.40, so there wasn't a lot of room for error and sanded through in a few spots. i thought about saying "screw it, i'll just do a round over" but it would have taken a pretty severe radius to clean up the "shelf". no big deal--changing gears.

wen't with a thicker 0.90" BWB binding. with a little more thickness it gave the router bit something more to bite into. i rerouted and did a few things differently
1. made sure the guitar was as flat against the router table as possible, and applied downward pressure. paid extra attention to the times when doing a 'climb' cut forced me to have a lot of the body off the table and not as much wood available to press down and flat against the table.
2. i didn't route as shallow in the depth and tried to get just a hair higher than the face of the guitar front and back--to make for light sanding work.
3. i test fit a piece of binding all the way around to make sure it's flush with the side faces when inserted. with layered binding there's not a lot of forgiveness if i need to sand the sides smooth.
4. this is the most important one--i pre bend the binding with a heat gun. this helped immensely. i planned on making a jig on the CNC to do this, but couldn't find a suitable piece of scrap around the shop, so i just used the guitar itself for the pre bend.
i think i nailed it this time. i'll know in a week when i'm back in town.
to tell you the truth i don't love it. for one, it's so thin on the front and back sides that it's barely noticeable. why go through all the trouble of doing binding if you only notice it from the side?
also, there were some craftsmanship issues. i guess i had some wobbly routes both in depth and height and by the time i sanded it smooth it looked a little poor. the binding with was 0.40, so there wasn't a lot of room for error and sanded through in a few spots. i thought about saying "screw it, i'll just do a round over" but it would have taken a pretty severe radius to clean up the "shelf". no big deal--changing gears.
wen't with a thicker 0.90" BWB binding. with a little more thickness it gave the router bit something more to bite into. i rerouted and did a few things differently
1. made sure the guitar was as flat against the router table as possible, and applied downward pressure. paid extra attention to the times when doing a 'climb' cut forced me to have a lot of the body off the table and not as much wood available to press down and flat against the table.
2. i didn't route as shallow in the depth and tried to get just a hair higher than the face of the guitar front and back--to make for light sanding work.
3. i test fit a piece of binding all the way around to make sure it's flush with the side faces when inserted. with layered binding there's not a lot of forgiveness if i need to sand the sides smooth.
4. this is the most important one--i pre bend the binding with a heat gun. this helped immensely. i planned on making a jig on the CNC to do this, but couldn't find a suitable piece of scrap around the shop, so i just used the guitar itself for the pre bend.
i think i nailed it this time. i'll know in a week when i'm back in town.
-
beauzooka

- PAT. # 2.972.923
- Posts: 789
- Joined: Thu May 23, 2013 2:02 pm
- Location: Seattle
- Contact:
-
overpwredbyfunk
- PAT PEND
- Posts: 27
- Joined: Sat Oct 26, 2013 4:26 pm
Re: New Custom Scratch Build - The Narwhal (Lots of Pics!)
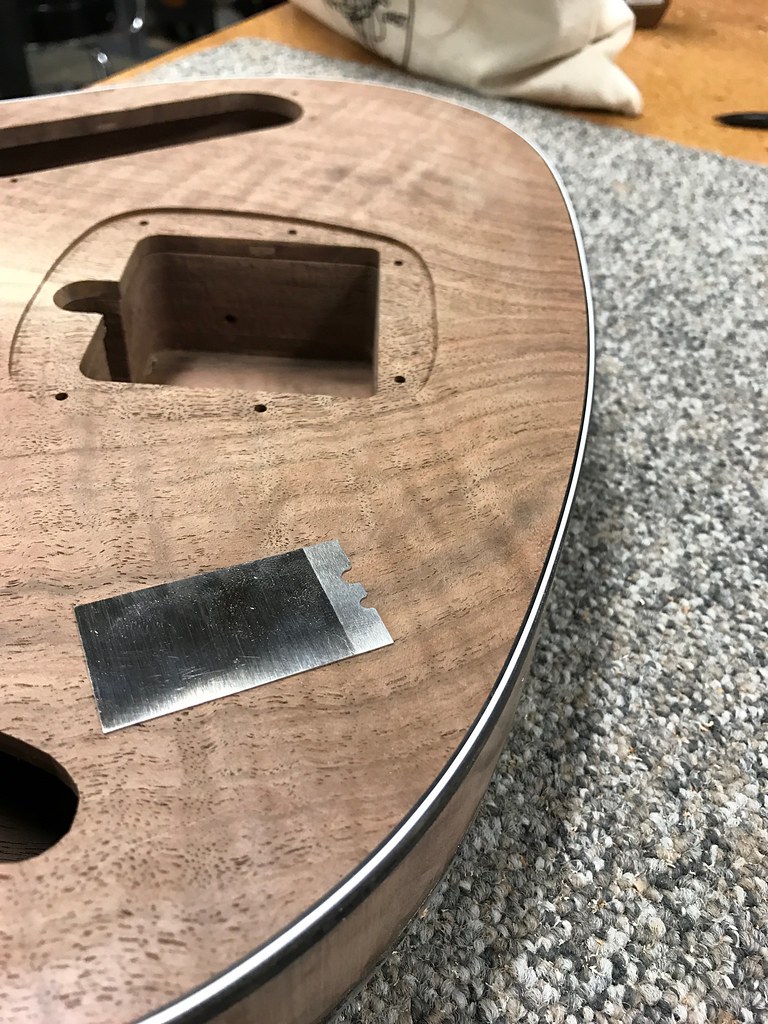
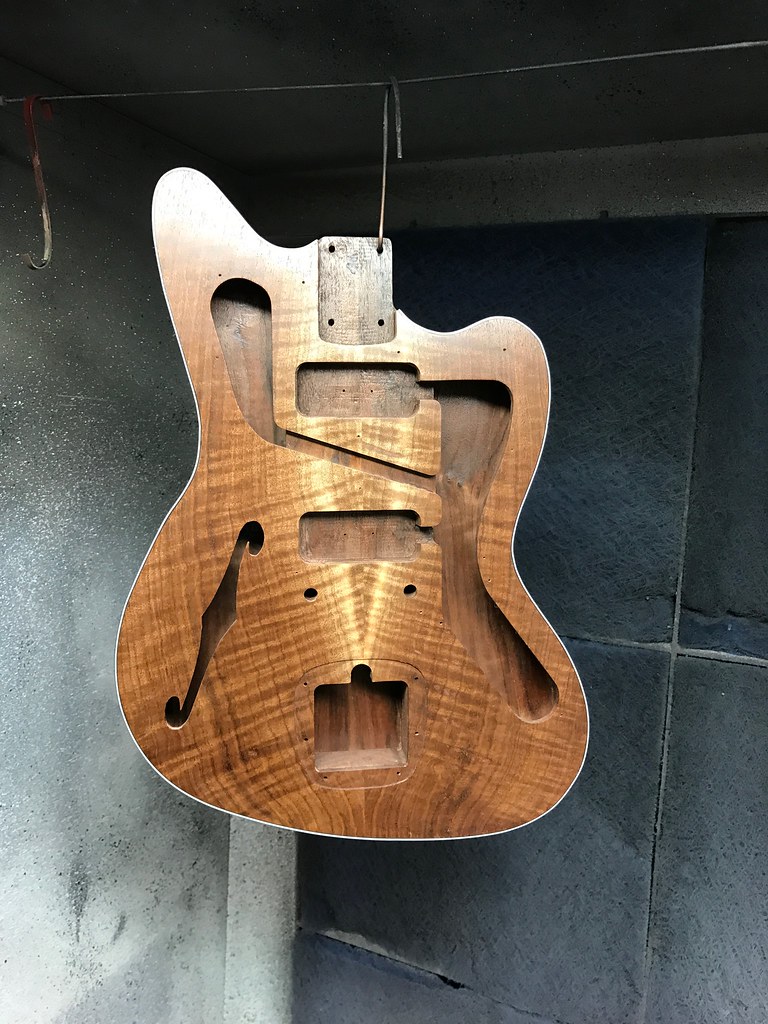
got to the shop tonight and started scraping the binding down and it worked beautifully. there's still a lot of ugly spots and i'm not sure it will come out this beautiful everywhere, but i'm cautiously optimistic
still lots of scraping to go when i have time
still lots of scraping to go when i have time
-
volhoo

- PAT. # 2.972.923
- Posts: 131
- Joined: Thu Nov 17, 2016 12:53 pm
- Location: SoCal
-
jthomas

- PAT. # 2.972.923
- Posts: 1220
- Joined: Sat Feb 16, 2013 12:44 pm
- Location: Downeast Maine
Re: New Custom Scratch Build - The Narwhal (Lots of Pics!)
I know or suspect that this is my thing and not yours, but... how cool would it be to have a clear pickguard to show all the lines of the wiring cavity and show all of the beautiful pattern in the wood. The wiring would need to be very clean and cool looking....
Bottom line... really wonderful craftsmanship. Keep the guitar porn coming.
Bottom line... really wonderful craftsmanship. Keep the guitar porn coming.
-
overpwredbyfunk
- PAT PEND
- Posts: 27
- Joined: Sat Oct 26, 2013 4:26 pm
Re: New Custom Scratch Build - The Narwhal (Lots of Pics!)
back in town and back in the shop! so, got all the binding scraped--and a scraper ended up being the weapon for the job.
admittedly, it didn't come out 'perfect'. i had to acetone a few spots and squeeze them down a bit
and there were a few minor scrape through spots that i'll have to touch up with black paint (not photographed), but overall i'm quite happy with my first binding job.
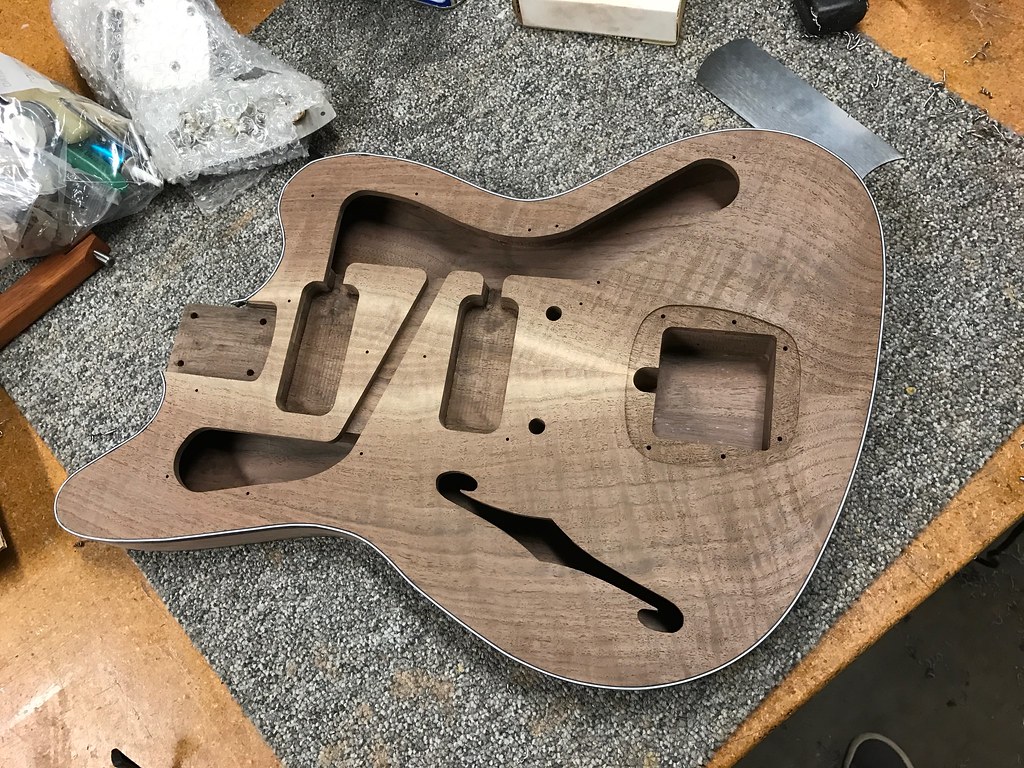
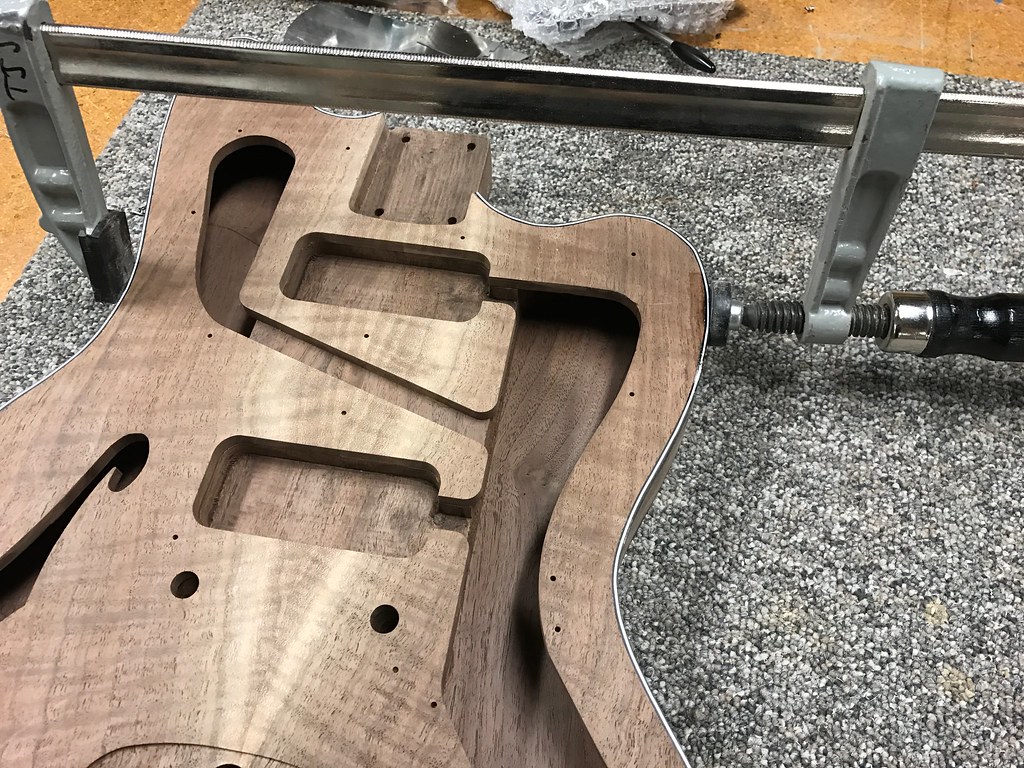
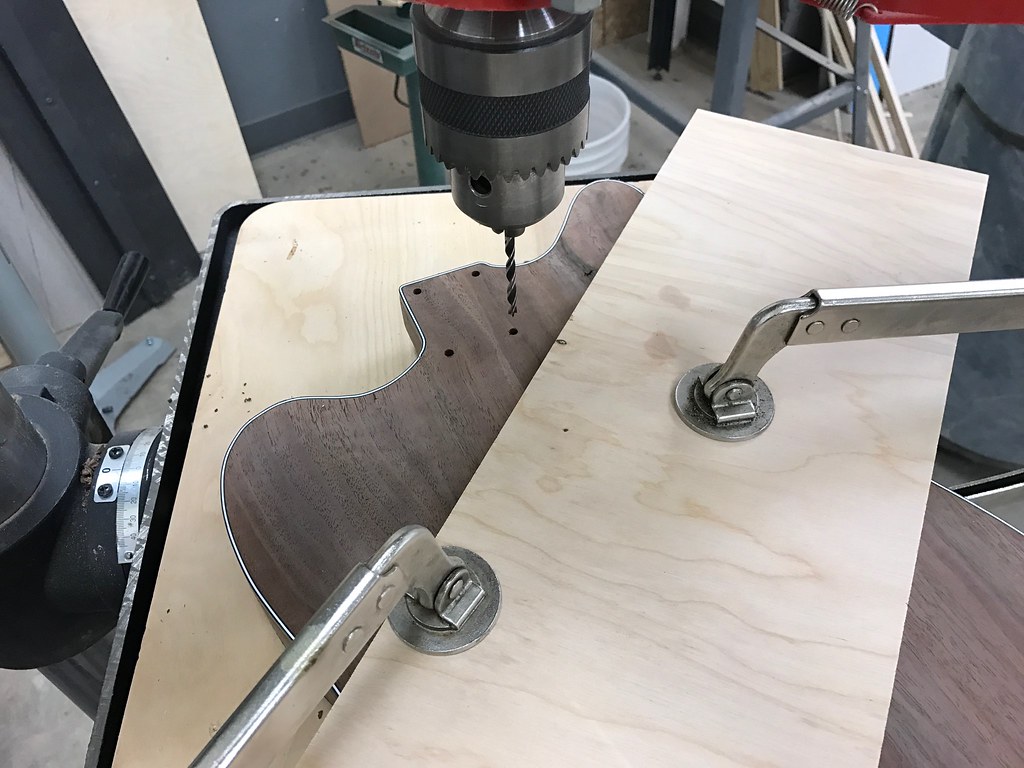
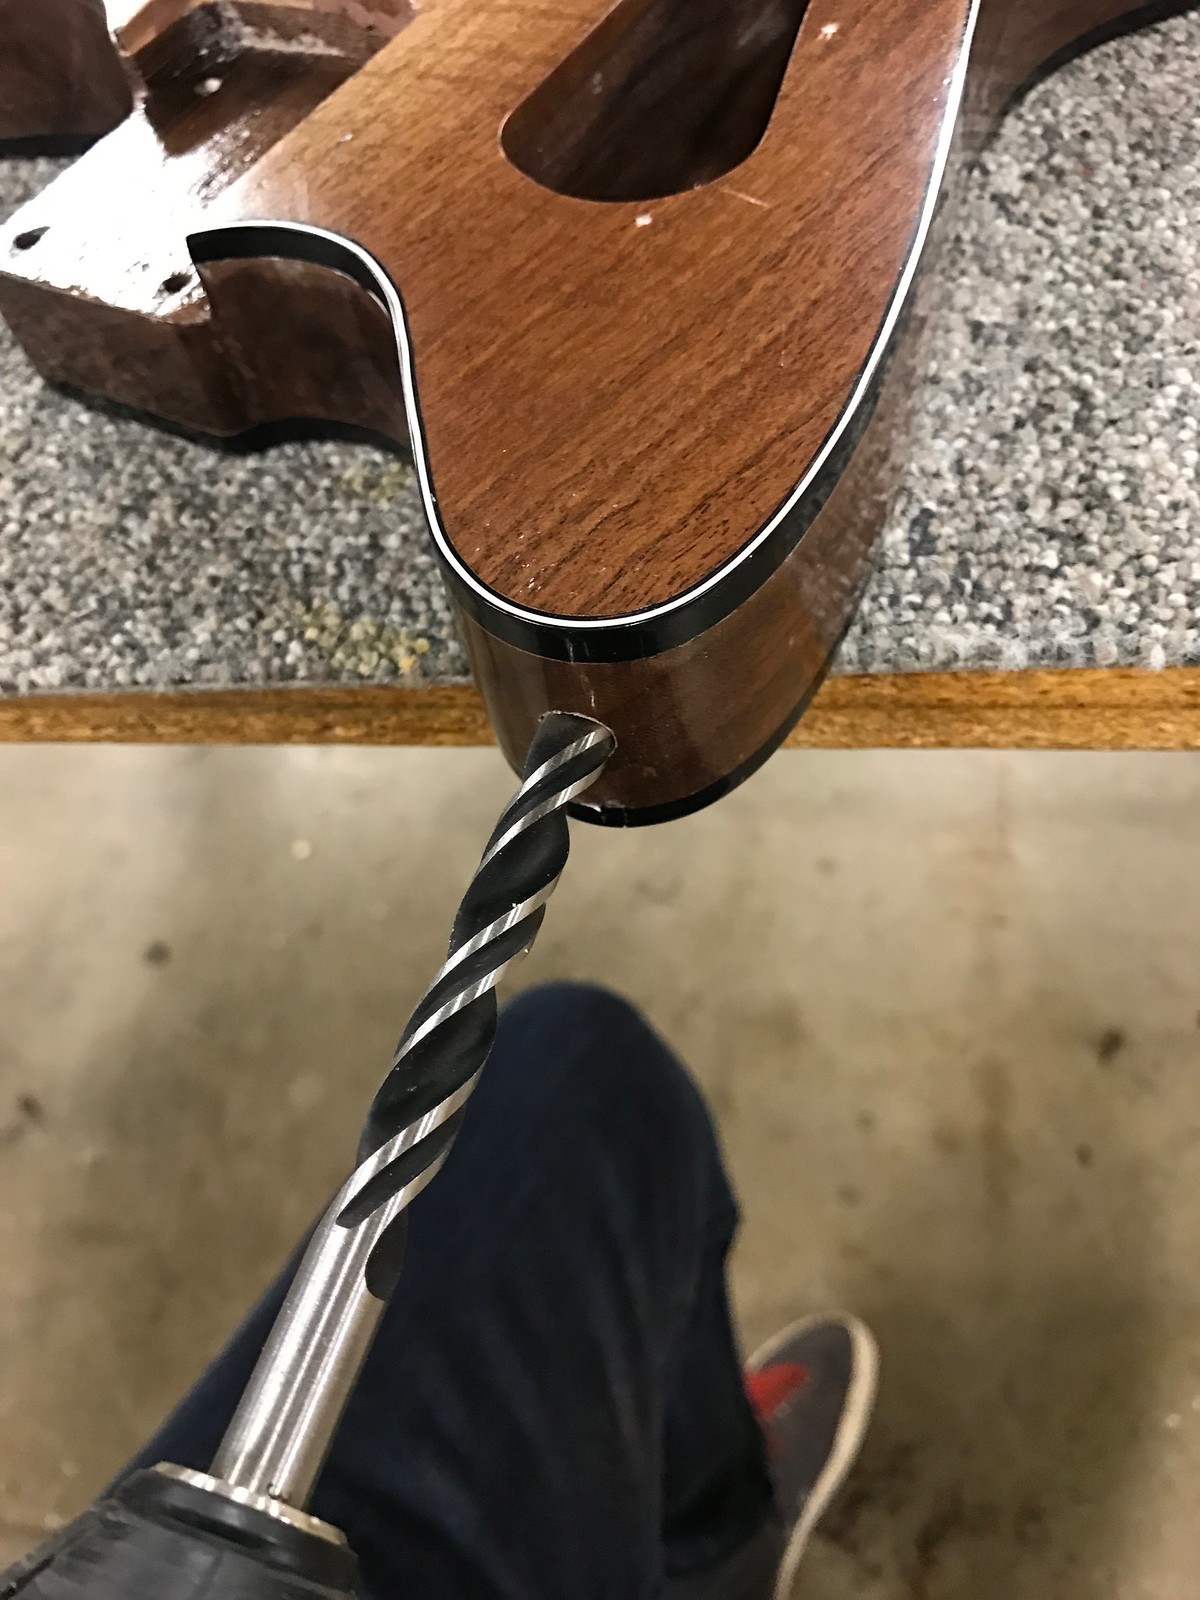
i also finally drilled through the holes for the neck attachment--i only CNC'd those on the "back" side because i didn't want to have alignment issues when gluing the layers of wood together. took my time with clamps and a good brad point bit
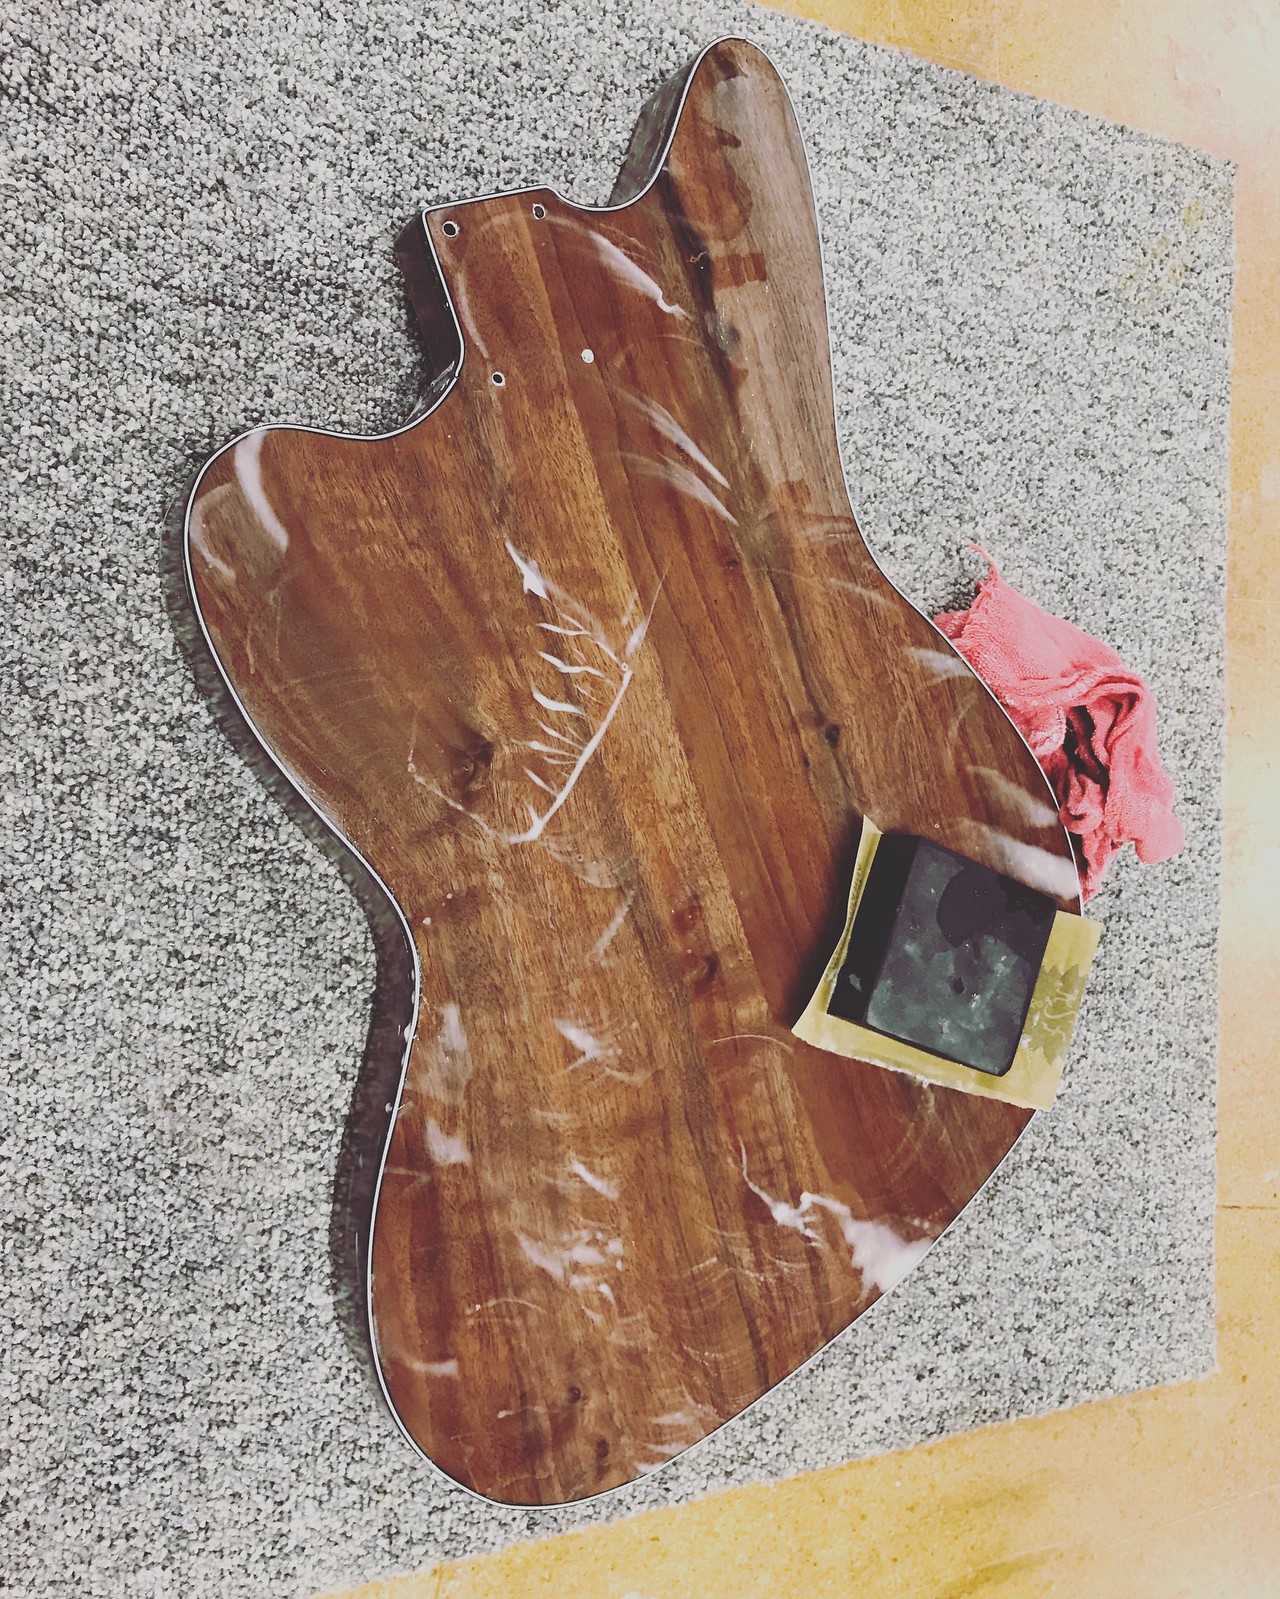
and then, my least favorite part of the guitar making process--the dreaded grain filling
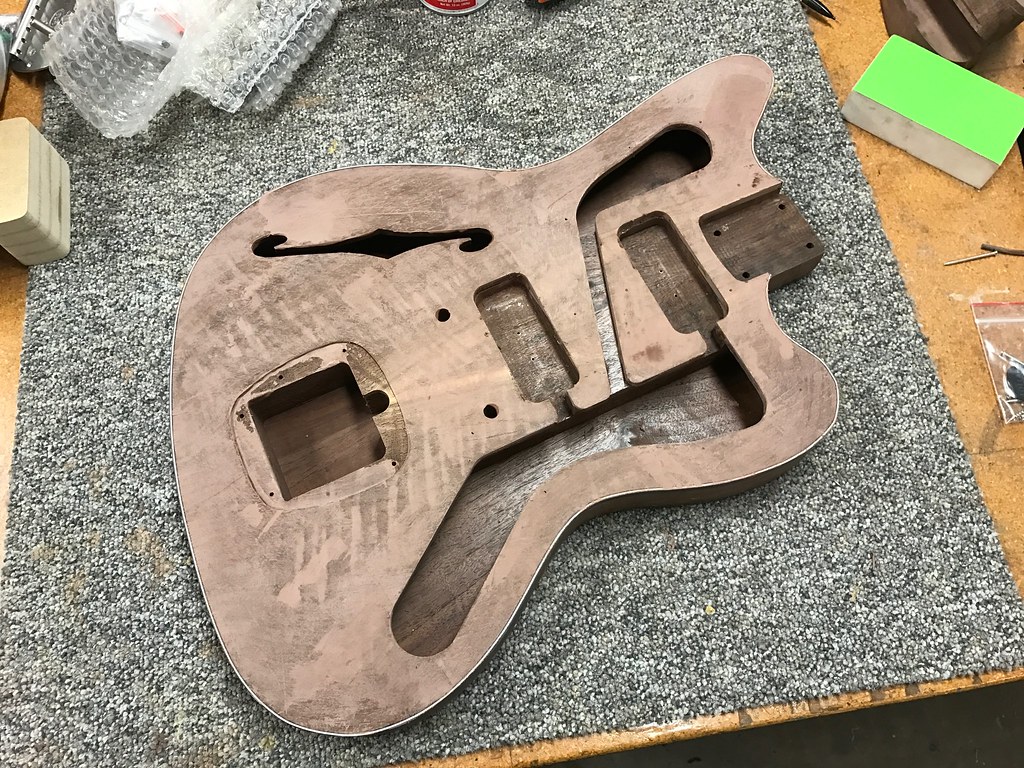
every time i do this, i think to myself "coulda done alder, dude".--but i gotta admit, compared to the ash body's i've filled, my first walnut guitar filled very easily! i've done enough of these that i avoid lacquer based grain fillers now and use timbermate. it dries quick, and it's water based and makes cleanup super easy.
i was able to get the whole thing grain filled and shot a coat of sanding sealer over it.
i'll do 2 more coats of sealer and sand it down to level before moving on to clear. my goal is to build up two coats of clear by tuesday night before leaving town again wednesday.
overall, very pleased--guitar also has a really nice knock tone!
admittedly, it didn't come out 'perfect'. i had to acetone a few spots and squeeze them down a bit
and there were a few minor scrape through spots that i'll have to touch up with black paint (not photographed), but overall i'm quite happy with my first binding job.
i also finally drilled through the holes for the neck attachment--i only CNC'd those on the "back" side because i didn't want to have alignment issues when gluing the layers of wood together. took my time with clamps and a good brad point bit
and then, my least favorite part of the guitar making process--the dreaded grain filling
every time i do this, i think to myself "coulda done alder, dude".--but i gotta admit, compared to the ash body's i've filled, my first walnut guitar filled very easily! i've done enough of these that i avoid lacquer based grain fillers now and use timbermate. it dries quick, and it's water based and makes cleanup super easy.
i was able to get the whole thing grain filled and shot a coat of sanding sealer over it.
i'll do 2 more coats of sealer and sand it down to level before moving on to clear. my goal is to build up two coats of clear by tuesday night before leaving town again wednesday.
overall, very pleased--guitar also has a really nice knock tone!
-
overpwredbyfunk
- PAT PEND
- Posts: 27
- Joined: Sat Oct 26, 2013 4:26 pm
Re: New Custom Scratch Build - The Narwhal (Lots of Pics!)
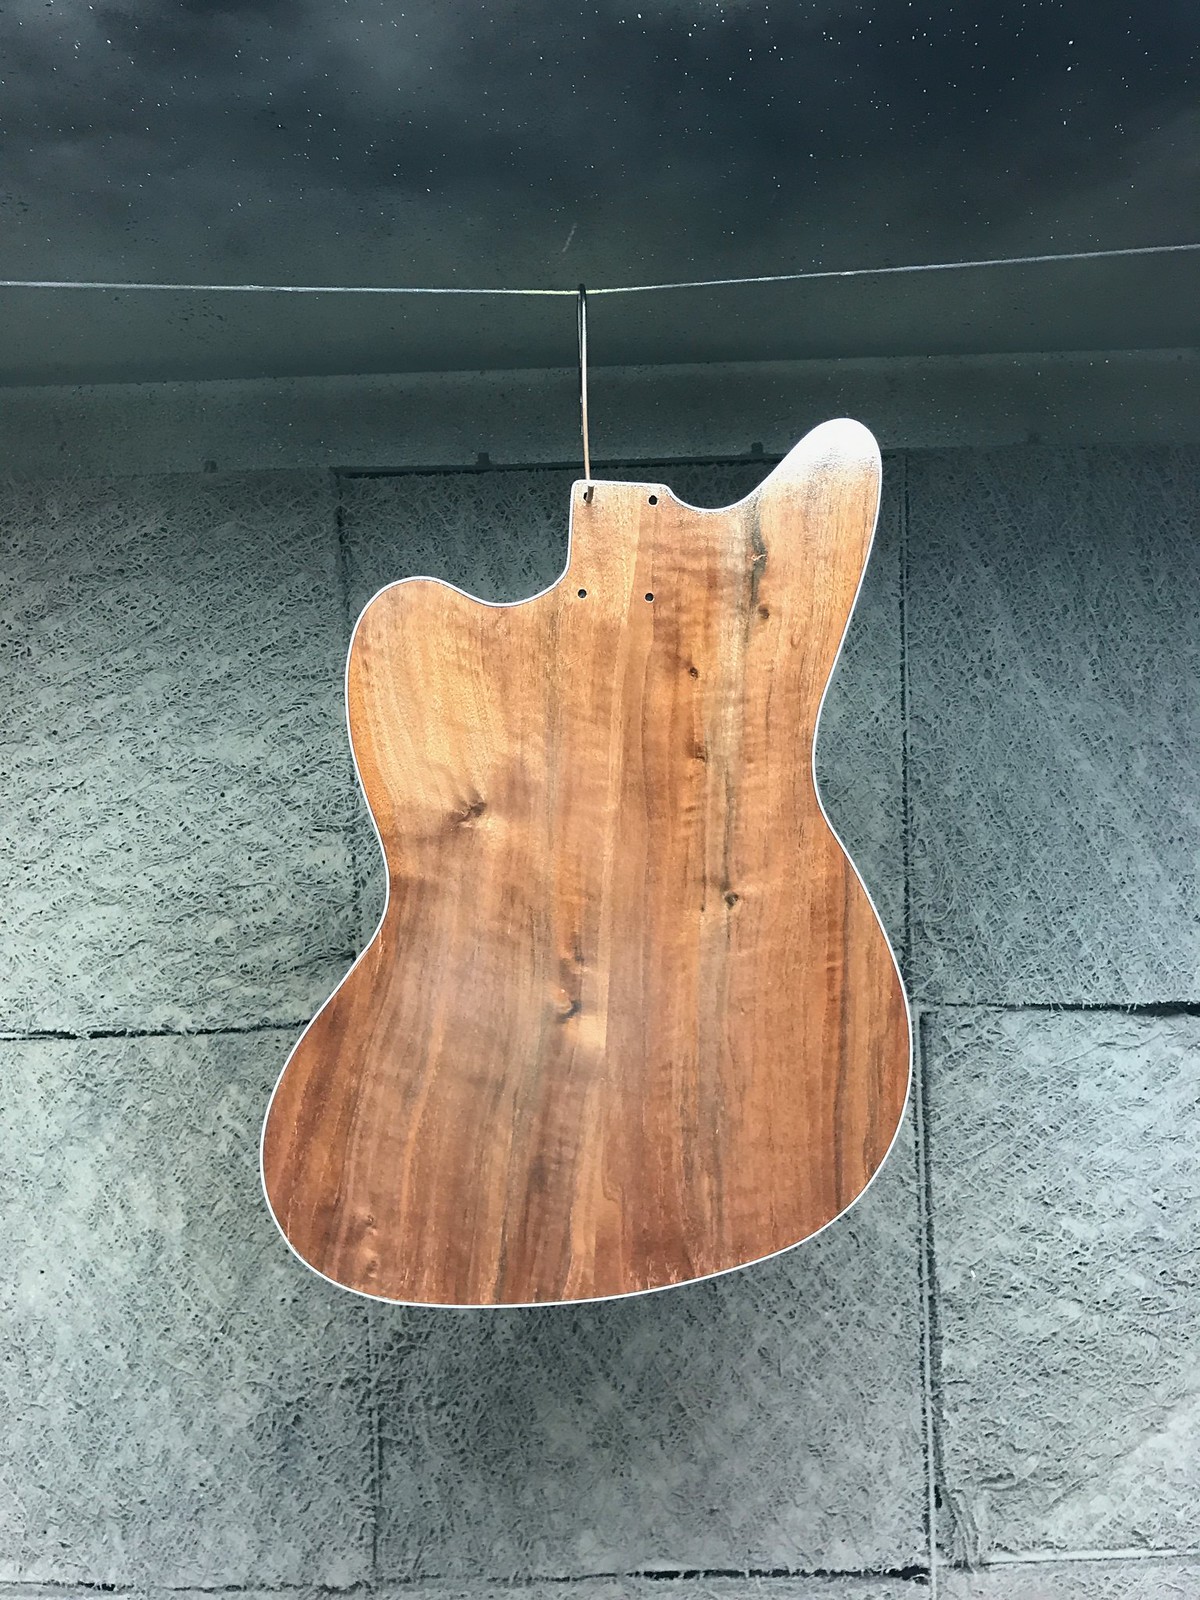
not much new to report--just hitting the paint booth building up a few layers of sealer
here's the back
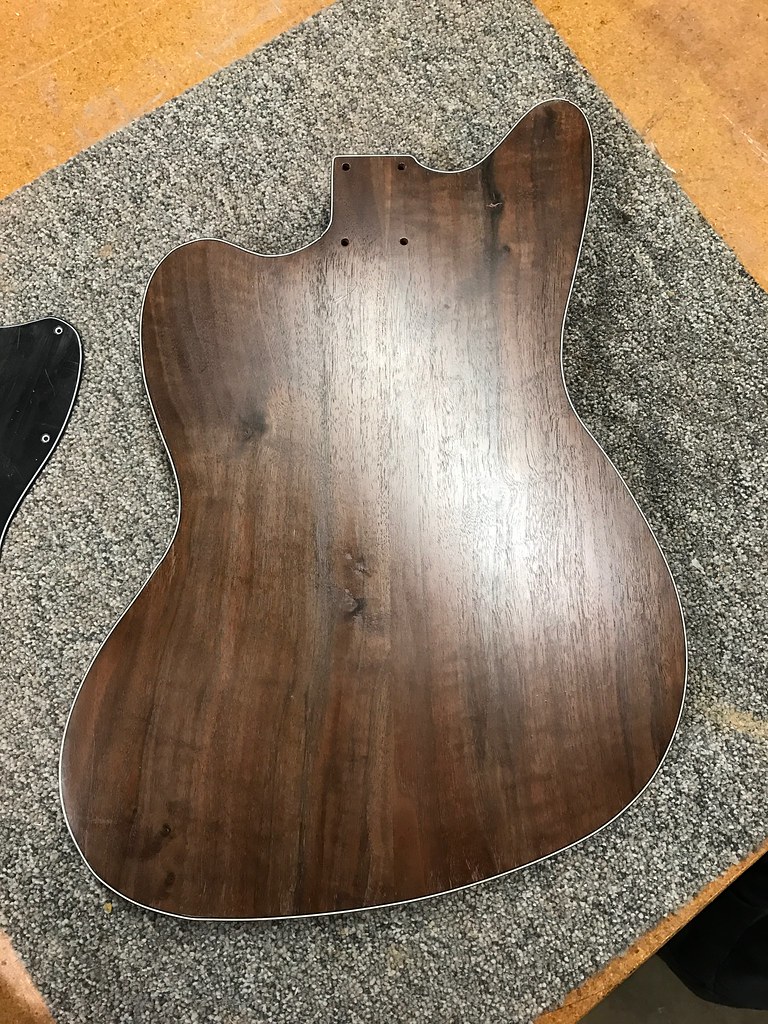
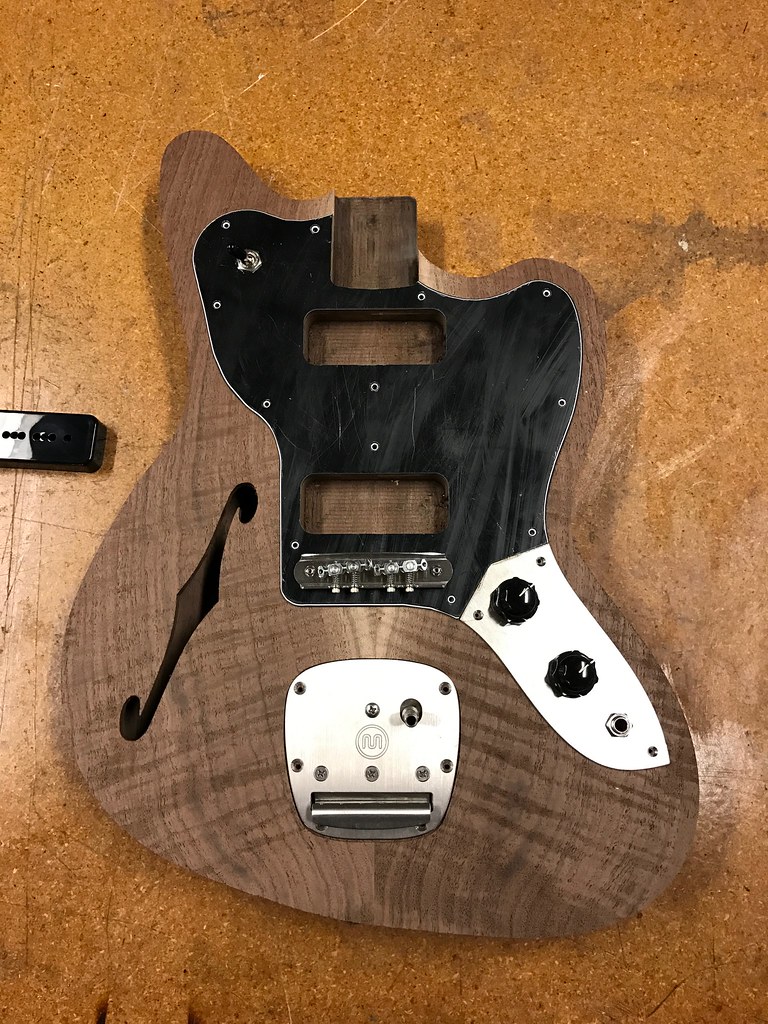
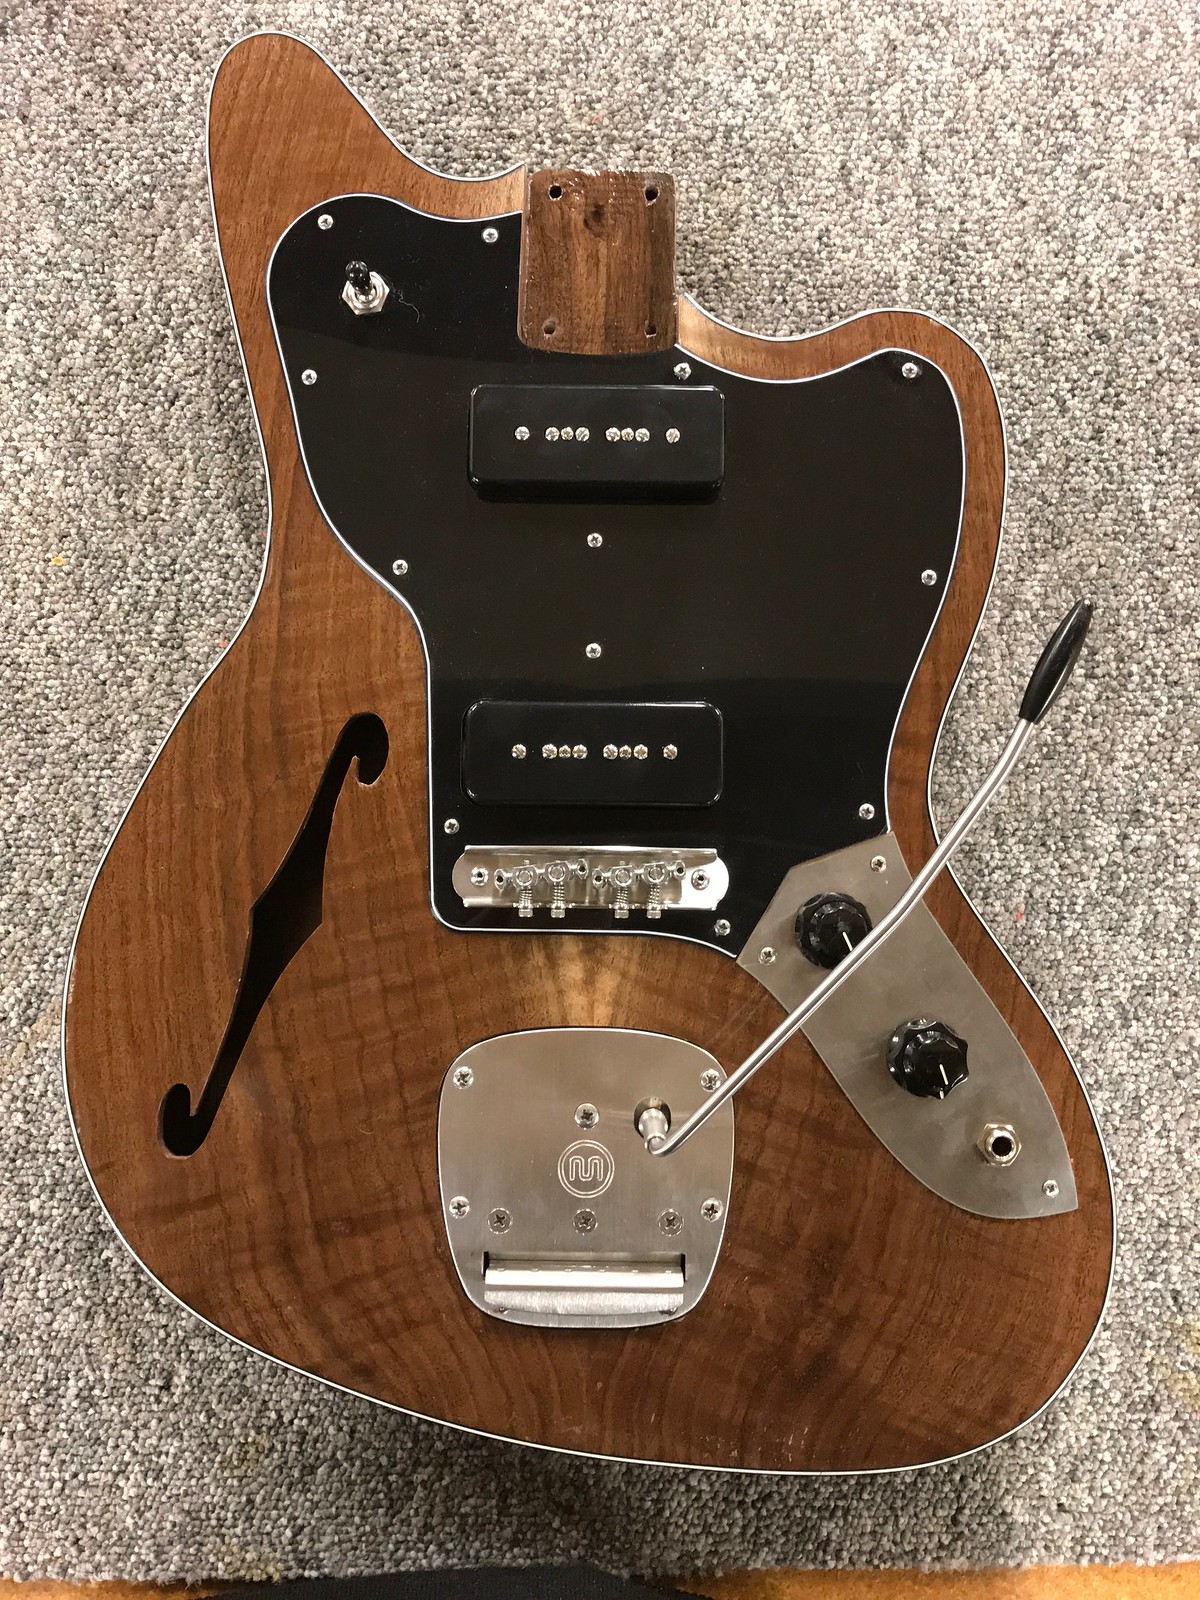
and here it is mocked up with all the parts

too late now, but i bet binding the F-hole woulda been cool? has anyone done that? I'm guess that's easier to do before you laminate the top to the body? Maybe the next one!
gotta head out of town for a few weeks for the day job. when i get back i'll sand the sealer level and start hitting it with clear nitro. while that's curing and i'm in a holding pattern waiting to wet sand i'll finally get to work on a neck.
here's the back
and here it is mocked up with all the parts
too late now, but i bet binding the F-hole woulda been cool? has anyone done that? I'm guess that's easier to do before you laminate the top to the body? Maybe the next one!
gotta head out of town for a few weeks for the day job. when i get back i'll sand the sealer level and start hitting it with clear nitro. while that's curing and i'm in a holding pattern waiting to wet sand i'll finally get to work on a neck.
-
hpr_hpr

- PAT. # 2.972.923
- Posts: 434
- Joined: Fri Apr 03, 2015 9:48 am
Re: New Custom Scratch Build - The Narwhal (Lots of Pics!)
Love that lighter figure in the walnut . . . to bad it gets covered up by the guard.
When thinking about any advice given always ask yourself "why would (s)he know more than I do".
-
Fiddy

- PAT. # 2.972.923
- Posts: 12395
- Joined: Thu Nov 29, 2007 11:38 am
- Location: Canada Dry
Re: New Custom Scratch Build - The Narwhal (Lots of Pics!)
Love this thing
-
overpwredbyfunk
- PAT PEND
- Posts: 27
- Joined: Sat Oct 26, 2013 4:26 pm
Re: New Custom Scratch Build - The Narwhal (Lots of Pics!)
hey folks--and happy new year
sorry for the long break--it mostly consisted of layer after layer of this . . . .
and i didn't think ya'll would wanna see that day after day. and after that, i had to back off and let the nitro cure before i could mess with it.
okay, so while that was happening, santa brought me a pickup winder kit
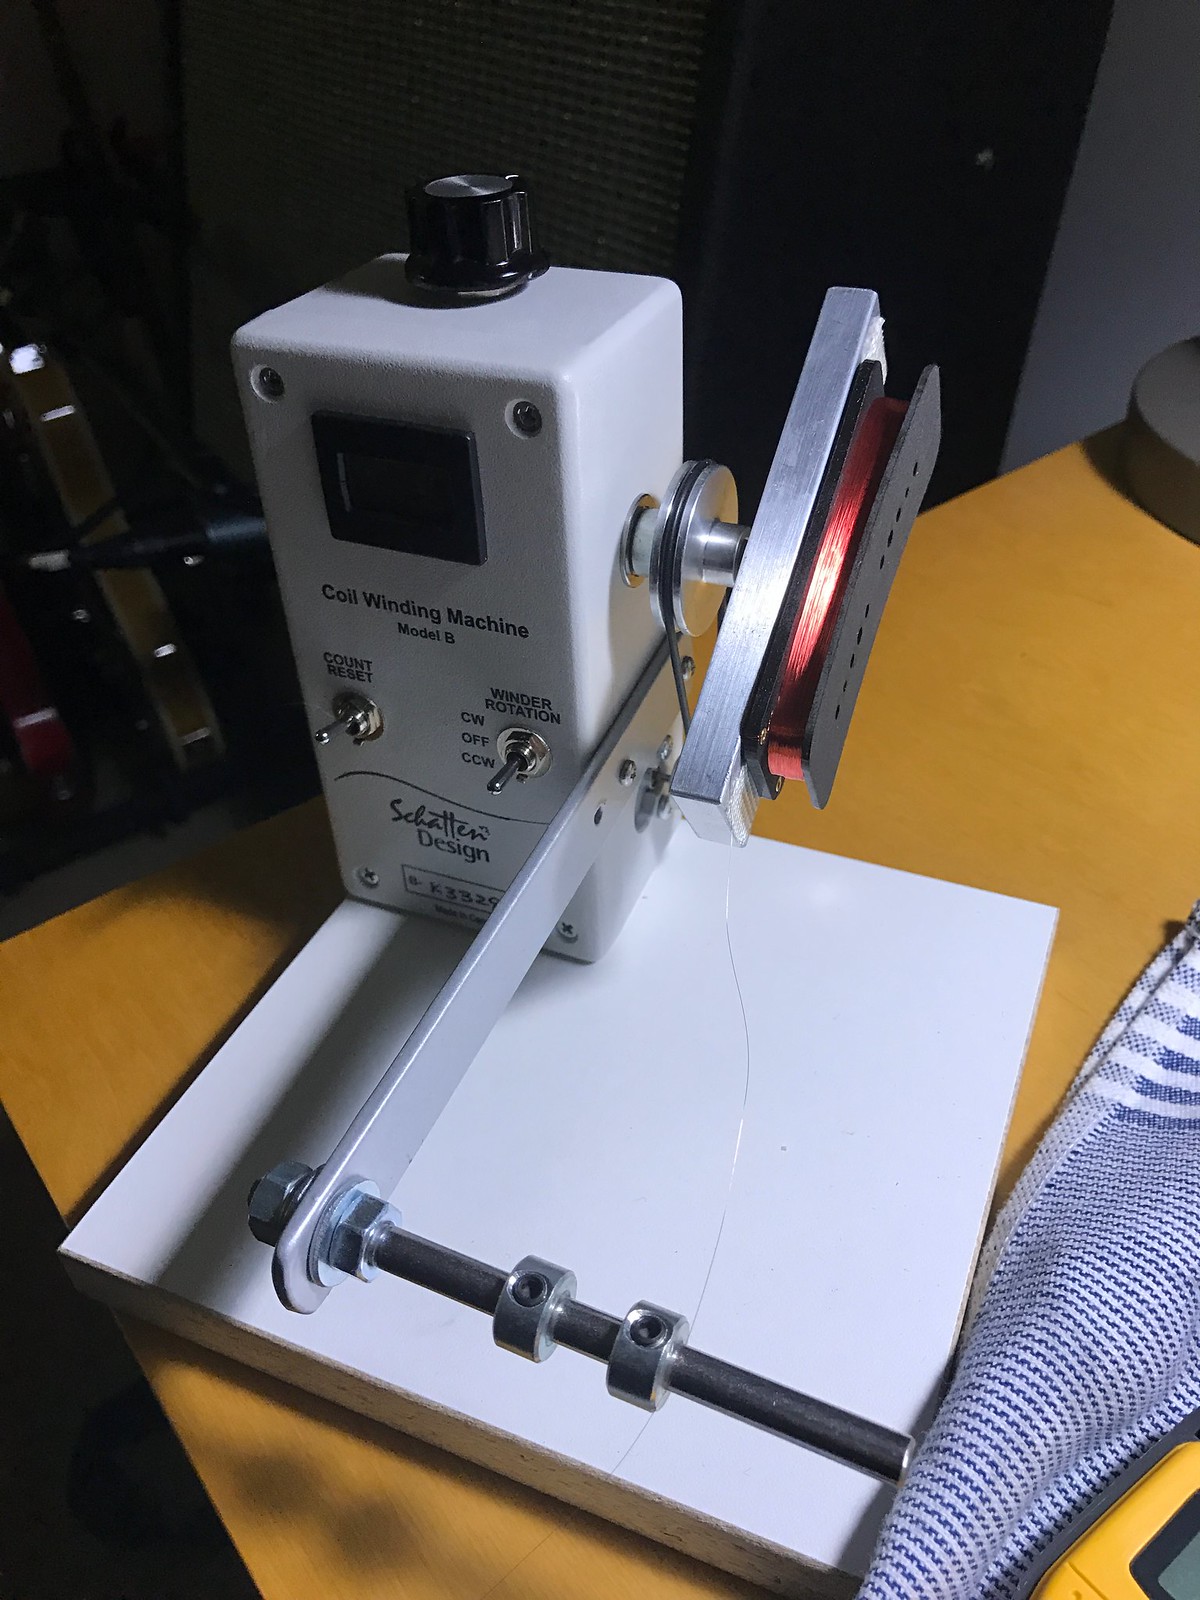
so i got to work wiring up my P90's
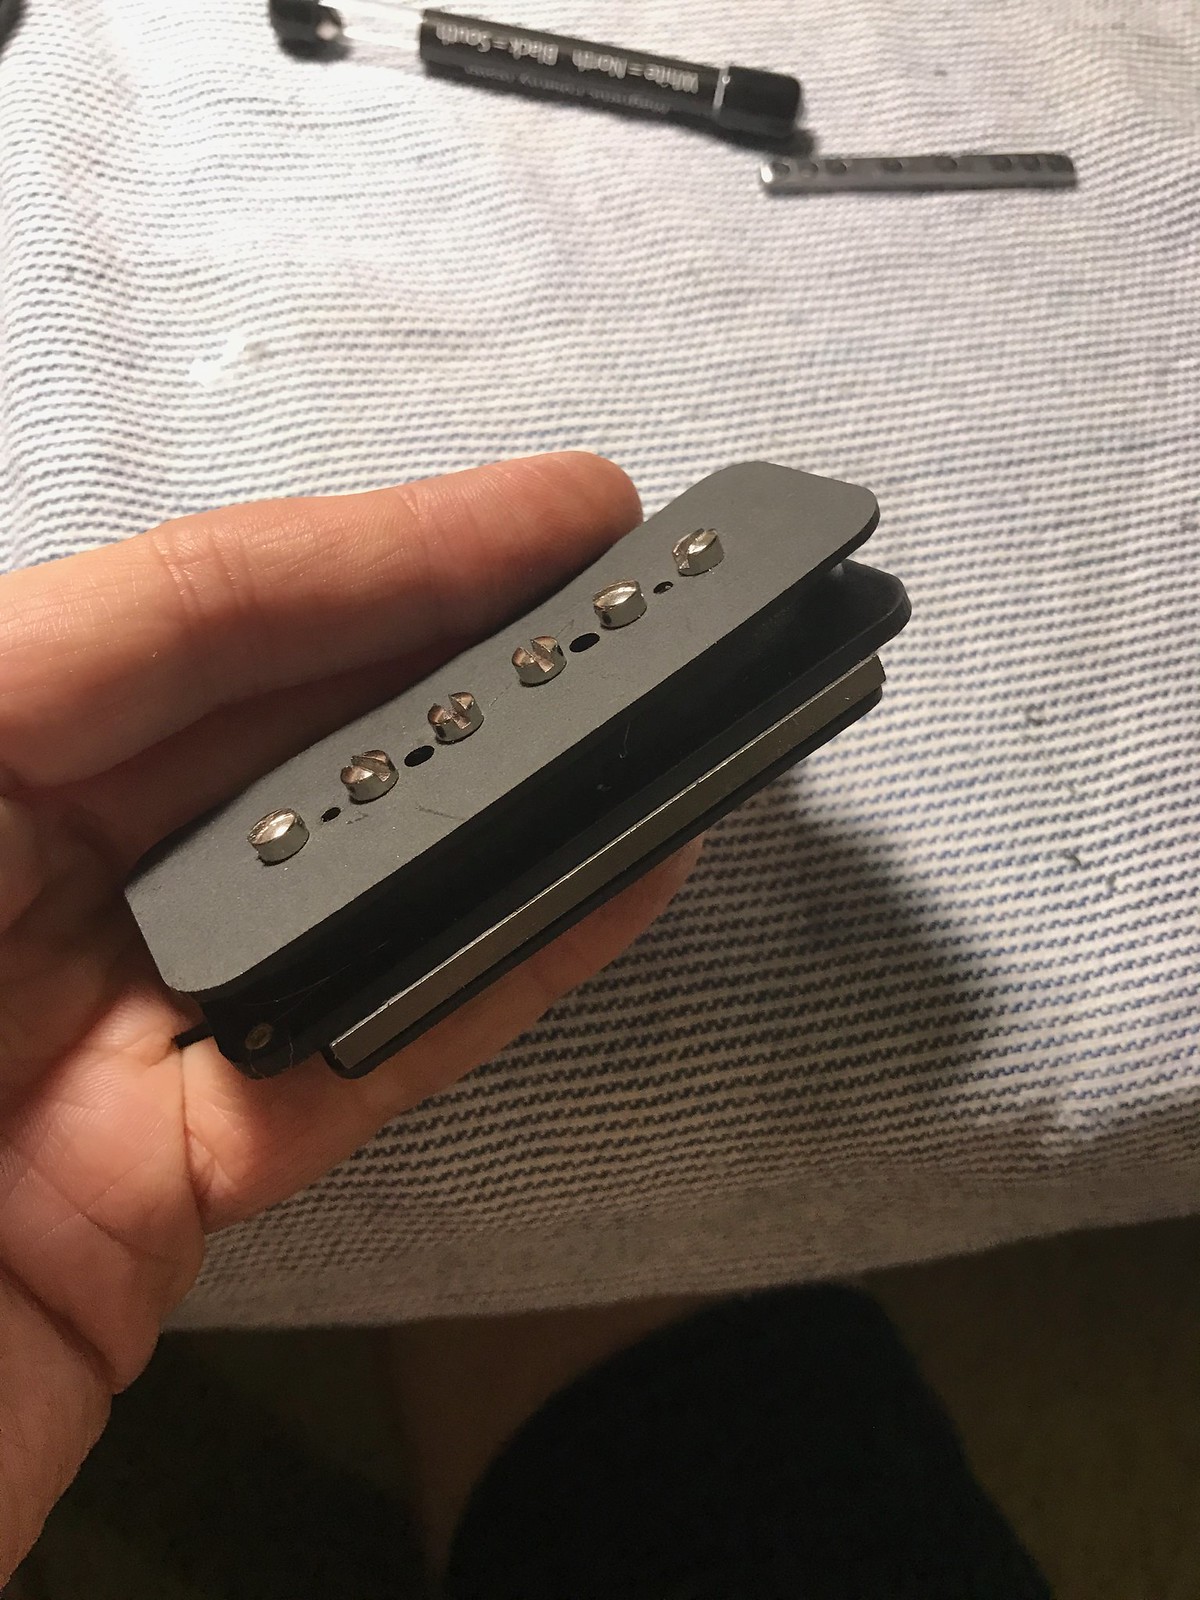
not much to it--just let the machine wind 10,000 times more or less until you get the resistance in the coil you want. now, i still don't have a glue pot or a pile of paraffin and beeswax, so the pickups going into this guitar are still Lollars, but i'll eventually swap them I suppose. or maybe not? i made these using Lollar's book, so they'll probably sound the same-ish.
okay--after a month has passed i was finally able to get to the business of wet sanding
and here it is wet sanded to 800 grit before the buffing and polishing started

i basically just went through the stewmac coarse, medium, fine, and swirl remover compounds--using a separate pad for each
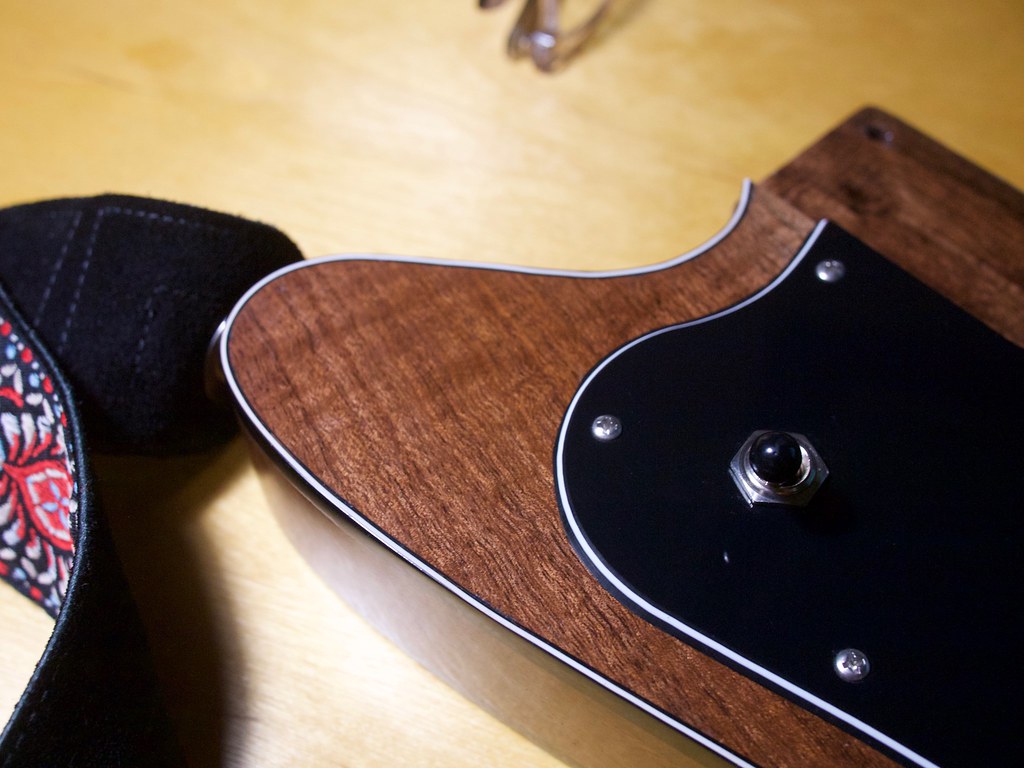
when it was all shiny and pretty i had to tackle the task (gulp) of dropping in the strap locks.
used a good set of brad point bits and it came out nice and clean. (pardon the buffing compound residue)
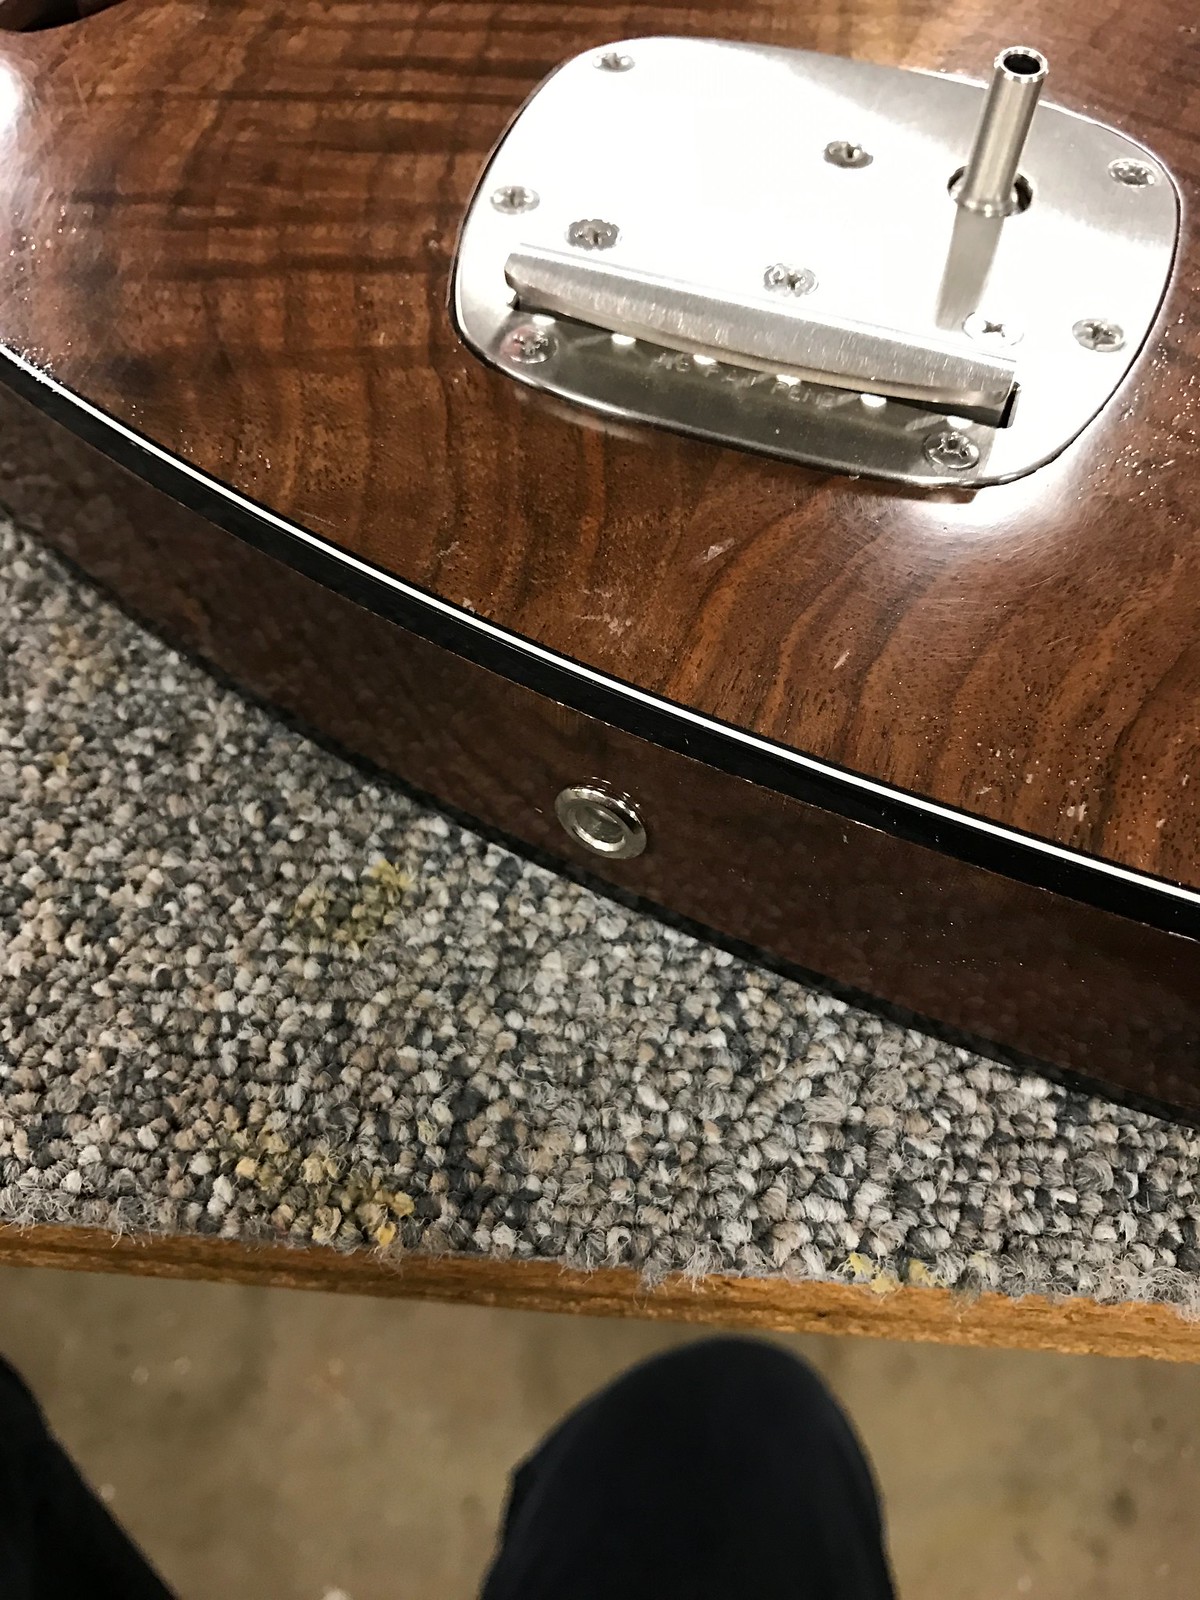
after a few on stage incidents i've finally started using strap locks. i like the dunlop ones, but never loved how far they protruded--so this time i went with the recessed ones. they look VERY clean.
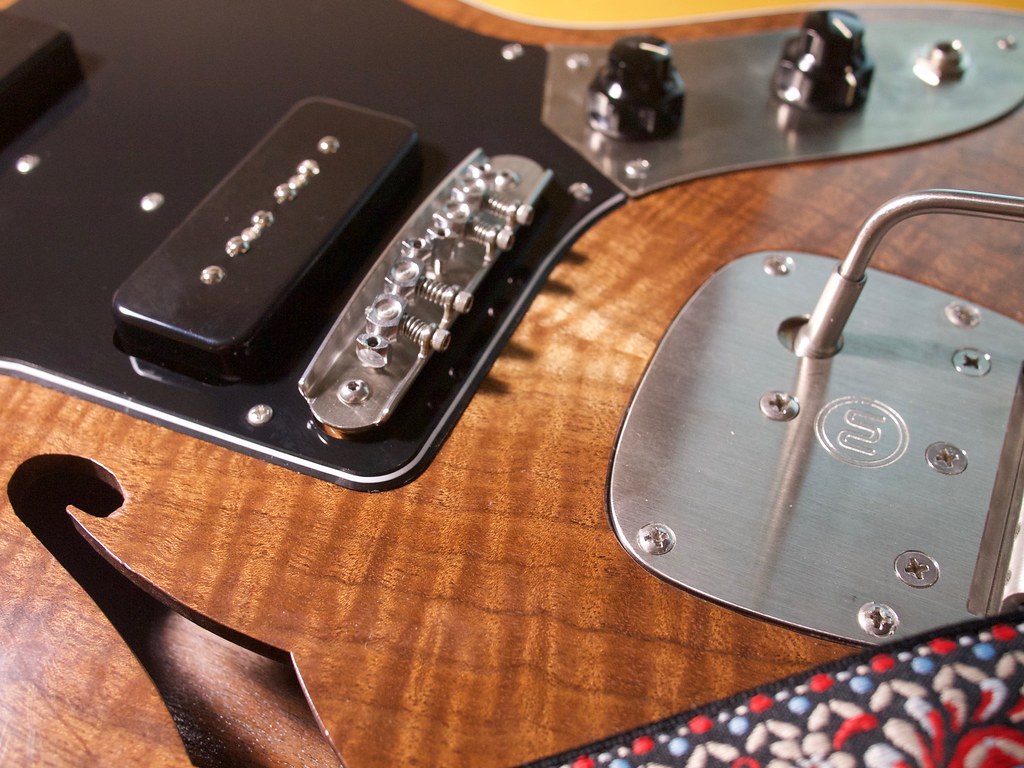
after that--time to wire it up!
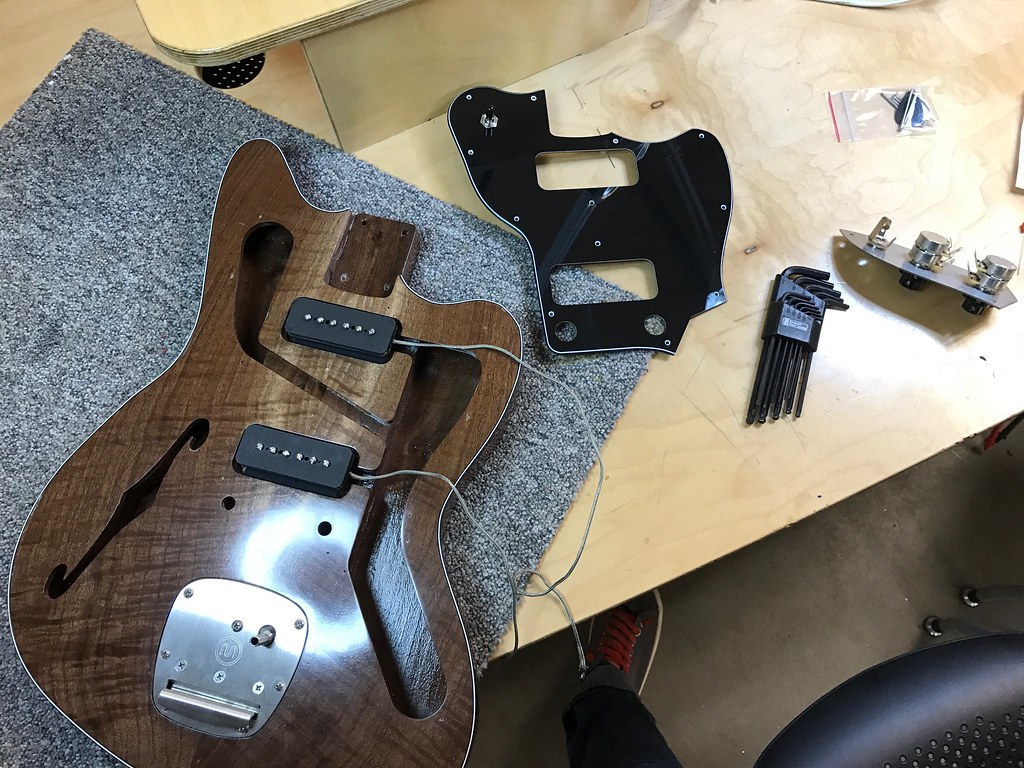
i went with concentric pots to keep the clutter down. it still has four knobs, just in a 2x2 configuration. pretty happy about that
and at long last--here it is all assembled


sorry for the long break--it mostly consisted of layer after layer of this . . . .
and i didn't think ya'll would wanna see that day after day. and after that, i had to back off and let the nitro cure before i could mess with it.
okay, so while that was happening, santa brought me a pickup winder kit
so i got to work wiring up my P90's
not much to it--just let the machine wind 10,000 times more or less until you get the resistance in the coil you want. now, i still don't have a glue pot or a pile of paraffin and beeswax, so the pickups going into this guitar are still Lollars, but i'll eventually swap them I suppose. or maybe not? i made these using Lollar's book, so they'll probably sound the same-ish.
okay--after a month has passed i was finally able to get to the business of wet sanding
and here it is wet sanded to 800 grit before the buffing and polishing started
i basically just went through the stewmac coarse, medium, fine, and swirl remover compounds--using a separate pad for each
when it was all shiny and pretty i had to tackle the task (gulp) of dropping in the strap locks.
used a good set of brad point bits and it came out nice and clean. (pardon the buffing compound residue)
after a few on stage incidents i've finally started using strap locks. i like the dunlop ones, but never loved how far they protruded--so this time i went with the recessed ones. they look VERY clean.
after that--time to wire it up!
i went with concentric pots to keep the clutter down. it still has four knobs, just in a 2x2 configuration. pretty happy about that
and at long last--here it is all assembled
-
Shadoweclipse13

- PAT. # 2.972.923
- Posts: 12446
- Joined: Fri Feb 07, 2014 9:22 pm
- Location: Stuck in the dimension of imagination
Re: New Custom Scratch Build - The Narwhal (Lots of Pics!)
SO killer  I just noticed that the binding is really perfect with the guard being a black-white-black guard
Pickup Switching Mad Scientist
http://www.offsetguitars.com/forums/viewtopic.php?f=8&t=104282&p=1438384#p1438384
http://www.offsetguitars.com/forums/viewtopic.php?f=8&t=104282&p=1438384#p1438384
-
pad

- PAT. # 2.972.923
- Posts: 1185
- Joined: Tue Dec 13, 2011 1:05 pm
- Location: Kassel, Germany.
Re: New Custom Scratch Build - The Narwhal (Lots of Pics!)
god ! don't know what to say, its just perfect in any way!