Page 111 of 122
Re: The D.I.Y. thread.
Posted: Tue Aug 14, 2018 6:57 pm
by clef051
Zork, your pedals look amazing, Can the one two fuck yeah fuzz have both on at the same time?

Re: The D.I.Y. thread.
Posted: Tue Aug 21, 2018 2:14 am
by wingnutkj
I made this kit up over the weekend:

It's a clone of a Mutron Micro-V from Fuzzdog's Pedal Parts. It's a reasonably straightforward kit to put together, and sounds great. I've done a few different Fuzzdog kits now, learning from my mistakes each time. This time, I got all of the components in the correct places, didn't burn the board with a too-hot iron, spotted that one of the transistors was different to the others BEFORE I'd soldered it in the wrong place, and didn't fry any diodes. Success!
It was my second attempt at a laser printer transfer, and as you can see, it almost worked - I should have gone round the edges with the iron for a bit longer, I think, and spent more time lining up the text to the pots - the attack and decay labels are slightly under the knobs.
I'll post a shot of the innards later.
Re: The D.I.Y. thread.
Posted: Thu Aug 23, 2018 7:46 am
by s_mcsleazy
thinking of getting back into pedal building. anyone know of a simple optical trem?
Re: The D.I.Y. thread.
Posted: Thu Aug 23, 2018 10:36 am
by storyboardist
Culture Jam's Shoot the Moon is pretty good. Layouts on my blog (effectslayouts.blogspot.com), the Tagboard blog, and OSHPark. Good sounding optical trem with a fairly low parts count.
Re: The D.I.Y. thread.
Posted: Mon Sep 03, 2018 4:04 pm
by westarttodrift
wingnutkj wrote: ↑Tue Aug 21, 2018 2:14 am
I made this kit up over the weekend:
It's a clone of a Mutron Micro-V from Fuzzdog's Pedal Parts. It's a reasonably straightforward kit to put together, and sounds great. I've done a few different Fuzzdog kits now, learning from my mistakes each time. This time, I got all of the components in the correct places, didn't burn the board with a too-hot iron, spotted that one of the transistors was different to the others BEFORE I'd soldered it in the wrong place, and didn't fry any diodes. Success!
It was my second attempt at a laser printer transfer, and as you can see, it almost worked - I should have gone round the edges with the iron for a bit longer, I think, and spent more time lining up the text to the pots - the attack and decay labels are slightly under the knobs.
I'll post a shot of the innards later.
Try putting down a quick layer of clear coat before ironing on the graphic, I used to have a ton of issues with getting things to stick but now I can reliably get a great transfer.
Re: The D.I.Y. thread.
Posted: Mon Sep 03, 2018 8:52 pm
by Shadoweclipse13
westarttodrift wrote: ↑Mon Sep 03, 2018 4:04 pm
Try putting down a quick layer of clear coat before ironing on the graphic, I used to have a ton of issues with getting things to stick but now I can reliably get a great transfer.
As in, the quick clearcoat layer is still a bit wet/damp when you iron it on?
Re: The D.I.Y. thread.
Posted: Mon Sep 03, 2018 10:19 pm
by Steadyriot.
s_mcsleazy wrote: ↑Thu Aug 23, 2018 7:46 am
thinking of getting back into pedal building. anyone know of a simple optical trem?
So, this is not an optical trem, but I've been looking for a good trem kit for a long while a few months ago and ended my search with this one:
Parasit Studio Green Currant
It's a great trem with 2 (or three if you use a three-way switch; I did!) modes that goes from subtle trem to tappy and choppy. It doesn't really do the repeat percussion hellicopter sound but I'm guessing you're not looking for that..! Check it out, Musikding sells a kit for not too much.
Re: The D.I.Y. thread.
Posted: Tue Sep 04, 2018 4:34 am
by wingnutkj
westarttodrift wrote: ↑Mon Sep 03, 2018 4:04 pm
Try putting down a quick layer of clear coat before ironing on the graphic, I used to have a ton of issues with getting things to stick but now I can reliably get a great transfer.
I'll give that a go - since I did the Micro-V, I've also re-done the transfer on my first Fuzzdog kit, and it's been my best result so far. For my first attempt, I primed the enclosure with white Halfords primer, printed onto plain white paper, and ironed on. A lot of the print stayed on the paper, and where the transfer was successful, it had paper fibres embedded in it. Nail varnish remover sorted them out, but the overall result was a bit lumpy, and I didn't do a good job of clear-coating afterwards.
For the Micro-V enclosure, I didn't prime, but polished the enclosure with micro-mesh pads, down to 12000 grit, then wiped with alcohol. I used glossy paper for the print, and that really helped with the transfer - much less of the print lifted, mainly at the edges. The gloss layer came away from the paper cleanly, resulting in a white/purple colour to the print, but I was able to remove it by rubbing with the nail varnish remover much more easily than when using the plain paper. Not sure if it was the abrasion or the acetone which did the job, but it worked. I then clear-coated.
I was happy enough with the results of that one, I went back to my first attempt. I sanded down the enclosure to the bare metal, then polished with the micro-mesh again. Did the transfer with glossy paper again, taking even more care to fully iron it. Was very happy with it all, and went to hit it with some clear coat. It went on cloudy. I couldn't work out what had happened until I looked at the can and realised I'd used primer instead of clear-coat - doh!

Luckily I was able to remove ONLY the primer with some very careful sanding with the 12000 micromesh pad, and made damn sure it was clear coat when I sprayed again! The result turned out pretty well - next time I think I'm going to try using the micromesh instead of the nail varnish remover to remove the layer of gloss.
Re: The D.I.Y. thread.
Posted: Tue Sep 04, 2018 1:40 pm
by westarttodrift
Shadoweclipse13 wrote: ↑Mon Sep 03, 2018 8:52 pm
westarttodrift wrote: ↑Mon Sep 03, 2018 4:04 pm
Try putting down a quick layer of clear coat before ironing on the graphic, I used to have a ton of issues with getting things to stick but now I can reliably get a great transfer.
As in, the quick clearcoat layer is still a bit wet/damp when you iron it on?
Not necessarily wet, but it doesn't need to be perfectly dry, I usually let it sit for 5-10 minutes but it depends on the type of clear coat you are using. Also FYI print the negative on sticker label backing paper. I haven't updated it in a while but you can see the results here:
https://www.facebook.com/EADUmbrellaGroup/
Re: The D.I.Y. thread.
Posted: Tue Sep 04, 2018 6:45 pm
by Shadoweclipse13
That's awesome! Thanks dude!!
Re: The D.I.Y. thread.
Posted: Thu Oct 11, 2018 6:39 am
by storyboardist
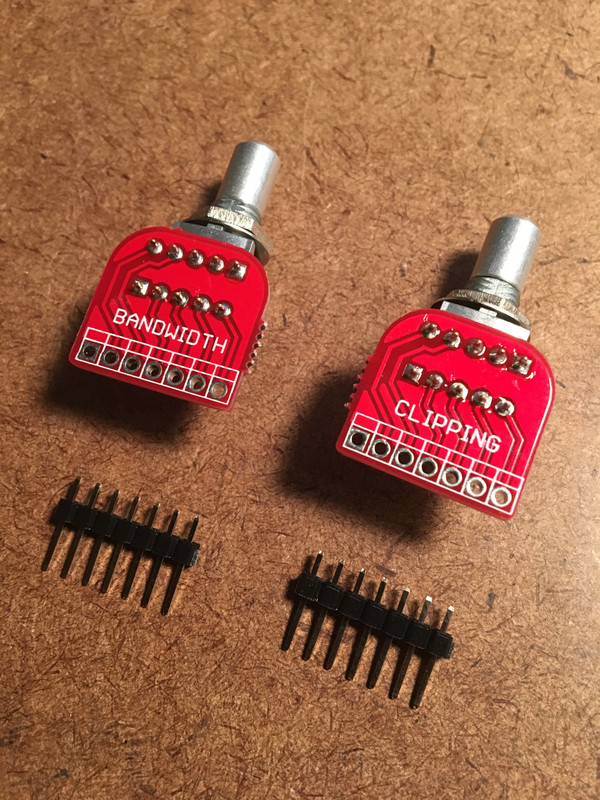
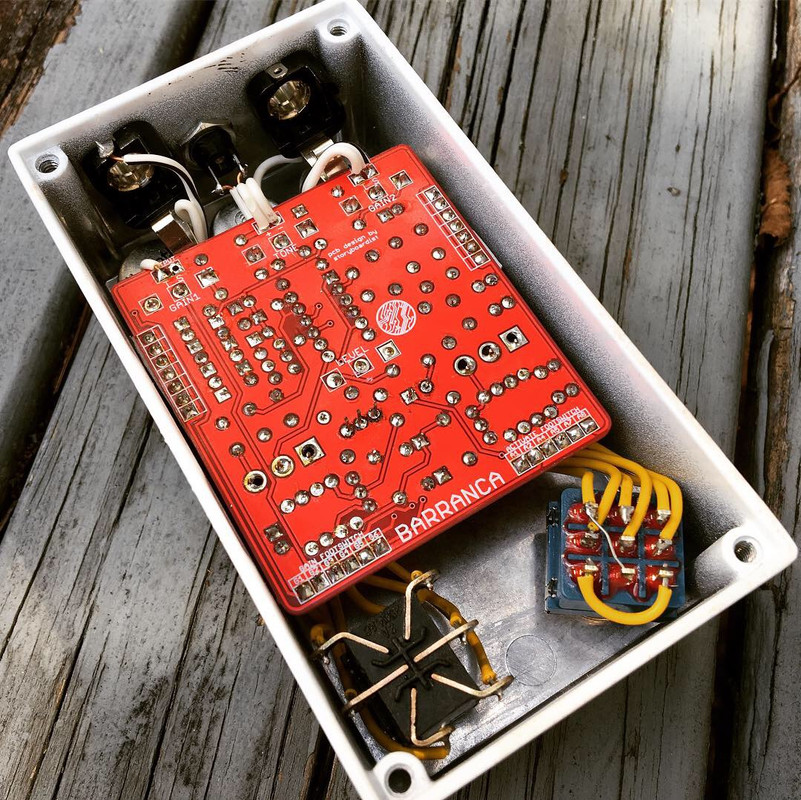
Been working on this one a while and finally got it boxed up last weekend. It's my take on the EQD Palisades, but without the boost option, since I wanted to squeeze it into a 125B enclosure. I used some 6P1T rotary switches for the bandwidth and clipping controls. Ended up adding another option to the bandwidth switch (Palisades has 5) since you can't limit the number of poles with the minis like you can with the large plastic Alpha rotaries. The rest of the circuit isn't that large, so it came together pretty neatly after that. Because of the rotary/daughterboard combo I had to use long leg PCB mount pots to get all the controls on the same level.
Here's the daughter boards and mini rotaries:

Guts:

Enclosure:
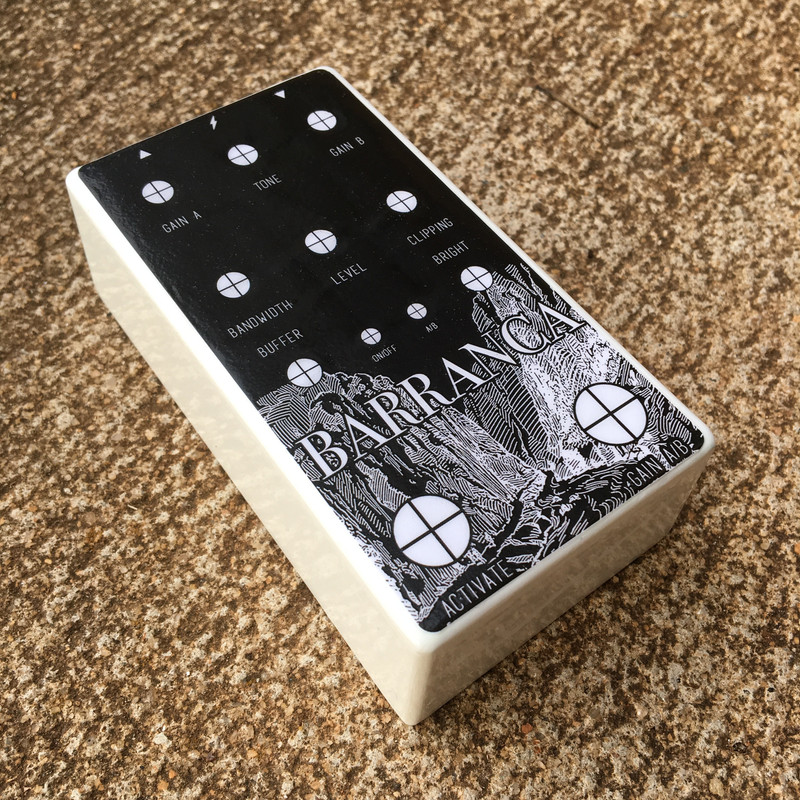
All buttoned up:

Re: The D.I.Y. thread.
Posted: Sun Oct 14, 2018 6:54 pm
by Shadoweclipse13
storyboardist wrote: ↑Thu Oct 11, 2018 6:39 am
It's my take on the EQD Palisades ... squeeze it into a 125B enclosure.
Son of a bitch dude, that's fantastic!!
Re: The D.I.Y. thread.
Posted: Mon Nov 05, 2018 12:32 am
by Steadyriot.
storyboardist wrote: ↑Thu Oct 11, 2018 6:39 am
Been working on this one a while and finally got it boxed up last weekend. It's my take on the EQD Palisades, but without the boost option, since I wanted to squeeze it into a 125B enclosure. I used some 6P1T rotary switches for the bandwidth and clipping controls. Ended up adding another option to the bandwidth switch (Palisades has 5) since you can't limit the number of poles with the minis like you can with the large plastic Alpha rotaries. The rest of the circuit isn't that large, so it came together pretty neatly after that. Because of the rotary/daughterboard combo I had to use long leg PCB mount pots to get all the controls on the same level.
All buttoned up:
Oh man I always love your work but I'd really rock one of those!
I've always wanted a palisades but found them way to expensive for pretty much a TS clone.
Re: The D.I.Y. thread.
Posted: Fri Nov 09, 2018 11:14 am
by eldredjames
Wow

, love that build! Did you make all the boards and the face
plate yourself? Either way, it is such a nice build! Any sound samples available? I'd love to build one of these.
Jim
Re: The D.I.Y. thread.
Posted: Fri Nov 09, 2018 1:16 pm
by eldredjames
eldredjames wrote: ↑Fri Nov 09, 2018 11:14 am
Wow
, love that build! Did you make all the boards and the face
plate yourself? Either way, it is such a nice build! Any sound samples available? I'd love to build one of these.
No need to answer I found your web site by following your user profile.

Expect my order soon, as soon as I check out the rest of your stuff.
Jim